My kitchen counter looked like a flour bomb had gone off. Black cocoa powder dusted everything—the floor, my shirt, even the cat who’d wandered in to investigate. I was elbow-deep in buttercream, trying to pipe a tiny witch hat that kept flopping over, when I realized the sugar cookie dough had been chilling for exactly three minutes too long. Honestly, that moment of pure chaos is where these Adorable Black Cat Halloween Sugar Cookies were born.
I wasn’t trying to be fancy. I just wanted something that felt like Halloween—cute, a little spooky, and totally doable without a pastry degree. You know how it is. You see those perfect cookies online with twelve different piping tips and hand-painted details, and you think, “Yeah, that’s not happening tonight.” So I took a different path. I kept the shapes simple, the frosting forgiving, and the whole process something you could actually finish before the kids’ sugar high wore off.
These little black cats have become my go-to for fall gatherings. They’re the kind of cookie that makes people smile before they even take a bite. And honestly, that’s the whole point of Halloween, right? A little bit of magic, a whole lot of fun, and zero stress in the kitchen.
Why You’ll Love This Recipe
I’ve tested this recipe more times than I care to admit. The first batch spread into blobs. The second batch was too dry. But this version? This is the one. I’ve learned every trick to keep those cat faces sharp and those little ears pointy.
- No Chill Dough: Most sugar cookies need an hour in the fridge. This dough is ready to roll and cut immediately. That’s a game-changer for impatient bakers like me.
- Simple Ingredients: Butter, sugar, flour, eggs, and cocoa powder. You probably have everything already. No weird specialty items required.
- Forgiving Frosting: The royal icing recipe here is practically foolproof. Too thick? Add a drop of water. Too thin? Add more sugar. It works with you, not against you.
- Perfect for Halloween Parties: These cookies are the star of any spooky spread. Kids love them. Adults sneak them. They disappear fast.
- Adorable Results: Let’s face it—nothing beats a cookie that looks like a tiny black cat. The whiskers, the little ears, the bright yellow eyes. It’s pure joy on a plate.
What makes these different from every other Halloween cookie out there? It’s the texture. The black cocoa gives them this deep, dark color and a subtle Oreo-like flavor. They’re soft but sturdy enough to hold their shape. And the frosting sets up just firm enough to stack them without smudging all your hard work.
What Ingredients You Will Need
This recipe uses simple, wholesome ingredients to deliver bold flavor and satisfying texture without the fuss. Most of these are pantry staples you probably already have on hand.
- Unsalted Butter: 1 cup (2 sticks), softened to room temperature. I use Kerrygold for the best flavor, but any good-quality butter works.
- Granulated Sugar: 1 cup. Regular white sugar gives these cookies their classic sweetness and tender crumb.
- Large Egg: 1, room temperature. Let it sit out for 30 minutes before starting.
- Vanilla Extract: 2 teaspoons. Pure vanilla makes a difference here—skip the imitation stuff.
- All-Purpose Flour: 2 and ½ cups, spooned and leveled. Too much flour makes cookies dry, so be gentle.
- Black Cocoa Powder: ½ cup. This is the secret ingredient. It’s darker than regular cocoa and gives that deep, spooky black color. I like the one from King Arthur Flour.
- Baking Powder: 1 teaspoon. Helps the cookies puff up just slightly.
- Salt: ½ teaspoon. Balances the sweetness and deepens the chocolate flavor.
For the Royal Icing:
- Powdered Sugar: 2 cups, sifted. Sifting prevents lumps in your frosting.
- Meringue Powder: 2 tablespoons. This stabilizes the icing and helps it dry hard. You can find it in the baking aisle.
- Warm Water: 3 to 4 tablespoons. Add slowly—you want a thick but pipeable consistency.
- Yellow Gel Food Coloring: For the cat eyes. Gel is better than liquid because it doesn’t thin out the icing.
- Black Food Coloring (optional): If your cocoa powder doesn’t make the icing dark enough.
Pro Tip: If you can’t find black cocoa powder, use regular Dutch-process cocoa and add a bit of black food coloring to the dough. It won’t be quite as dark, but it’ll still look great.
Equipment Needed
You don’t need a professional bakery setup for these cookies. Here’s what I actually use when I make them:
- Cat-shaped Cookie Cutter: A 3-inch cat face cutter is perfect. I found mine on Amazon for under ten dollars. If you don’t have one, you can trace a template onto cardboard and cut around it with a knife.
- Baking Sheets: Two large, light-colored sheets. Dark pans can cause the bottoms to brown too fast.
- Parchment Paper: Non-negotiable. It prevents sticking and makes cleanup a breeze.
- Rolling Pin: I use a standard wooden one with thickness rings. If you don’t have rings, use two chopsticks on either side to keep the dough even.
- Stand Mixer or Hand Mixer: Either works. I’ve made these with both. The hand mixer takes a bit longer but gets the job done.
- Piping Bags: Small disposable ones or reusable silicone. A zip-top bag with a tiny corner snipped off works in a pinch.
- Small Round Piping Tip: Size 2 or 3 for the icing details. You can also just snip a tiny hole in the bag.
- Offset Spatula: Great for spreading frosting if you prefer a flooded look instead of piped details.
- Cooling Rack: Lets the cookies cool evenly so the frosting doesn’t melt.
I’ve learned the hard way that cheap cookie cutters can bend. Spend a couple extra dollars on a sturdy one—it makes a difference in the final shape.
Preparation Method
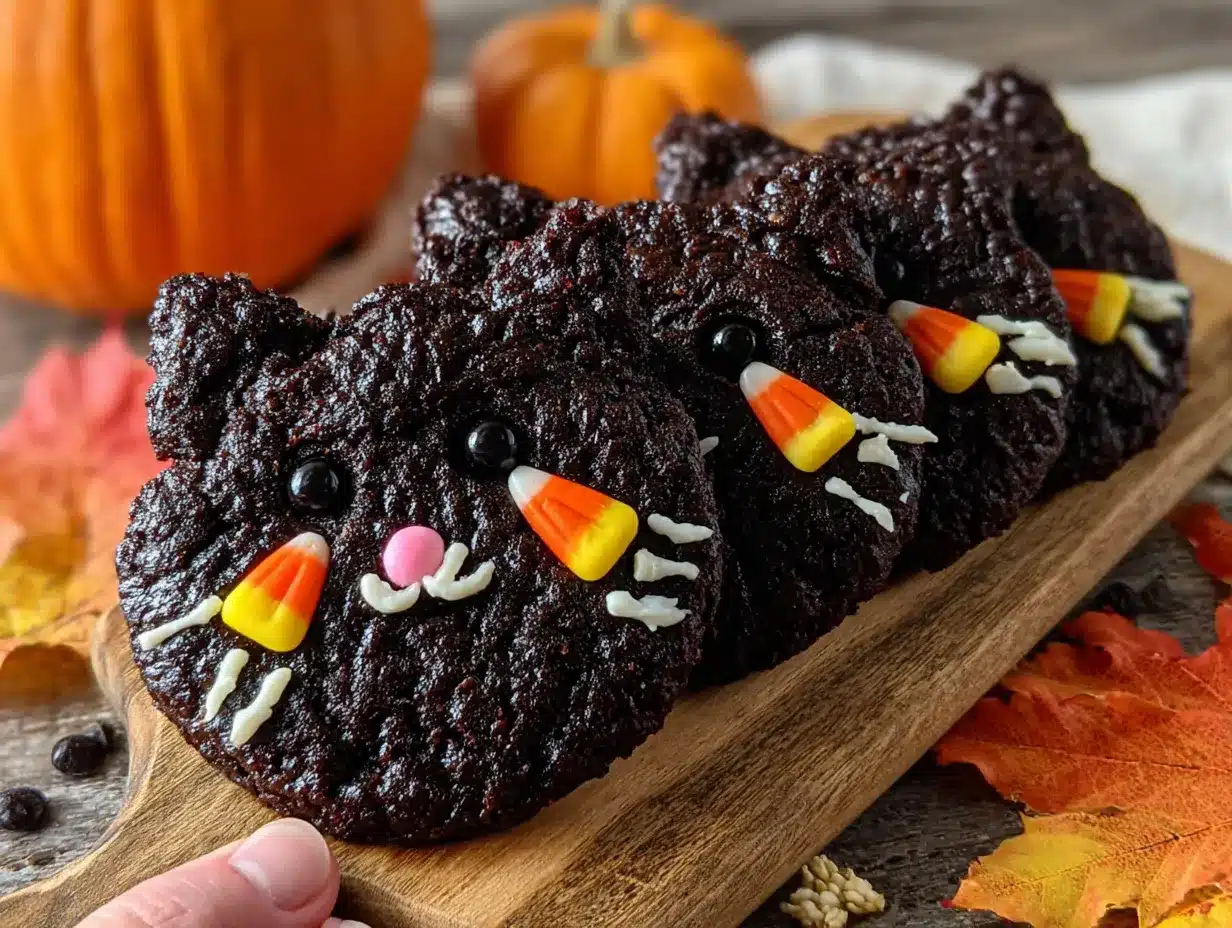
Let’s get baking. This recipe makes about 24 cookies, depending on the size of your cutter.
- Cream the Butter and Sugar: In a large bowl, beat the softened butter and granulated sugar together until light and fluffy. This takes about 3 minutes on medium speed. You want it pale yellow and airy. Scrape down the sides halfway through.
- Add the Egg and Vanilla: Beat in the egg and vanilla extract until fully combined. The mixture might look a little curdled at this point—that’s totally normal. Don’t panic.
- Mix the Dry Ingredients: In a separate bowl, whisk together the flour, black cocoa powder, baking powder, and salt. This ensures the cocoa is evenly distributed so you don’t get streaks.
- Combine Wet and Dry: Gradually add the dry ingredients to the wet mixture, mixing on low speed. Stop as soon as the dough comes together. Overmixing makes tough cookies. The dough will be soft but not sticky.
- Roll the Dough: Lightly flour your work surface. Roll the dough out to about ¼-inch thickness. I use rolling pin rings to keep it even. If the dough feels too sticky, dust with a tiny bit more flour.
- Cut the Cat Shapes: Dip your cookie cutter in flour before each cut to prevent sticking. Press straight down—don’t twist. Twisting seals the edges and makes the cookies spread oddly. Transfer the shapes to a parchment-lined baking sheet, leaving about 2 inches between each.
- Chill (Optional but Helpful): If the dough feels warm or sticky, pop the tray in the fridge for 10 minutes. This helps the cookies hold their shape better in the oven. I skip this if I’m in a hurry, but the ears come out sharper when I do it.
- Bake: Preheat your oven to 350°F (175°C). Bake for 8 to 10 minutes. The cookies should look set around the edges but still soft in the center. They’ll firm up as they cool. Don’t overbake—that’s the number one mistake people make.
- Cool Completely: Let the cookies sit on the baking sheet for 5 minutes, then transfer to a cooling rack. Wait until they’re completely cool before frosting. Warm cookies will melt your icing into a puddle.
- Make the Royal Icing: In a medium bowl, whisk together the powdered sugar and meringue powder. Add warm water one tablespoon at a time, stirring until you get a thick, glossy consistency. It should flow like honey—slow but steady. Divide the icing into two bowls. Leave one white (or dye it yellow for the eyes) and color the other black.
- Pipe the Faces: Fill your piping bag with the black icing. Pipe a thin outline around the edge of each cat cookie. Then fill in the center with more icing, using a toothpick to spread it into the corners. Let this base layer dry for about 30 minutes.
- Add the Eyes and Details: Once the black icing is set, use the yellow icing to pipe two small oval eyes. Add a tiny dot of black icing in the center of each eye for the pupil. Pipe little whiskers and a small pink or white nose. Let everything dry completely—about 2 hours—before stacking or serving.
Sensory Check: The dough should feel smooth and slightly soft, like play-doh. When you press it gently, it should hold the indent. The baked cookies will smell deeply chocolaty and look matte black with a slight sheen.
Cooking Tips & Techniques
I’ve messed up this recipe more times than I want to admit. Here’s what I’ve learned so you don’t have to repeat my mistakes.
Don’t Overwork the Dough. The first time I made these, I kept re-rolling the scraps until the dough got tough. The cookies came out hard as rocks. Now I gather the scraps gently, press them together, and roll only once or twice. The less you handle it, the more tender the cookie.
Watch the Oven Like a Hawk. Black cocoa makes it hard to tell when cookies are done because they’re already dark. I set my timer for 8 minutes and check. The edges should look slightly dry, and the center should still feel soft when you gently press it. They’ll continue baking on the hot sheet after you pull them out.
Use a Toothpick for Details. I’m not great with piping bags. My hands shake, and the lines come out wobbly. So I pipe a rough outline and then use a toothpick to drag the icing into place. It gives me way more control. For the eyes, I dip the toothpick in yellow icing and dot it on. Perfect circles every time.
Keep the Icing Covered. Royal icing dries out fast. If you’re not using it immediately, cover the bowl with a damp paper towel. Otherwise, you’ll end up with crusty lumps that won’t pipe smoothly.
Practice on Parchment First. Before I touch a cookie, I pipe a few practice cats on a piece of parchment paper. It helps me get the feel for the consistency and pressure. Plus, if I mess up, I just scrape it back into the bowl.
Variations & Adaptations
One of the best things about this recipe is how easy it is to change up. Here are some variations I’ve tried and loved.
Gluten-Free Version: Swap the all-purpose flour for a 1:1 gluten-free baking blend. I’ve used Bob’s Red Mill with great results. Just add an extra tablespoon of flour to the dough—gluten-free blends tend to absorb less liquid.
Vegan Adaptation: Use vegan butter sticks (not the spreadable kind) and a flax egg (1 tablespoon ground flaxseed mixed with 3 tablespoons water). The texture will be slightly less tender, but the flavor is still fantastic. For the icing, use aquafaba (the liquid from a can of chickpeas) instead of meringue powder.
Spooky Ghost Variation: Use the same dough but cut it with a ghost-shaped cutter. Skip the black cocoa and use regular cocoa powder for a lighter color. Pipe simple ghost faces with white icing and black eyes. It’s a fun way to mix up your Halloween platter.
Pumpkin Spice Twist: Add 1 teaspoon of pumpkin pie spice to the dry ingredients. The warm spices pair beautifully with the black cocoa. I made these for a fall party last year, and they were gone in ten minutes.
No-Icing Option: If you’re short on time, skip the royal icing entirely. Press candy eyes into the dough before baking, or melt some white chocolate chips and drizzle them on for quick, messy faces. They won’t be as polished, but they’ll still be delicious.
Serving & Storage Suggestions
These cookies are best served at room temperature. The icing needs to be fully set—about 2 hours after decorating—before you move them. I arrange them on a festive platter with some fake spiderwebs and plastic spiders for a fun Halloween display.
Perfect Pairings: Serve these alongside a warm mug of apple cider or a tall glass of cold milk. If you’re hosting a party, they look amazing next to a bowl of candy corn or caramel popcorn. I’ve also served them after a big dinner with coffee—the deep chocolate flavor is a great finish.
Storage: Keep the cookies in an airtight container at room temperature. They’ll stay fresh for up to a week. Layer them between sheets of parchment paper to prevent the icing from sticking. Do not refrigerate—the moisture will make the cookies soft and the icing tacky.
Freezing: You can freeze the baked, undecorated cookies for up to 3 months. Wrap them tightly in plastic wrap and place them in a freezer bag. When you’re ready to decorate, let them thaw at room temperature for an hour, then ice as usual. I do this all the time for holiday baking—it spreads the work out over a few days.
Flavor Development: Honestly, these cookies taste even better the next day. The cocoa flavor deepens, and the texture softens just slightly. If you can resist eating them all on day one, you’re in for a treat on day two.
Nutritional Information & Benefits
Let’s be real—these are cookies. They’re a treat, not a health food. But there are a few bright spots worth mentioning.
Estimated Per Cookie (based on 24 cookies):
- Calories: 145
- Fat: 7g
- Carbohydrates: 20g
- Sugar: 12g
- Protein: 2g
Health Highlights: Black cocoa powder is rich in antioxidants called flavonoids, which can help reduce inflammation. It also has less sugar than milk chocolate, so these are actually lower in sugar than many store-bought Halloween treats. The butter provides a small amount of vitamin A, and the eggs add a bit of protein.
Dietary Considerations: This recipe contains wheat, dairy, and eggs. For allergen-friendly versions, check the variations section above. If you’re watching your sugar intake, you can reduce the sugar in the cookie dough by a quarter cup—the cookies will be slightly less sweet but still tasty.
My personal philosophy? Life is short. Eat the cookie. Just maybe don’t eat all 24 in one sitting. Share them with friends, bring them to a party, or stash a few in the freezer for a rainy day.
Conclusion
These Adorable Black Cat Halloween Sugar Cookies are everything I want in a holiday treat. They’re fun to make, beautiful to look at, and absolutely delicious to eat. The deep black cocoa flavor, the soft but sturdy texture, and the cute little faces—it’s a combination that never gets old.
I love that this recipe doesn’t require professional decorating skills. If I can make these cats look cute, anyone can. The imperfections are part of the charm. A slightly crooked whisker, a lopsided eye—it just gives each cookie its own personality. That’s what makes them special.
I’d love to see your versions. Tag me in your photos, leave a comment below, or send me a message with your favorite Halloween cookie memory. And if you’re looking for more festive treats, don’t miss my Mini Lemon Blueberry Cheesecakes—they’re perfect for your Halloween party spread. Happy baking, and may your kitchen stay just a little less messy than mine!
Frequently Asked Questions
Can I make the dough ahead of time?
Absolutely. Wrap the dough tightly in plastic wrap and refrigerate for up to 3 days. Let it sit at room temperature for 10 minutes before rolling. You can also freeze the dough for up to 3 months.
Why did my cookies spread too much?
This usually happens when the dough is too warm. Pop the cut cookies in the fridge for 10 minutes before baking. Also, make sure your butter isn’t too soft—it should be room temperature, not melted.
Can I use a different cookie cutter?
Of course! This dough works with any shape. Just adjust the baking time slightly for smaller or larger cutters. Ghosts, pumpkins, and bats all work beautifully.
How do I get the icing perfectly black?
Black cocoa powder gives a deep dark color, but it might look more dark brown than true black. Add a tiny drop of black gel food coloring to the icing to get that true black shade. Start with a toothpick’s worth and add more as needed.
My royal icing is too runny. What do I do?
Add more sifted powdered sugar, one tablespoon at a time, until it thickens up. If it’s too thick, add water a drop at a time. The perfect consistency is thick enough to hold its shape but thin enough to spread smoothly.
Pin This Recipe!

Easy Adorable Black Cat Halloween Sugar Cookies
These adorable black cat sugar cookies are soft, deeply chocolaty, and decorated with simple royal icing. They’re perfect for Halloween parties and require no chill time for the dough.
- Prep Time: 30 minutes
- Cook Time: 10 minutes
- Total Time: 45 minutes
- Yield: 24 servings 1x
- Category: Dessert
- Cuisine: American
Ingredients
- 1 cup (2 sticks) unsalted butter, softened
- 1 cup granulated sugar
- 1 large egg, room temperature
- 2 teaspoons vanilla extract
- 2 ½ cups all-purpose flour, spooned and leveled
- ½ cup black cocoa powder
- 1 teaspoon baking powder
- ½ teaspoon salt
- 2 cups powdered sugar, sifted
- 2 tablespoons meringue powder
- 3 to 4 tablespoons warm water
- Yellow gel food coloring
- Black food coloring (optional)
Instructions
- Cream the butter and sugar together until light and fluffy, about 3 minutes.
- Beat in the egg and vanilla extract until combined.
- In a separate bowl, whisk together flour, black cocoa powder, baking powder, and salt.
- Gradually add dry ingredients to wet mixture, mixing on low until dough comes together.
- Roll dough out to ¼-inch thickness on a lightly floured surface.
- Cut into cat shapes using a 3-inch cat cookie cutter, dipping cutter in flour between cuts.
- Place shapes on parchment-lined baking sheets, leaving 2 inches between each. Chill for 10 minutes if dough is warm.
- Bake at 350°F (175°C) for 8 to 10 minutes, until edges are set but centers are soft.
- Cool on baking sheet for 5 minutes, then transfer to a wire rack to cool completely.
- Make royal icing: whisk powdered sugar and meringue powder, add warm water until thick and glossy. Divide and color one portion black and one yellow.
- Pipe black icing outline around each cookie, then fill in center. Let dry 30 minutes.
- Pipe yellow eyes, add black pupils, pipe whiskers and nose. Let dry completely, about 2 hours.
Notes
For best results, do not overmix dough. Black cocoa makes it hard to judge doneness; set timer for 8 minutes and check edges. Royal icing dries quickly; keep covered with a damp paper towel. Cookies taste even better the next day.
Nutrition
- Serving Size: 1 cookie
- Calories: 145
- Sugar: 12
- Sodium: 85
- Fat: 7
- Saturated Fat: 4
- Carbohydrates: 20
- Fiber: 1
- Protein: 2
Keywords: Halloween cookies, black cat cookies, sugar cookies, royal icing, easy Halloween treats


