The summer I turned thirty-two, I spent a ridiculous amount of time in a dusty antique shop in upstate New York, hunting for a pie plate my grandmother had once owned. I didn’t find the pie plate. But what I did find, tucked between a chipped tea set and a stack of yellowed linens, was a beat-up community cookbook from 1978. The cover had a faded drawing of a scarecrow, and the pages smelled like someone’s attic—musty and sweet, all at once.
I bought it for a dollar, mostly out of pity for the thing. That night, flipping through it in my hotel room, I found a recipe for “Spiderweb Brownies” handwritten on the back of a napkin and taped to the page. The handwriting was loopy and urgent, with a note at the bottom that said, “For the block party—kids went WILD.” I mean, I wasn’t expecting to find Halloween gold in an antique shop, but there I was, sitting on a lumpy bed, reading about peanut butter and chocolate in a way I’d never considered before.
Honestly, I almost didn’t try it. The original recipe called for something called “margarine goo,” which sounded terrifying. But the idea of a peanut butter spiderweb stretched over fudgy brownies stuck with me. I tweaked it, tested it, and let me tell you—the first time I pulled a batch out of the oven, I knew I’d found something special. The way the peanut butter swirls against the dark chocolate? It’s like a little piece of Halloween magic you can actually eat. Maybe you’ve been there—looking for one thing and finding something completely unexpected. That’s this recipe for me. It’s the surprise that keeps giving.
Why You’ll Love This Recipe
I’ve tested this recipe about six times now (my neighbors have become very willing taste-testers), and I can say with confidence: these are not your average box-mix brownies. Here is why this version stands out from the crowd:
- Quick & Easy: From start to finish, you’re looking at about 45 minutes. Perfect for a last-minute Halloween party or a Tuesday night craving that demands something spooky.
- Simple Ingredients: You probably have most of this in your pantry right now. No fancy extracts or specialty flours—just butter, sugar, cocoa, and peanut butter doing their thing.
- Perfect for Halloween: The spiderweb design is genuinely impressive, but it’s so simple to create. Kids can help, and adults will think you spent hours on it.
- Crowd-Pleaser: I’ve brought these to three different gatherings now, and every single time, someone asks for the recipe. The combination of fudgy brownie and creamy peanut butter is basically irresistible.
- Unbelievably Delicious: The texture is the real star here. The brownies are dense and rich, almost like a cross between a brownie and a truffle. And that peanut butter web? It gets slightly crispy on the edges while staying soft in the middle. It’s next-level comfort food, honestly.
What makes this recipe different from the rest is the technique. Instead of just swirling peanut butter on top, you actually pipe it into a web pattern that bakes into the surface. It’s not just another Halloween dessert—it’s your best version of a spooky treat. The kind that makes you close your eyes after the first bite. Trust me on this one.
What Ingredients You Will Need
This recipe uses simple, wholesome ingredients that come together to create something that looks way more complicated than it actually is. Here is what you need and why each one matters:
For the Brownie Base
- Unsalted butter, melted (1 cup / 2 sticks) – I prefer using unsalted so I can control the salt level. Let it cool slightly before adding to the sugar, or you’ll end up with scrambled eggs later.
- Granulated sugar (2 cups / 400g) – This gives the brownies that crackly top we all love. Don’t reduce it unless you want a denser, less shiny surface.
- Large eggs, room temperature (4) – Room temperature eggs incorporate better and give you a smoother batter. If you forgot to take them out, place them in warm water for 5 minutes.
- Vanilla extract (2 teaspoons) – Pure vanilla makes a difference here. I’ve used imitation in a pinch, and honestly, the brownies were still good, but the real stuff adds depth.
- Unsweetened cocoa powder (1 cup / 85g) – I recommend using a Dutch-process cocoa for a darker, richer flavor. My go-to is Droste, but any good brand works. Do not use hot chocolate mix—learned that mistake the hard way.
- All-purpose flour (1 cup / 125g) – Spoon and level it into your measuring cup. Scooping directly can pack in too much flour and make the brownies dry.
- Salt (1/2 teaspoon) – Enhances the chocolate flavor. Don’t skip it.
- Baking powder (1/2 teaspoon) – Just enough to give them a little lift without making them cakey.
For the Peanut Butter Spiderweb
- Creamy peanut butter (1/2 cup / 130g) – Use a standard brand like Jif or Skippy for the best consistency. Natural peanut butter that separates? It will be too oily and won’t pipe well. Trust me, I tried.
- Powdered sugar (1/4 cup / 30g) – This stabilizes the peanut butter so it holds its shape when piped.
- Milk (2–3 tablespoons) – Whole milk works best, but any milk you have on hand will do. Add it slowly until the mixture is smooth but not runny.
For Decoration (Optional but Fun)
- Candy eyes (about 12) – These are purely for the spooky factor. You can find them at any craft store or online. My kids fight over who gets to place them.
- Chocolate drizzle (optional) – A little extra melted chocolate on top never hurt anybody.
You can swap the peanut butter for sunflower seed butter if you need a nut-free version, but the flavor will be different. For a gluten-free option, use a 1:1 gluten-free flour blend—I’ve had good luck with Bob’s Red Mill.
Equipment Needed
You don’t need a professional kitchen to pull these off, but a few tools make the process smoother:
- 9×13-inch baking pan – This size gives you the perfect thickness. Glass or metal both work, but metal tends to brown the edges more evenly.
- Parchment paper – Line your pan with it, leaving some overhang on the sides. This makes lifting the brownies out a breeze, and cleanup is so much easier.
- Mixing bowls – One large bowl for the wet ingredients and another for the dry. Nothing fancy needed.
- Whisk and spatula – A whisk for combining the eggs and sugar, and a rubber spatula for folding in the flour without overmixing.
- Piping bag or zip-top bag – For the peanut butter web. I’ve used both, and honestly, a zip-top bag with the corner snipped off works just as well. No need to buy a fancy piping set.
- Measuring cups and spoons – Accuracy matters here, especially for the cocoa powder and flour.
- Cooling rack – Letting the brownies cool completely in the pan is fine, but a rack speeds things up if you’re impatient like me.
If you don’t have a piping bag, don’t stress. A small zip-top bag with a tiny hole cut in the corner is your best friend. I’ve also used a squeeze bottle in a pinch, but the bag gives you more control.
Preparation Method
Alright, let’s get into the nitty-gritty. This method has been tested and tweaked so you don’t have to learn the hard way like I did.
- Preheat your oven to 350°F (175°C). Line your 9×13-inch pan with parchment paper, leaving about 2 inches of overhang on the long sides. Lightly grease the paper with butter or non-stick spray. Do not skip this—I once forgot and spent 20 minutes chiseling brownie off the pan.
- Melt the butter in a microwave-safe bowl or on the stovetop. Let it cool for about 5 minutes. You don’t want it hot enough to cook the eggs when you mix them in.
- Combine the melted butter and sugar in a large bowl. Whisk them together until they look like wet sand—about 1 minute. The mixture should be glossy and smooth.
- Add the eggs one at a time, whisking well after each addition. The batter will get thicker and look almost shiny. Then add the vanilla and whisk again. At this point, the batter should be smooth and slightly thick.
- Sift the cocoa powder, flour, salt, and baking powder into a separate bowl. Sifting prevents lumps—I learned this after biting into a pocket of dry cocoa powder one time. Not fun.
- Fold the dry ingredients into the wet mixture using a rubber spatula. Stir gently until just combined. Overmixing will make the brownies tough and cakey. You want a few streaks of flour remaining—they’ll disappear as you finish folding.
- Pour the batter into the prepared pan and spread it evenly with the spatula. The batter will be thick, almost like a paste. That’s normal. Give it a few gentle taps on the counter to release any air bubbles.
- Bake for 20 minutes, then remove the pan from the oven. The brownies should be set around the edges but still slightly jiggly in the center. This is important—you want them underbaked so the peanut butter web can finish cooking on top.
- While the brownies are baking, make the peanut butter web. In a small bowl, combine the peanut butter and powdered sugar. Stir until crumbly, then add milk one tablespoon at a time until the mixture is smooth and pipeable. It should be thick but not stiff—think toothpaste consistency.
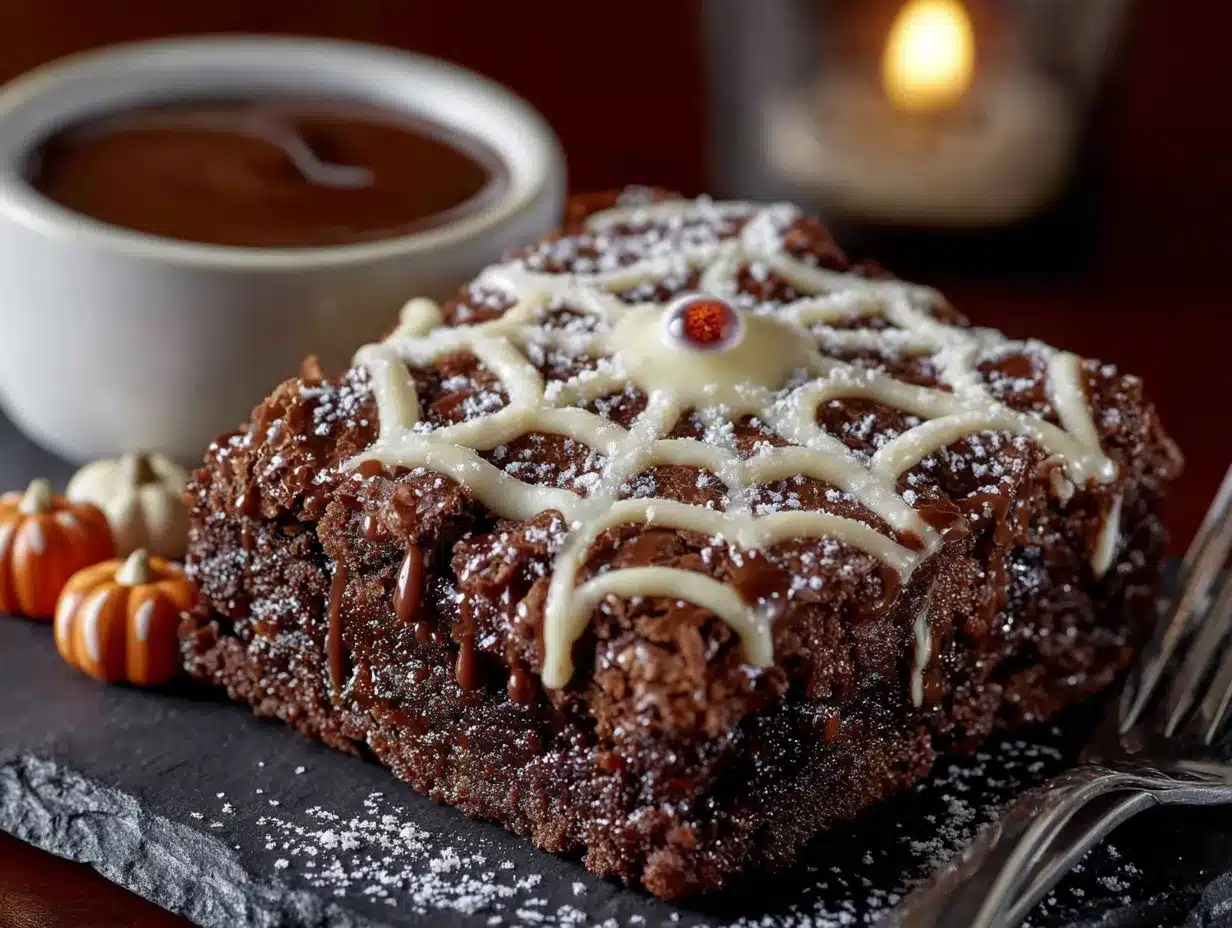
- Spoon the peanut butter mixture into a piping bag or zip-top bag and snip off a tiny corner. Pipe concentric circles on top of the partially baked brownies, starting from the center and working outward. Space them about an inch apart.
- Create the web effect by dragging a toothpick or knife from the center outward through the circles. Wipe the toothpick clean between each drag to keep the lines sharp. You should see a beautiful spiderweb pattern emerge.
- Return the pan to the oven and bake for another 10–12 minutes. The edges should be set, and the peanut butter should look slightly puffed. A toothpick inserted into the center should come out with a few moist crumbs—not wet batter.
- Let the brownies cool completely in the pan on a wire rack. This takes about 1–2 hours. Do not rush this step. Cutting into warm brownies will make the web crumble and the brownies fall apart. I speak from experience.
- Once cooled, lift the brownies out using the parchment overhang. Place them on a cutting board and use a sharp knife to slice into squares. Wipe the knife clean between cuts for neat edges.
- Add candy eyes to the center of each spiderweb square, pressing gently so they stick. If they don’t stay, dab a tiny bit of peanut butter on the back as glue.
Cooking Tips & Techniques
I’ve made these brownies about six times now, and I’ve collected a few lessons along the way. Here are the ones that actually matter:
Don’t overbake the first stage. The initial 20-minute bake is crucial. If you bake them too long, the peanut butter web won’t have time to set properly, and you’ll end up with a gooey mess. The center should still wobble when you take them out. Trust the jiggle.
Use room temperature eggs. Cold eggs can seize the butter and make the batter lumpy. If you forget to take them out early, place them in a bowl of warm water for 5 minutes. It works every time.
Pipe the peanut butter carefully. If the circles are too thick, they’ll sink into the brownies. Keep the lines thin—about the width of a pencil. And don’t worry if they’re not perfect. The toothpick drag will smooth everything out.
Let them cool completely. I know it’s tempting to cut into them while they’re warm, but I promise you, it’s a disaster. The brownies need time to set, and the peanut butter web needs to firm up. I once cut into them after 30 minutes, and the web basically slid off. Learn from my impatience.
Use a sharp knife for slicing. A dull knife will drag through the peanut butter and mess up the web. Run the knife under hot water, wipe it dry, and slice. Clean the blade between each cut for the cleanest edges.
Variations & Adaptations
One of the best things about this recipe is how flexible it is. Here are a few ways I’ve adapted it:
- Nut-Free Version: Swap the peanut butter for sunflower seed butter or WowButter. The flavor will be different, but the texture works the same. Just note that sunflower seed butter can turn green when baked—don’t panic, it’s a natural reaction.
- Gluten-Free Option: Use a 1:1 gluten-free flour blend. I’ve tested this with Bob’s Red Mill, and the brownies come out slightly more tender but still delicious. Add an extra tablespoon of flour to compensate for the lack of gluten.
- Dark Chocolate Lovers: Replace half the cocoa powder with dark cocoa powder for an even richer, more intense chocolate flavor. It makes the spiderweb pop against a darker background.
- Spicy Twist: Add 1/4 teaspoon of cayenne pepper to the dry ingredients. The heat pairs beautifully with the chocolate and peanut butter, and it gives the brownies a little kick that surprises people.
- Mint Chocolate Version: Add 1/2 teaspoon of peppermint extract to the batter along with the vanilla. Top the finished brownies with crushed candy canes for a holiday-themed variation.
I tried a version with almond butter once, and honestly, it was fine but not as creamy. The peanut butter really is the star here. Stick with it if you can.
Serving & Storage Suggestions
These brownies are best served at room temperature, but they’re also incredible straight from the fridge—the peanut butter gets firmer and almost fudge-like. For a truly indulgent experience, warm a brownie in the microwave for 10 seconds and top it with a scoop of vanilla ice cream. The contrast between warm brownie and cold ice cream is pure magic.
Pair these with a glass of cold milk, a hot cup of coffee, or a scoop of pumpkin ice cream for a full fall experience. If you’re serving them at a Halloween party, arrange them on a black platter with some fake cobwebs and plastic spiders for extra spooky vibes.
Storage: Store leftover brownies in an airtight container at room temperature for up to 3 days. If you stack them, place a sheet of parchment paper between layers to prevent the webs from sticking together. For longer storage, freeze them in a single layer on a baking sheet, then transfer to a freezer-safe bag. They’ll keep for up to 3 months. Thaw at room temperature for about 30 minutes before serving.
The flavors actually deepen after a day or two—the chocolate becomes richer, and the peanut butter melds into the brownie base. Honestly, I sometimes make these a day ahead on purpose.
Nutritional Information & Benefits
Let’s be real—these are a treat, not a health food. But here’s what you’re working with, per brownie (based on 16 servings):
- Calories: Approximately 320
- Fat: 18g
- Carbohydrates: 38g
- Protein: 6g
- Sugar: 26g
- Fiber: 2g
On the bright side, dark chocolate contains antioxidants and flavonoids that may support heart health. Peanut butter adds protein and healthy fats, which can help keep you full longer. If you use a high-quality cocoa powder, you’re getting a decent dose of iron and magnesium too. I’m not saying these are a superfood, but they’re not empty calories either. Everything in moderation, right?
For those with dietary restrictions, these brownies contain gluten, dairy, and peanuts. See the variations section for substitutions if needed.
Conclusion
These spooky Halloween brownies with peanut butter spiderweb are exactly what a Halloween dessert should be—fun, impressive, and absolutely delicious. They look like you spent hours on them, but honestly, they come together in under an hour. The combination of fudgy chocolate and creamy peanut butter is a classic for a reason, and the spiderweb design takes it to a whole new level.
I hope you give these a try, whether for a Halloween party, a cozy night in, or just because you wanted something special. Feel free to customize them based on what you have on hand—swap the candy eyes for sprinkles, use dark chocolate chips instead of cocoa, or add a pinch of cinnamon for warmth. The best recipes are the ones you make your own.
If you make these, I’d love to hear about it. Drop a comment below, share a photo, or let me know if you tried a fun variation. And if you’re looking for more spooky treats, check out our pumpkin bread recipe or these ghost cookies for another Halloween hit. Happy baking, and don’t forget to save a brownie for yourself before the kids get to them!
Frequently Asked Questions
Can I use a brownie mix instead of making from scratch?
Yes, you can definitely use a boxed brownie mix to save time. Just prepare the mix according to the package directions, bake for the minimum time recommended, then add the peanut butter web and finish baking. The flavor won’t be as rich, but it still works great for a quick treat.
Why did my peanut butter web sink into the brownies?
This usually happens if the peanut butter mixture is too thin or if the brownies were overbaked before adding the web. Make sure your peanut butter mixture is thick enough to hold its shape—add extra powdered sugar if needed. Also, pull the brownies out at the 20-minute mark when the center is still jiggly.
Can I make these brownies ahead of time?
Absolutely. These brownies actually taste better the next day because the flavors have time to meld. Bake them, let them cool completely, and store them in an airtight container at room temperature for up to 3 days. Add the candy eyes right before serving so they stay fresh.
How do I get clean slices without messing up the web?
Use a sharp knife and wipe it clean between each cut. For extra clean slices, run the knife under hot water, dry it off, then slice. Let the brownies cool completely before cutting—warm brownies will crumble and the web will slide off.
Can I freeze these brownies?
Yes, they freeze beautifully. Place the cooled brownies in a single layer on a baking sheet and freeze for 1 hour. Then transfer them to a freezer-safe bag or container. They’ll keep for up to 3 months. Thaw at room temperature for about 30 minutes before serving.
Pin This Recipe!

Spooky Halloween Brownies with Peanut Butter Spiderweb
Fudgy, rich brownies topped with a creamy peanut butter spiderweb pattern. This easy Halloween dessert looks impressive but comes together in under an hour, making it perfect for parties or a fun treat.
- Prep Time: 15 minutes
- Cook Time: 30 minutes
- Total Time: 45 minutes
- Yield: 16 servings 1x
- Category: Dessert
- Cuisine: American
Ingredients
- 1 cup (2 sticks) unsalted butter, melted
- 2 cups (400g) granulated sugar
- 4 large eggs, room temperature
- 2 teaspoons vanilla extract
- 1 cup (85g) unsweetened cocoa powder (Dutch-process preferred)
- 1 cup (125g) all-purpose flour
- 1/2 teaspoon salt
- 1/2 teaspoon baking powder
- 1/2 cup (130g) creamy peanut butter (e.g., Jif or Skippy)
- 1/4 cup (30g) powdered sugar
- 2–3 tablespoons milk (whole milk preferred)
- Candy eyes (about 12, optional for decoration)
- Chocolate drizzle (optional)
Instructions
- Preheat oven to 350°F (175°C). Line a 9×13-inch baking pan with parchment paper, leaving 2 inches of overhang on the long sides. Lightly grease the paper with butter or non-stick spray.
- Melt the butter in a microwave-safe bowl or on the stovetop. Let it cool for about 5 minutes.
- In a large bowl, whisk together the melted butter and sugar until glossy and smooth, about 1 minute.
- Add the eggs one at a time, whisking well after each addition. The batter will become thicker and shiny. Add the vanilla and whisk again.
- In a separate bowl, sift together the cocoa powder, flour, salt, and baking powder.
- Fold the dry ingredients into the wet mixture using a rubber spatula until just combined. Do not overmix; a few streaks of flour are fine.
- Pour the batter into the prepared pan and spread evenly. Tap the pan gently on the counter to release air bubbles.
- Bake for 20 minutes. The brownies should be set around the edges but still slightly jiggly in the center.
- While the brownies bake, make the peanut butter web: In a small bowl, combine the peanut butter and powdered sugar. Stir until crumbly, then add milk one tablespoon at a time until smooth and pipeable (toothpaste consistency).
- Spoon the peanut butter mixture into a piping bag or zip-top bag and snip off a tiny corner. Pipe concentric circles on top of the partially baked brownies, starting from the center and working outward, spacing them about an inch apart.
- Create the web effect by dragging a toothpick or knife from the center outward through the circles. Wipe the toothpick clean between each drag.
- Return the pan to the oven and bake for another 10–12 minutes. The edges should be set, and the peanut butter should look slightly puffed. A toothpick inserted into the center should come out with a few moist crumbs.
- Let the brownies cool completely in the pan on a wire rack, about 1–2 hours.
- Once cooled, lift the brownies out using the parchment overhang. Place on a cutting board and slice into squares with a sharp knife, wiping the blade clean between cuts.
- Add candy eyes to the center of each spiderweb square, pressing gently to stick. If needed, dab a tiny bit of peanut butter on the back as glue.
Notes
Do not overbake the first stage; the center should still jiggle. Use room temperature eggs to prevent lumpy batter. Pipe peanut butter in thin lines (pencil width) to avoid sinking. Let brownies cool completely before cutting to preserve the web. For clean slices, run the knife under hot water and wipe dry between cuts. Store in an airtight container at room temperature for up to 3 days, or freeze for up to 3 months.
Nutrition
- Serving Size: 1 brownie
- Calories: 320
- Sugar: 26
- Sodium: 180
- Fat: 18
- Saturated Fat: 9
- Carbohydrates: 38
- Fiber: 2
- Protein: 6
Keywords: Halloween brownies, peanut butter spiderweb, spooky dessert, fudgy brownies, easy Halloween treat


