Third batch in two days, and I finally stopped overthinking the icing consistency. The first batch looked like a spider had a meltdown—too runny, the webs just bled into the white frosting like some kind of abstract horror. The second? Too stiff. The piping bag fought me the whole way, and the lines snapped like dry spaghetti. But this third round—this one had that satisfying *thwip* of a clean line, the web holding its shape just long enough before I dragged the toothpick through. Honestly, I almost didn’t save the first two trays. I was that close to tossing them. But something kept me going back to the mixing bowl, tweaking the butter-to-powdered-sugar ratio, testing different chilling times for the cut-outs. It’s not about being perfect—it’s about that moment when you pull the toothpick through and the web appears, clean and deliberate. That little rush is addictive.
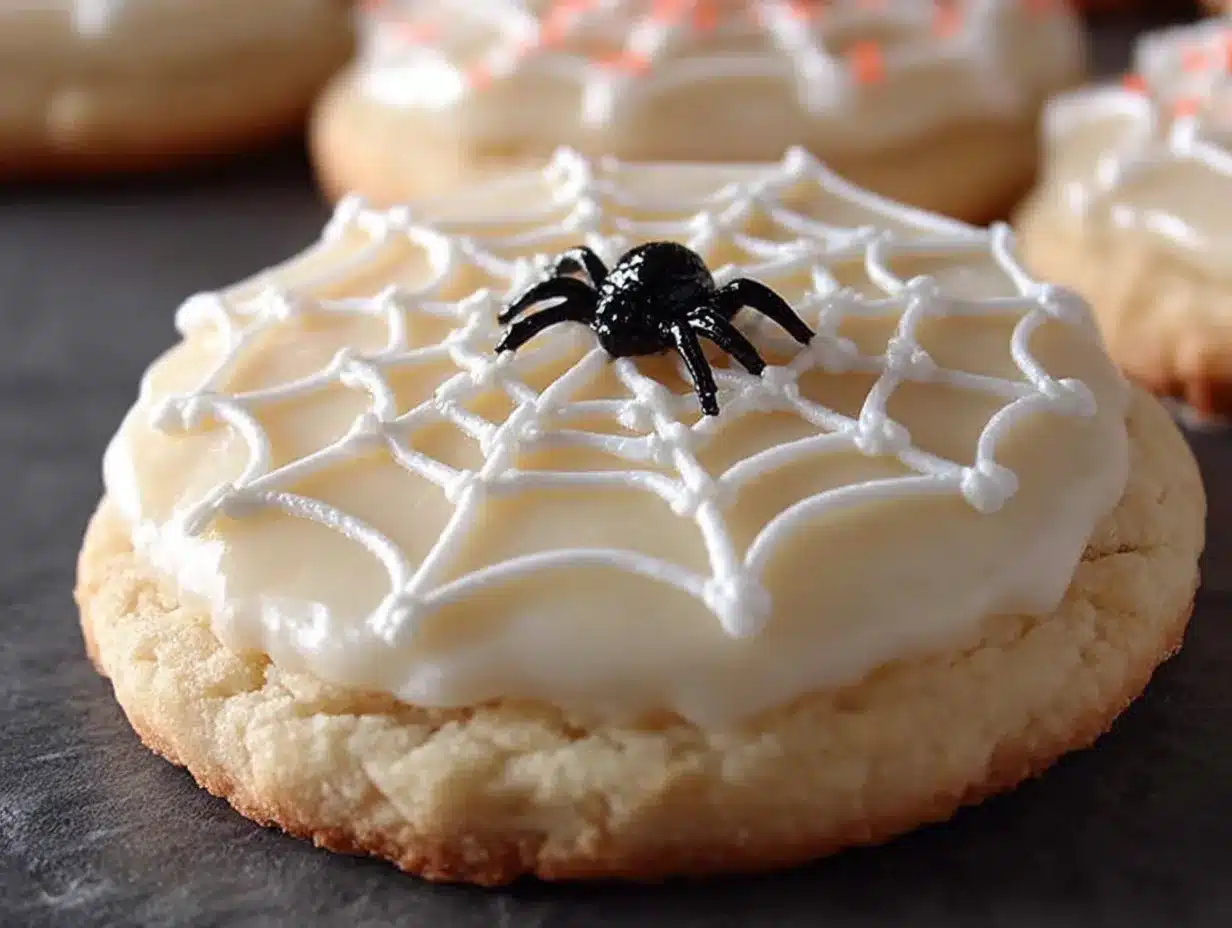
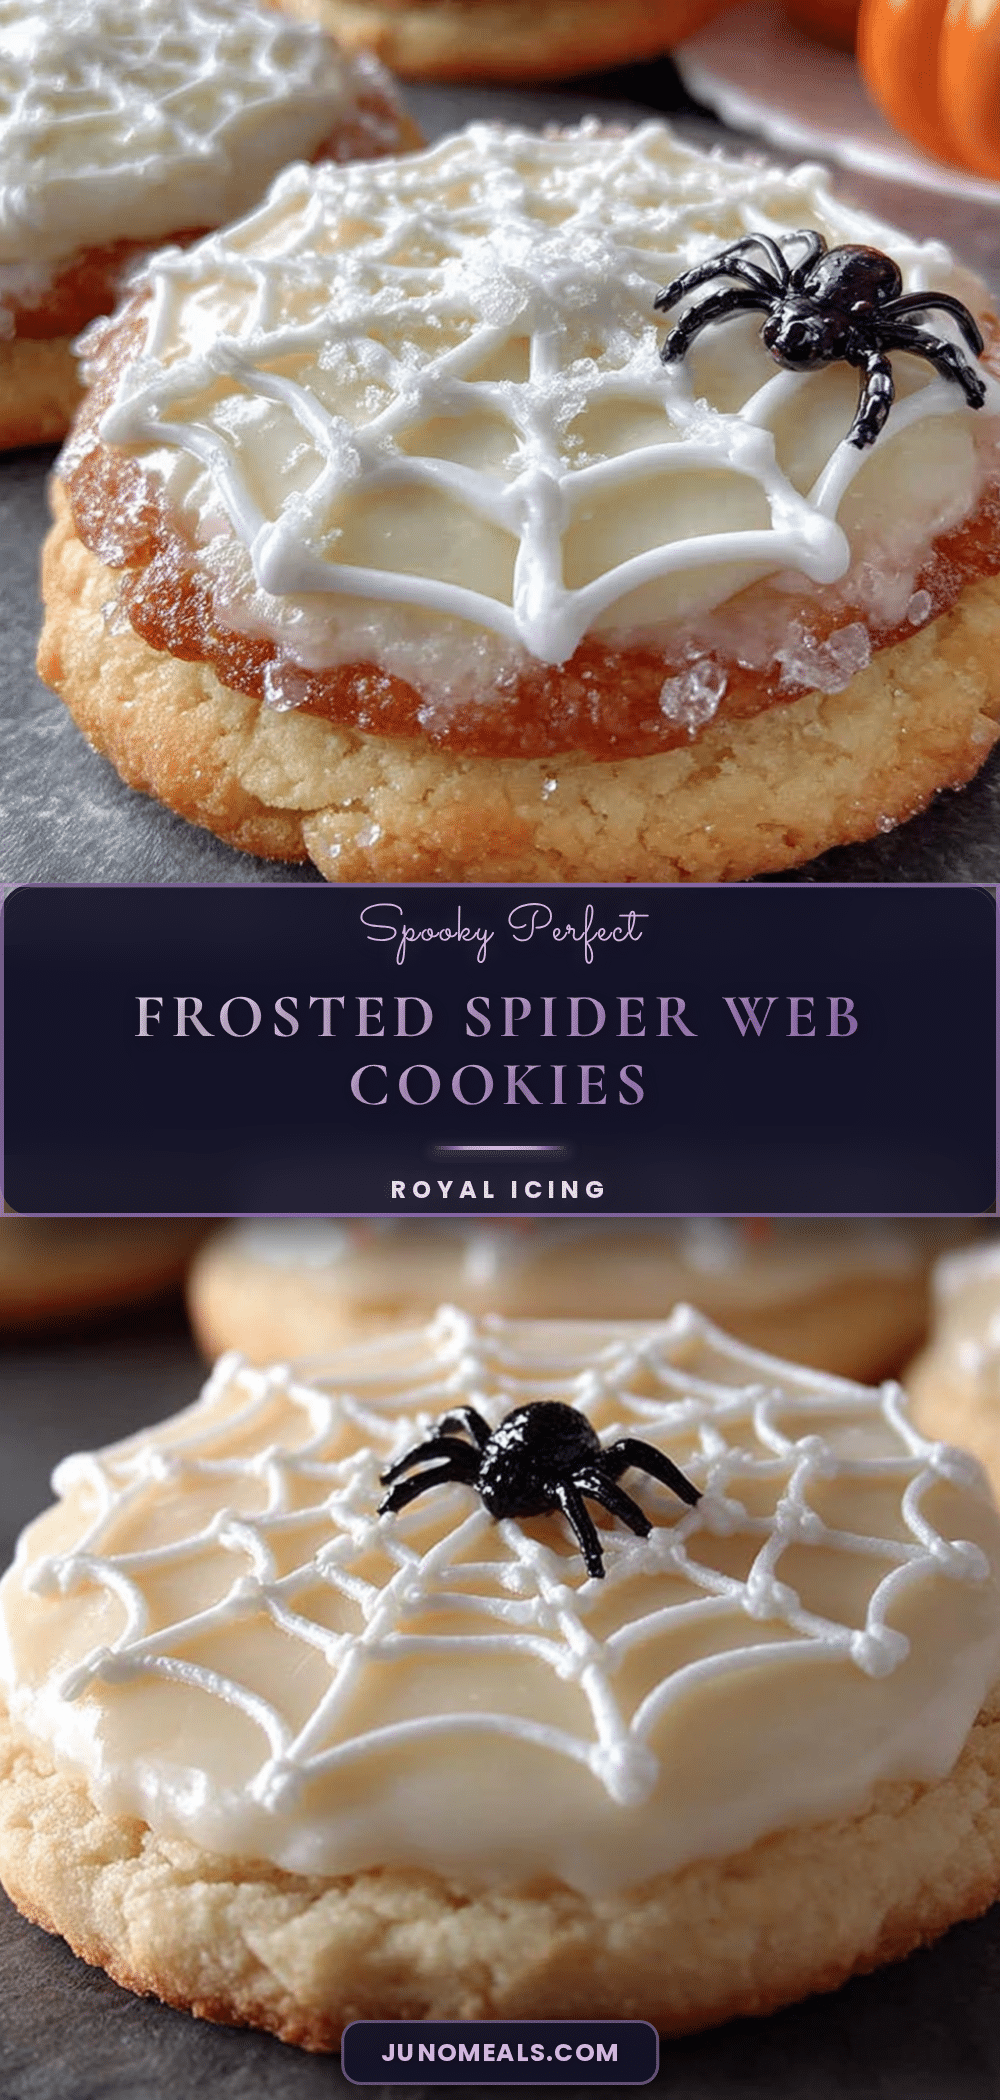
These Perfect Frosted Spider Web Sugar Cookies aren’t just another Halloween treat. They’re the ones you make when you want to impress without spending hours on fondant or complicated piping. The cookie itself is a classic, buttery sugar cookie—crisp edges, soft centers, sturdy enough to hold a thick layer of frosting without crumbling. And the web design? It looks way harder than it actually is. I promise you, if I can nail it after three tries (and two disasters), you can nail it on your first.
I started making these for a Halloween party a few years ago, and they disappeared faster than the candy bowl. Now they’re a yearly tradition—the kind of thing my friends text me about in October, asking if the “spider cookies” are happening again. There’s something deeply satisfying about handing someone a plate of cookies that look like they came from a bakery. And the best part? You get to be the one who made them.
Why You’ll Love This Recipe
- Quick & Easy: From start to finish, you’re looking at about 45 minutes of active time. The dough chills for 30 minutes, but that’s hands-off. Perfect for a weeknight baking session or a last-minute Halloween party.
- Simple Ingredients: No obscure specialty items. Butter, sugar, flour, eggs, vanilla—you probably have most of it already. The only “special” thing is black gel food coloring, and you can find that at any grocery store.
- Perfect for Halloween: These cookies are the star of any spooky spread. They work for classroom parties, office potlucks, or just a fun weekend activity with the kids.
- Crowd-Pleaser: I’ve brought these to gatherings where people swore they “weren’t dessert people,” and watched them grab a second. The combination of buttery cookie and creamy frosting is universal.
- Unbelievably Delicious: Let’s be real—some decorated cookies are all show and no flavor. Not these. The cookie base is soft, rich, and slightly tangy from a tiny splash of lemon juice. It’s a recipe I’ve tweaked over years to get that perfect balance.
What makes these different from every other frosted sugar cookie recipe out there? It’s the technique. I use a slightly thicker frosting that holds its shape beautifully, so the web pattern stays crisp. And the toothpick drag method? It’s foolproof. You don’t need a steady hand or artistic talent—just a toothpick and a little confidence.
This is the kind of recipe that makes you feel like a professional baker, even if you’ve never piped a line in your life. It’s comfort food with a spooky twist, and honestly, it’s the most fun you’ll have in the kitchen all October.
What Ingredients You Will Need
This recipe uses simple, pantry-friendly ingredients to create a cookie that’s both sturdy enough for decorating and tender enough to melt in your mouth. The frosting is a classic buttercream, slightly stiffened to hold the web design perfectly.
For the Sugar Cookies
- 2 ¾ cups (345g) all-purpose flour – Spoon and level for accuracy. Too much flour makes cookies dense.
- 1 teaspoon baking powder – Helps the cookies rise just a bit, giving them a soft interior.
- ½ teaspoon salt – Balances the sweetness and enhances the butter flavor.
- 1 cup (226g) unsalted butter, softened – I use Kerrygold for the rich flavor, but any good-quality butter works. Let it sit out for at least 30 minutes.
- 1 cup (200g) granulated sugar – White sugar keeps the cookies light and crisp.
- 1 large egg, room temperature – Cold egg can seize the butter. Pop it in warm water for 5 minutes if you forgot.
- 1 teaspoon vanilla extract – Pure vanilla, not imitation. It makes a difference.
- ½ teaspoon lemon juice – This is my secret trick. It brightens the flavor and cuts the sweetness without tasting lemony.
For the Buttercream Frosting
- 1 cup (226g) unsalted butter, softened – Again, room temperature is key.
- 3 ½ cups (420g) powdered sugar – Sift it if it’s lumpy. Nobody wants crunchy frosting.
- 2 tablespoons heavy cream – Or whole milk. Heavy cream gives a richer texture.
- 1 teaspoon vanilla extract – Keeps the flavor consistent with the cookie.
- Pinch of salt – Trust me on this. It prevents the frosting from being cloyingly sweet.
- Black gel food coloring – Americolor or Wilton work best. Liquid coloring will thin the frosting too much.
For the Web Design
- White frosting base – The same buttercream, left white.
- Black frosting – About ¼ cup of the buttercream, dyed black.
- Toothpicks – Plain wooden ones. The round shape creates the best web lines.
- Piping bags or zip-top bags – Snip a tiny corner for the black frosting.
Equipment Needed
- Stand mixer or hand mixer – I prefer my KitchenAid for the cookie dough, but a hand mixer works fine. You’ll need it for the frosting too.
- Large mixing bowls – One for dry ingredients, one for wet.
- Rolling pin – I use a wooden one with adjustable rings for even thickness. If you don’t have rings, use two chopsticks as guides.
- Round cookie cutter – 2.5 to 3 inches in diameter. A biscuit cutter works too.
- Baking sheets – Light-colored metal sheets prevent over-browning. Dark sheets cook faster, so keep an eye on them.
- Parchment paper – Non-negotiable. It prevents sticking and makes cleanup a breeze.
- Piping bags – Reusable silicone ones are great, but disposable zip-top bags work in a pinch.
- Toothpicks – The star of the web design. Keep a bunch handy.
- Cooling rack – Wire racks allow air to circulate, so cookies cool evenly.
If you don’t have a stand mixer, don’t worry. I’ve made these cookies with a hand mixer and a wooden spoon more times than I can count. The dough comes together either way. Just make sure your butter is properly softened, or you’ll be fighting the mixer the whole time.
Preparation Method
- Make the cookie dough. In a medium bowl, whisk together the flour, baking powder, and salt. Set aside. In a large bowl, beat the softened butter and granulated sugar on medium speed until light and fluffy—about 3 minutes. Scrape down the sides. Add the egg, vanilla, and lemon juice. Beat until combined, about 30 seconds. Gradually add the dry ingredients, mixing on low until just combined. The dough will be soft but not sticky.
- Chill the dough. Divide the dough in half, flatten each half into a disk, and wrap tightly in plastic wrap. Refrigerate for at least 30 minutes, or up to 2 days. Chilling prevents spreading and makes the dough easier to roll. If you skip this step, your cookies will turn into blobs. I learned this the hard way.
- Preheat and prepare. Preheat your oven to 350°F (175°C). Line two baking sheets with parchment paper.
- Roll and cut. On a lightly floured surface, roll one disk of dough to ¼-inch thickness. Use a round cookie cutter to cut out shapes. Re-roll scraps once. Place cookies 2 inches apart on the prepared baking sheets. If the dough gets soft, pop the sheet in the fridge for 10 minutes before baking.
- Bake. Bake for 8-10 minutes, or until the edges are just barely golden. The centers should look set but not browned. Let cookies cool on the baking sheet for 5 minutes, then transfer to a wire rack to cool completely. Do not frost warm cookies—the frosting will melt and slide right off.
- Make the frosting. In a large bowl, beat the softened butter on medium speed until creamy, about 2 minutes. Gradually add the powdered sugar, one cup at a time, beating on low. Add the heavy cream, vanilla, and salt. Beat on medium-high for 3 minutes until light and fluffy. If it’s too thick, add a splash more cream. Too thin? Add a little more powdered sugar.
- Divide and color. Transfer about ¼ cup of the frosting to a small bowl. Add black gel food coloring until you reach a deep, dark black. Start with a tiny dab—gel coloring is concentrated. Mix well. Transfer the black frosting to a piping bag or zip-top bag. Snip a very small corner off the tip.
- Frost the cookies. Spread a thin, even layer of white frosting on each cooled cookie. Use the back of a spoon or an offset spatula. Let the frosting set for about 5 minutes—it should be slightly tacky but not wet.
- Create the web. Pipe a small dot of black frosting in the center of each cookie. Then pipe 3-4 concentric circles around the dot, spacing them about ¼ inch apart. Working quickly, drag a toothpick from the center dot outward through the circles to the edge. Wipe the toothpick clean, then repeat from the edge inward toward the center, spacing the lines evenly around the cookie. You should have 6-8 lines total. The toothpick pulls the black frosting through the white, creating a web effect.
- Set and serve. Let the frosting set for about 15 minutes before serving or stacking. The webs will firm up slightly, making the cookies easier to handle.
Cooking Tips & Techniques
I’ve made these cookies more times than I care to admit, and I’ve messed up every possible step at least once. Here’s what I learned:
- Don’t overwork the dough. Mix until the flour just disappears. Over-mixing develops gluten, which makes cookies tough. You want tender, not chewy.
- Chill, chill, chill. If at any point the dough feels sticky or soft, throw it back in the fridge for 15 minutes. Warm dough spreads in the oven, and you’ll end up with flat, shapeless cookies.
- Use gel food coloring. Liquid drops will thin your frosting and ruin the web effect. Gel coloring gives you a deep black without changing the consistency. I use Americolor Super Black—it’s worth the extra dollar.
- Work in batches. Only frost a few cookies at a time. If you frost all 24 cookies before piping the webs, the frosting will develop a skin, and the toothpick drag won’t work as well. Frost 4-5 cookies, pipe the webs, then move on.
- Toothpick angle matters. Drag the toothpick at a slight angle, not straight down. This helps the black frosting spread evenly through the white base. Practice on a piece of parchment first if you’re nervous.
- Wipe between lines. Every time you pull the toothpick through, wipe it clean on a paper towel. Otherwise, you’ll drag white frosting back into the black, and the web will look muddy.
My biggest failure? The first time I tried this, I used liquid food coloring and ended up with gray, weepy frosting that refused to set. I had to scrape every cookie clean and start over. Now I know better, and so do you.
Variations & Adaptations
- Gluten-Free Option: Substitute the all-purpose flour with a 1:1 gluten-free baking flour blend. I’ve used King Arthur Measure for Measure with great results. Add 1 teaspoon of xanthan gum if your blend doesn’t already include it.
- Vegan Version: Use vegan butter (like Miyoko’s) and a flax egg (1 tablespoon ground flaxseed + 3 tablespoons water, let sit for 5 minutes). The cookies will be slightly less tender but still delicious. Use coconut cream in the frosting instead of heavy cream.
- Different Shapes: Don’t limit yourself to rounds. Use Halloween-themed cutters—pumpkins, ghosts, bats. The web design works on any shape, just pipe the concentric circles to match the contour of the cookie.
- Color Swaps: Instead of black on white, try orange frosting with black webs, or green with purple. For Christmas, use red and green. The technique is the same—just change the colors.
- Spiced Cookies: Add 1 teaspoon of cinnamon and ½ teaspoon of nutmeg to the dry ingredients. It gives the cookies a warm, fall flavor that pairs beautifully with the sweet frosting.
- Royal Icing Version: If you prefer a harder, glossier finish, use royal icing instead of buttercream. The web technique works the same way, but you’ll need to work faster since royal icing sets quickly.
I once made a batch with orange zest in the dough and chocolate frosting instead of white. They were weirdly good—like a chocolate-orange Halloween treat. Don’t be afraid to experiment.
Serving & Storage Suggestions
These cookies are best served at room temperature. The frosting is creamy and soft, the cookie is tender—cold straight from the fridge ruins the texture. If you’re serving them at a party, arrange them on a platter in a single layer. A few strategically placed candy spiders or sprinkles add a fun touch.
For storage, place the cookies in an airtight container with parchment paper between layers. They’ll stay fresh at room temperature for up to 5 days. Do not refrigerate—the fridge dries out the cookies and makes the frosting grainy. If you live in a humid climate, keep them in a cool, dry spot away from the stove or dishwasher.
You can freeze the unfrosted cookies for up to 3 months. Bake, cool, and freeze in a single layer on a baking sheet. Once frozen, transfer to a zip-top bag. When you’re ready to decorate, thaw at room temperature for 30 minutes, then frost as directed. The frosting itself doesn’t freeze well, so always make it fresh.
The flavors actually get better after a day or two. The cookie softens slightly, and the frosting melds with the cookie base. I’ve eaten these on day four and still loved them. Just keep them sealed tight.
Nutritional Information & Benefits
Let’s be honest—these are a treat, not a health food. But here’s the estimated breakdown per cookie (based on 24 cookies):
- Calories: 245
- Fat: 14g
- Carbohydrates: 29g
- Protein: 2g
- Sugar: 18g
That said, there’s a small silver lining. The butter provides a good dose of vitamin A (hello, healthy vision), and the eggs add a bit of protein and choline, which supports brain health. If you use high-quality vanilla extract, you’re getting trace amounts of antioxidants. It’s not a superfood, but it’s not empty calories either.
For dietary considerations: This recipe contains gluten, dairy, and eggs. If you need to avoid any of those, check the variations section for substitutions. I’ve made a vegan version for a friend with allergies, and while it wasn’t identical, it was still pretty darn good.
My personal take? Food is about joy, connection, and celebration. One cookie isn’t going to derail your health goals. It’s the habit that matters, not the treat. So go ahead—enjoy the web.
Conclusion
These Perfect Frosted Spider Web Sugar Cookies are more than just a pretty face. They’re buttery, tender, and surprisingly easy to decorate once you know the trick. The toothpick method takes about 10 seconds per cookie, and the result looks like you spent hours on it. That’s the kind of baking magic I can get behind.
I love this recipe because it’s forgiving. You can mess up the first few webs (I certainly did), and they’ll still taste amazing. It’s also the kind of recipe that brings people together—kids love helping with the toothpick drag, and adults always ask for the recipe. It’s a conversation starter, a party pleaser, and a tradition in the making.
If you make these, I want to hear about it. Leave a comment below and tell me how your webs turned out. Did you add a spider? Change the colors? Make a double batch because they disappeared too fast? Share your photos, your tweaks, your happy accidents. That’s what this community is about.
Now go preheat that oven. Your spider webs are waiting.
Frequently Asked Questions
Can I make the dough ahead of time?
Absolutely. The dough can be refrigerated for up to 2 days or frozen for up to 3 months. Just wrap it tightly in plastic wrap and thaw in the fridge overnight before rolling.
Why did my frosting turn gray instead of black?
You probably used liquid food coloring. Liquid drops contain water, which thins the frosting and dilutes the color. Use gel-based food coloring for a true, deep black. Start with a tiny amount—you can always add more.
Can I use royal icing instead of buttercream?
Yes, royal icing works great for this design. It sets harder, which makes the cookies easier to stack and transport. Just work quickly, because royal icing develops a skin faster than buttercream.
My cookies spread too much in the oven. What went wrong?
Two common culprits: the dough wasn’t chilled long enough, or your butter was too soft. Make sure the dough chills for at least 30 minutes, and if the kitchen is warm, pop the cut cookies in the fridge for 10 minutes before baking.
How do I prevent the toothpick from dragging white frosting into the black?
Wipe the toothpick clean on a paper towel after each drag. This keeps the lines crisp and prevents the colors from muddying. It’s a small step that makes a huge difference in the final look.
Pin This Recipe!
Perfect Frosted Spider Web Sugar Cookies
These buttery sugar cookies are topped with a creamy frosting and a stunning spider web design that looks way harder than it actually is. The toothpick drag method makes it foolproof, so you can create bakery-worthy Halloween treats in no time.
- Prep Time: 45 minutes
- Cook Time: 10 minutes
- Total Time: 1 hour 25 minutes (includes 30 minutes chilling)
- Yield: 24 cookies 1x
- Category: Dessert
- Cuisine: American
Ingredients
- 2 ¾ cups (345g) all-purpose flour
- 1 teaspoon baking powder
- ½ teaspoon salt
- 1 cup (226g) unsalted butter, softened
- 1 cup (200g) granulated sugar
- 1 large egg, room temperature
- 1 teaspoon vanilla extract
- ½ teaspoon lemon juice
- 1 cup (226g) unsalted butter, softened (for frosting)
- 3 ½ cups (420g) powdered sugar
- 2 tablespoons heavy cream
- 1 teaspoon vanilla extract (for frosting)
- Pinch of salt (for frosting)
- Black gel food coloring
- White frosting base (same buttercream, left white)
- Black frosting (about ¼ cup of buttercream, dyed black)
- Toothpicks
- Piping bags or zip-top bags
Instructions
- Make the cookie dough: In a medium bowl, whisk together flour, baking powder, and salt. Set aside. In a large bowl, beat softened butter and granulated sugar on medium speed until light and fluffy, about 3 minutes. Scrape down sides. Add egg, vanilla, and lemon juice. Beat until combined, about 30 seconds. Gradually add dry ingredients, mixing on low until just combined. Dough will be soft but not sticky.
- Chill the dough: Divide dough in half, flatten each half into a disk, and wrap tightly in plastic wrap. Refrigerate for at least 30 minutes, or up to 2 days.
- Preheat and prepare: Preheat oven to 350°F (175°C). Line two baking sheets with parchment paper.
- Roll and cut: On a lightly floured surface, roll one disk of dough to ¼-inch thickness. Use a round cookie cutter to cut out shapes. Re-roll scraps once. Place cookies 2 inches apart on prepared baking sheets. If dough gets soft, chill sheet for 10 minutes before baking.
- Bake: Bake for 8-10 minutes, or until edges are just barely golden. Centers should look set but not browned. Let cookies cool on baking sheet for 5 minutes, then transfer to a wire rack to cool completely.
- Make the frosting: In a large bowl, beat softened butter on medium speed until creamy, about 2 minutes. Gradually add powdered sugar, one cup at a time, beating on low. Add heavy cream, vanilla, and salt. Beat on medium-high for 3 minutes until light and fluffy. Adjust consistency with more cream or powdered sugar as needed.
- Divide and color: Transfer about ¼ cup of frosting to a small bowl. Add black gel food coloring until deep black. Transfer black frosting to a piping bag or zip-top bag. Snip a very small corner off the tip.
- Frost the cookies: Spread a thin, even layer of white frosting on each cooled cookie. Let frosting set for about 5 minutes until slightly tacky but not wet.
- Create the web: Pipe a small dot of black frosting in the center of each cookie. Pipe 3-4 concentric circles around the dot, spacing them about ¼ inch apart. Working quickly, drag a toothpick from the center dot outward through the circles to the edge. Wipe toothpick clean, then repeat from the edge inward toward the center, spacing lines evenly around the cookie (6-8 lines total).
- Set and serve: Let frosting set for about 15 minutes before serving or stacking.
Notes
Use gel food coloring for deep black without thinning frosting. Work in batches: frost 4-5 cookies at a time before piping webs. Wipe toothpick clean between each drag for crisp lines. Dough can be refrigerated up to 2 days or frozen up to 3 months. Unfrosted cookies can be frozen for up to 3 months.
Nutrition
- Serving Size: 1 cookie
- Calories: 245
- Sugar: 18
- Sodium: 95
- Fat: 14
- Saturated Fat: 8
- Carbohydrates: 29
- Protein: 2
Keywords: spider web cookies, Halloween sugar cookies, frosted sugar cookies, spider web design, Halloween dessert, easy decorated cookies


