It was 11:47 PM on a random Wednesday, and I had a fierce, inexplicable hankering for a bakery scone. Not just any scone—one of those thick, tender, slightly crumbly ones with a glossy drip of icing. The problem? I didn’t have heavy cream, cold butter cubes ready to go, or even a proper pastry cutter. But I did have a can of pumpkin puree hanging out in the back of the pantry, a half-empty bag of all-purpose flour, and the wild idea that maybe—just maybe—pumpkin could replace the cream and keep things moist without the fuss. Let me tell you, that late-night kitchen experiment felt like a gamble. I was tired, my counter was a mess, and I definitely got flour on my favorite black t-shirt. But when those scones came out of the oven, golden and fragrant with cinnamon and nutmeg, and I drizzled that simple maple glaze over the top? Honestly, I just stood there in the dim light, holding a warm scone, feeling a little bit like a genius. This is the recipe that came from that weird, impulsive, late-night craving. It’s the one I now make for every single gathering because it steals the show without stealing your time. If you’ve ever wanted a scone that’s impossibly tender, perfectly spiced, and looks like you spent hours on it (when you really didn’t), you’re in the right place.
Why You’ll Love This Recipe
I’ve tested this recipe more times than I care to count—once for a brunch where I accidentally doubled the baking powder (don’t ask), and once for a Thanksgiving potluck where they vanished before the turkey even hit the table. So trust me when I say: these scones are a winner. They have that perfect, almost-biscuit-like texture on the inside with a slightly crisp edge, and the maple glaze adds just the right amount of sweetness without being cloying.
- Quick & Easy: From start to finish, you’re looking at about 30 minutes. No chilling the dough, no complicated folds. Just mix, shape, bake, and glaze.
- Simple Ingredients: You probably have most of these in your kitchen right now—flour, sugar, butter, pumpkin puree, and a few warm spices. No fancy extracts or hard-to-find items.
- Perfect for Hosting: These scones are a dream for dinner parties, brunches, or holiday gatherings. They look impressive on a platter, and you can prep the dough the night before to save time when guests arrive.
- Crowd-Pleaser: I’ve served these to kids, adults, and even my picky aunt who “doesn’t like pumpkin.” She asked for the recipe. Enough said.
- Unbelievably Delicious: The texture is what gets people. It’s not dry or dense like some scones can be. The pumpkin keeps everything moist and tender, while the maple glaze adds that bakery-style finish.
What makes this different from every other pumpkin scone recipe out there? It’s the method. By grating frozen butter into the flour (a trick I picked up from a pastry chef friend), you get those flaky layers without any special equipment. And the maple glaze isn’t just a drizzle—it’s a thick, glossy blanket that soaks slightly into the warm scone, creating a little pocket of sweetness in every bite. This isn’t just another version; it’s the one you’ll come back to again and again.
What Ingredients You Will Need
This recipe uses simple, wholesome ingredients to deliver that signature scone texture and bold pumpkin flavor. Most of these are pantry staples, which makes this perfect for last-minute baking when you’re hosting.
- All-purpose flour: 2 cups (240g). The backbone of our scones. I use Gold Medal or King Arthur for consistent results. Don’t substitute with whole wheat unless you want a denser scone—trust me on this one.
- Granulated sugar: 1/3 cup (65g). Just enough to sweeten without overpowering the pumpkin and spices.
- Baking powder: 1 tablespoon. Make sure it’s fresh—this is what gives the scones their lift. If your baking powder is older than 6 months, it’s time for a new can.
- Salt: 1/2 teaspoon. Balances the sweetness and enhances the spices.
- Pumpkin pie spice: 1 1/2 teaspoons. You can use store-bought or make your own with cinnamon, nutmeg, ginger, and cloves. I prefer the homemade blend because I can adjust the cinnamon-to-nutmeg ratio to my taste.
- Cinnamon: 1 teaspoon. Because you can never have too much cinnamon in a pumpkin recipe.
- Unsalted butter: 1/2 cup (113g), frozen. This is the secret to flaky scones. Freeze the butter for at least 30 minutes before grating it into the flour mixture. If you only have salted butter, reduce the added salt to 1/4 teaspoon.
- Pumpkin puree: 1/2 cup (120g). Not pumpkin pie filling! Make sure it’s 100% pure pumpkin. Libby’s is my go-to brand for consistent moisture content.
- Heavy cream: 1/4 cup (60ml). Adds richness and helps bind the dough. You can substitute with whole milk if needed, but the scones won’t be quite as tender.
- Vanilla extract: 1 teaspoon. Pure vanilla extract is worth the splurge here—it rounds out the spices beautifully.
For the Maple Glaze:
- Powdered sugar: 1 cup (120g). Sifted to avoid lumps.
- Pure maple syrup: 2 tablespoons. Not pancake syrup—use the real stuff. Grade A dark amber has the strongest maple flavor and works best here.
- Milk or heavy cream: 1-2 tablespoons. Adjust to reach your desired consistency. For a thicker glaze that stays put, use 1 tablespoon. For a thinner drizzle, go with 2.
- Vanilla extract: 1/2 teaspoon. A little extra depth never hurts.
Equipment Needed
You don’t need a fancy bakery setup for these scones. Here’s what you’ll actually use:
- Box grater or food processor: For grating the frozen butter. A box grater is my favorite because it’s easy to clean and gives you those perfect little butter shards. A food processor with a grating disc works too, but it’s more to wash.
- Large mixing bowl: For combining dry ingredients and cutting in the butter.
- Pastry cutter or two forks: If you don’t want to grate the butter, you can cut it into the flour using a pastry cutter. I’ve done both methods, and grating is faster and more consistent.
- Baking sheet: Line it with parchment paper for easy cleanup. I’ve used silicone baking mats too, and they work fine, but the bottoms of the scones don’t get quite as golden.
- Bench scraper or sharp knife: For cutting the dough into triangles. A bench scraper is ideal because it cuts cleanly without squishing the edges.
- Wire cooling rack: Essential for letting the glaze set without turning the bottom of the scones soggy.
- Whisk: For the glaze. A small whisk works better than a fork for getting that smooth, lump-free consistency.
Budget-friendly tip: If you don’t have a box grater, just freeze the butter and chop it into tiny pieces with a sharp knife. It takes a little longer, but the result is the same.
Preparation Method
- Preheat your oven to 400°F (200°C). Line a baking sheet with parchment paper. Getting the oven hot before you start mixing is important—you want the butter to stay cold until it hits the heat.
- Grate the frozen butter. Take your stick of frozen butter and grate it on the large holes of a box grater. Work quickly—your hands will warm the butter, and you want those little shards to stay solid. If the butter starts to soften, pop the grated pieces back in the freezer for 5 minutes.
- Mix the dry ingredients. In a large bowl, whisk together the flour, sugar, baking powder, salt, pumpkin pie spice, and cinnamon. Make sure everything is evenly distributed—you don’t want a pocket of baking powder in your scone.
- Cut in the butter. Add the grated frozen butter to the flour mixture. Use your fingertips or a pastry cutter to work the butter into the flour until the mixture looks like coarse crumbs with some pea-sized butter pieces remaining. This takes about 30 seconds with your fingers. Don’t overwork it—those butter pockets are what create flaky layers.
- Combine the wet ingredients. In a small bowl or measuring cup, whisk together the pumpkin puree, heavy cream, and vanilla extract until smooth. The mixture should be thick but pourable.
- Bring the dough together. Make a well in the center of the flour-butter mixture. Pour in the pumpkin mixture all at once. Use a rubber spatula or your hands to fold everything together until just combined. The dough will look shaggy and a little dry in spots—that’s exactly what you want. Overmixing will make the scones tough.
- Shape the dough. Turn the dough out onto a lightly floured surface. Gently bring it together with your hands, then pat it into a circle about 3/4-inch thick. Don’t use a rolling pin—the warmth of your hands is enough. If the dough sticks, dust your hands and the surface with a little more flour.
- Cut the scones. Use a bench scraper or sharp knife to cut the circle into 8 wedges, like a pizza. For cleaner edges, wipe the blade between cuts. Place the wedges on the prepared baking sheet, spacing them about 2 inches apart—they’ll spread a little, but not much.
- Bake. Pop the sheet into the preheated oven and bake for 14 to 17 minutes, or until the scones are golden brown on the bottom and the tops are just starting to turn light gold. They should feel firm to the touch but still have a little give. Let them cool on the baking sheet for 5 minutes, then transfer to a wire rack.
- Make the glaze. While the scones are cooling, whisk together the powdered sugar, maple syrup, vanilla, and 1 tablespoon of milk or cream. If the glaze is too thick to drizzle, add the second tablespoon. You want it thick enough to coat the back of a spoon but still pourable.
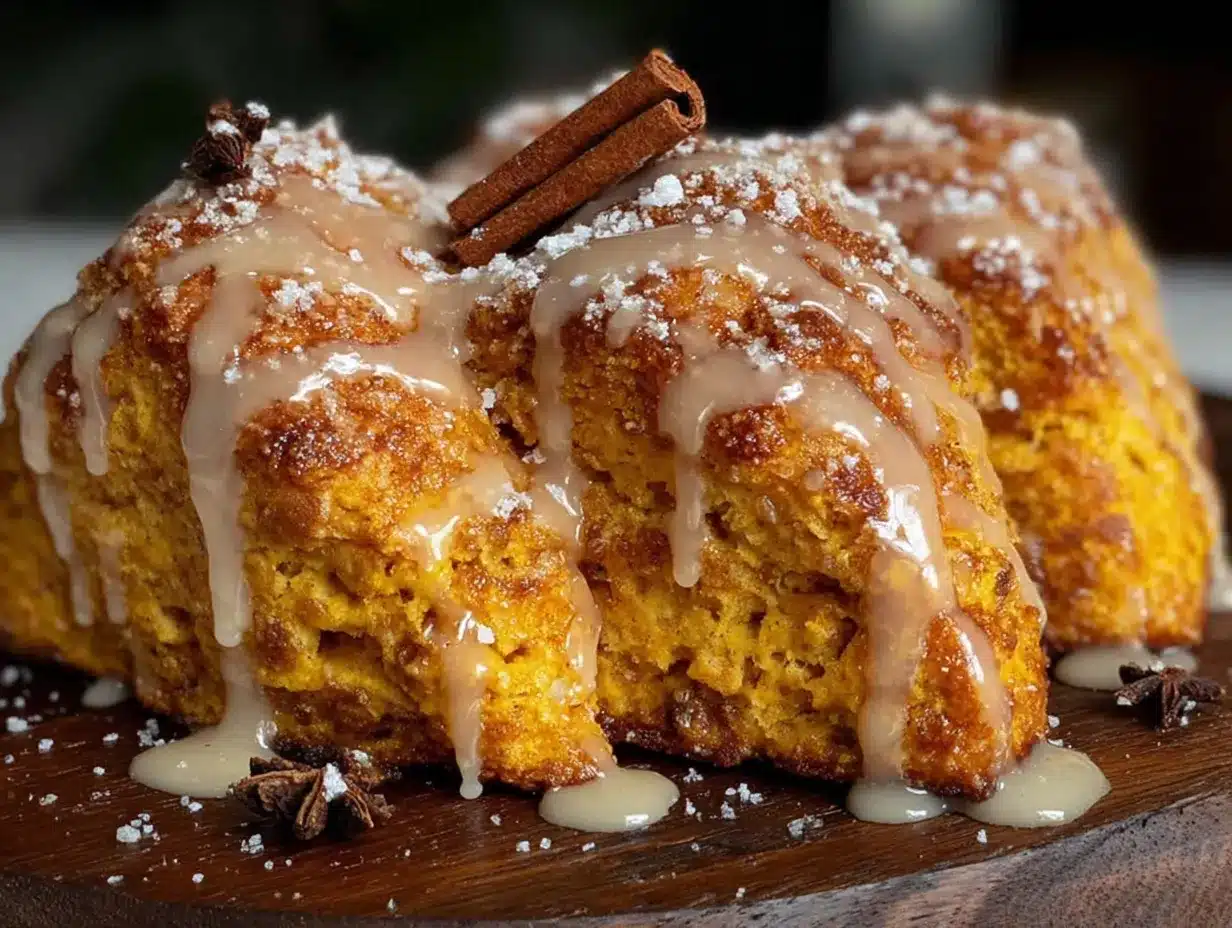
- Glaze the scones. Drizzle the glaze over the warm scones using a spoon or a piping bag with the tip snipped off. The warmth will help the glaze spread slightly and soak into the top layer. Let the glaze set for about 10 minutes before serving.
Cooking Tips & Techniques
I’ve made this recipe more times than I can count, and I’ve definitely had my share of failures. Here’s what I’ve learned the hard way so you don’t have to.
The cold butter rule is non-negotiable. I once tried to speed things up by using room-temperature butter. The result? Flat, greasy discs that spread into each other in the oven. The frozen butter creates steam pockets as it melts, which gives you those flaky layers. If your kitchen is warm, pop the grated butter back in the freezer for 10 minutes before mixing it into the flour.
Don’t twist the cutter. If you’re using a biscuit cutter instead of cutting wedges, press straight down without twisting. Twisting seals the edges and prevents the scones from rising properly. I learned this after a batch of sad, lopsided scones that looked more like cookies.
Use a light hand with the dough. The more you handle it, the tougher it gets. Mix until the flour is just incorporated—there should still be some dry patches. When patting it into a circle, use quick, gentle motions. Think of it like you’re handling a baby bird, not a piece of clay.
Bake from frozen for a special trick. If you’re hosting, here’s a game-changer: cut the scones, arrange them on the baking sheet, and freeze them solid. Once frozen, transfer to a zip-top bag. When guests are coming, bake them straight from frozen—just add 3 to 5 minutes to the baking time. Fresh scones with zero morning effort.
Glaze while warm, but not hot. If the scones are too hot, the glaze will melt into a puddle. If they’re completely cool, the glaze will sit on top and not adhere. The sweet spot is about 5 to 10 minutes out of the oven—warm enough to let the glaze soak in slightly, but cool enough that it stays put.
Variations & Adaptations
One of the best things about this recipe is how flexible it is. Here are a few ways I’ve adapted it for different occasions and dietary needs.
Dairy-Free Version: Substitute the butter with a high-quality vegan butter stick (like Miyoko’s or Earth Balance) and use coconut cream or oat milk instead of heavy cream. Freeze the vegan butter just like regular butter. The texture will be slightly less tender, but still delicious. I tested this for a friend with a dairy allergy, and she said it was the best scone she’d had in years.
Gluten-Free Option: Use a 1:1 gluten-free flour blend that contains xanthan gum, like Bob’s Red Mill. Add an extra tablespoon of cream because gluten-free flours tend to absorb more liquid. The scones won’t be quite as flaky, but they’ll still be tender and flavorful.
Chocolate Chip Pumpkin Scones: Fold in 1/2 cup of mini chocolate chips after combining the wet and dry ingredients. The chocolate adds a nice contrast to the warm spices. I made these for a fall potluck, and they were gone before the plain ones.
Savory Pumpkin Scones: Skip the sugar and pumpkin pie spice. Add 1 teaspoon of garlic powder, 1/2 teaspoon of black pepper, and 1/2 cup of shredded cheddar cheese to the dry ingredients. Omit the maple glaze and brush the tops with melted butter before baking. These are incredible with soup or chili.
Cranberry Orange Twist: Add 1/2 cup of dried cranberries and the zest of one orange to the dry ingredients. Replace the vanilla in the glaze with orange juice for a bright, citrusy finish. This is my go-to for Thanksgiving morning.
Serving & Storage Suggestions
These scones are best served warm, with the glaze still slightly soft. Arrange them on a wooden board or a simple white platter for that bakery-style presentation. If you’re hosting a brunch, set them out alongside fresh fruit, scrambled eggs, and a pot of strong coffee or chai tea. They also pair beautifully with a cup of hot apple cider or a spiced latte.
For a dinner party, serve them as a sweet ending instead of dessert. I once brought a batch to a friend’s dinner party, and everyone grabbed one with their coffee—they were gone in minutes. The maple glaze adds just enough sweetness to satisfy a sugar craving without being overwhelming.
Storage: Keep leftover scones in an airtight container at room temperature for up to 3 days. If you’ve already glazed them, layer parchment paper between the scones so the glaze doesn’t stick. For longer storage, freeze unglazed scones in a zip-top bag for up to 3 months. Thaw at room temperature, then reheat in a 300°F oven for 5 minutes before glazing.
Reheating: The microwave works in a pinch (about 15 seconds), but it can make the scones a little chewy. For the best texture, pop them in a toaster oven or regular oven at 350°F for 5 to 7 minutes. The outside gets slightly crisp again, while the inside stays tender.
Flavor development: Honestly, these scones taste even better the next day. The spices have time to meld, and the glaze sets into a lovely, crackly shell. If you’re hosting, bake them a day ahead, store them unglazed, and glaze them just before serving.
Nutritional Information & Benefits
Per scone (with glaze): approximately 320 calories, 14g fat, 45g carbohydrates, 4g protein, 2g fiber, 22g sugar. These are estimates based on standard ingredients.
While these scones are definitely a treat, they do offer some nutritional perks. Pumpkin puree is packed with vitamin A (over 200% of your daily needs per cup) and is a good source of fiber and antioxidants. The cinnamon and nutmeg in the spice blend have anti-inflammatory properties, and maple syrup contains some minerals like zinc and manganese. Plus, since this recipe uses real ingredients without preservatives or artificial flavors, you’re getting a more wholesome version of a bakery favorite.
If you’re watching your sugar intake, you can reduce the glaze to a light drizzle or skip it entirely—the scones are still flavorful on their own. For a lower-carb version, substitute the all-purpose flour with almond flour and use a sugar-free maple syrup alternative. The texture will be different (more dense and tender), but the flavor will still be there.
Conclusion
Look, I know there are a million pumpkin scone recipes out there. But this one? This is the one I keep coming back to. It’s the one I make for Thanksgiving brunch, for lazy Sunday mornings with friends, and for those late-night moments when I just need something warm and sweet and comforting. The texture is spot-on—tender, flaky, not too dry—and that maple glaze is just the right amount of extra. Plus, it’s flexible enough to adapt to whatever you have on hand or whatever dietary needs your guests have. That’s the kind of recipe you want in your back pocket when you’re hosting.
I’d love to hear how these turn out for you. Did you try a variation? Did your guests devour them? Drop a comment below and let me know—I read every single one, and I’m always looking for new twists to try. And if you share a photo on Instagram or Pinterest, tag me so I can see your beautiful scones. Happy baking, friends. You’ve got this.
Frequently Asked Questions
Can I use pumpkin pie filling instead of pumpkin puree?
No, please don’t. Pumpkin pie filling is pre-sweetened and spiced, which will throw off the sugar and spice balance in this recipe. Stick with 100% pure pumpkin puree. If you accidentally bought pie filling, you can still use it—just reduce the sugar to 2 tablespoons and skip the pumpkin pie spice. The texture will be slightly different, but it’ll still work.
Why did my scones turn out dry?
This usually happens from overmixing or overbaking. Mix the dough only until it comes together—there should still be some dry spots. And start checking the scones at 14 minutes. Every oven runs differently, and those last few minutes can make the difference between tender and dry. If your scones consistently come out dry, add an extra tablespoon of cream to the wet ingredients next time.
Can I make the dough ahead of time?
Absolutely. You can prepare the dough, cut the scones, and arrange them on a parchment-lined baking sheet. Cover with plastic wrap and refrigerate for up to 24 hours, or freeze for up to 3 months. Bake from chilled or frozen, adding a few extra minutes to the baking time. This is my favorite trick for hosting—fresh scones with zero morning stress.
How do I get the glaze to look like the pictures?
The key is consistency. Start with 1 tablespoon of milk or cream and whisk well. The glaze should be thick enough to coat the back of a spoon but still flow slowly. If it’s too thick, add a few drops more liquid. If it’s too thin, add a little more powdered sugar. Drizzle it over warm (not hot) scones using a spoon, and let gravity do the work. For a cleaner look, use a piping bag with a small round tip.
Can I make these without a box grater?
Yes. If you don’t have a box grater, freeze the butter and chop it into tiny pieces with a sharp knife. It takes a little longer, but the result is the same. You can also use a food processor: pulse the flour mixture with cold butter cubes until it looks like coarse meal. Just be careful not to over-process, or you’ll lose those butter pockets that create flaky layers.
Pin This Recipe!

Easy Pumpkin Scones with Maple Glaze Recipe
These impossibly tender, perfectly spiced pumpkin scones with a glossy maple glaze come together in about 30 minutes with simple ingredients. The secret to their flaky texture is grated frozen butter, and they’re flexible enough for dairy-free, gluten-free, or savory variations.
- Prep Time: 15 minutes
- Cook Time: 17 minutes
- Total Time: 32 minutes
- Yield: 8 servings 1x
- Category: Breakfast, Brunch, Dessert
- Cuisine: American
Ingredients
- 2 cups (240g) all-purpose flour
- 1/3 cup (65g) granulated sugar
- 1 tablespoon baking powder
- 1/2 teaspoon salt
- 1 1/2 teaspoons pumpkin pie spice
- 1 teaspoon cinnamon
- 1/2 cup (113g) unsalted butter, frozen
- 1/2 cup (120g) pumpkin puree (not pumpkin pie filling)
- 1/4 cup (60ml) heavy cream
- 1 teaspoon vanilla extract
- 1 cup (120g) powdered sugar, sifted
- 2 tablespoons pure maple syrup
- 1–2 tablespoons milk or heavy cream
- 1/2 teaspoon vanilla extract
Instructions
- Preheat your oven to 400°F (200°C). Line a baking sheet with parchment paper.
- Grate the frozen butter on the large holes of a box grater. Work quickly and if the butter starts to soften, pop the grated pieces back in the freezer for 5 minutes.
- In a large bowl, whisk together the flour, sugar, baking powder, salt, pumpkin pie spice, and cinnamon until evenly distributed.
- Add the grated frozen butter to the flour mixture. Use your fingertips or a pastry cutter to work the butter into the flour until the mixture looks like coarse crumbs with some pea-sized butter pieces remaining. Don’t overwork.
- In a small bowl or measuring cup, whisk together the pumpkin puree, heavy cream, and vanilla extract until smooth.
- Make a well in the center of the flour-butter mixture. Pour in the pumpkin mixture all at once. Use a rubber spatula or your hands to fold everything together until just combined. The dough will look shaggy and a little dry in spots.
- Turn the dough out onto a lightly floured surface. Gently bring it together with your hands, then pat it into a circle about 3/4-inch thick. Don’t use a rolling pin.
- Use a bench scraper or sharp knife to cut the circle into 8 wedges, like a pizza. Wipe the blade between cuts for cleaner edges. Place the wedges on the prepared baking sheet, spacing them about 2 inches apart.
- Bake for 14 to 17 minutes, or until the scones are golden brown on the bottom and the tops are just starting to turn light gold. They should feel firm to the touch but still have a little give. Let them cool on the baking sheet for 5 minutes, then transfer to a wire rack.
- While the scones are cooling, whisk together the powdered sugar, maple syrup, vanilla, and 1 tablespoon of milk or cream. If the glaze is too thick to drizzle, add the second tablespoon. You want it thick enough to coat the back of a spoon but still pourable.
- Drizzle the glaze over the warm scones using a spoon or a piping bag with the tip snipped off. Let the glaze set for about 10 minutes before serving.
Notes
The cold butter rule is non-negotiable for flaky layers. Don’t twist the cutter when cutting scones. Use a light hand with the dough to avoid toughness. For a make-ahead trick, freeze cut scones and bake from frozen, adding 3-5 minutes to baking time. Glaze while warm but not hot for best adherence. Scones taste even better the next day as flavors meld.
Nutrition
- Serving Size: 1 scone with glaze
- Calories: 320
- Sugar: 22
- Sodium: 280
- Fat: 14
- Saturated Fat: 8
- Carbohydrates: 45
- Fiber: 2
- Protein: 4
Keywords: pumpkin scones, maple glaze, easy scone recipe, fall baking, pumpkin recipes, brunch recipes, quick scones


