I’m not supposed to play favorites with recipes, but let’s be honest—some just hit different. Last October, I stopped by my neighbor Maggie’s place to borrow a ladder (mine had mysteriously vanished after a garage sale I swear I didn’t authorize), and the smell hit me before I even got through the screen door. Warm apples, butter, and something almost like salted caramel—but deeper, more complex. She was standing there in her flour-dusted sweater, holding a spatula like it was no big deal, while this gorgeous pan of layered perfection sat cooling on her counter.
“Oh, those are just something I threw together,” she said, waving her hand like she hadn’t just created what I would later argue was the best fall dessert I’d ever eaten. I mean, really. “Just something.” I almost laughed. She handed me a bar still warm from the pan, and I closed my eyes after the first bite—no shame. The buttery crust, the creamy cheesecake layer, the soft apple topping, and that ribbon of caramel running through it all? It was ridiculous.
You know that feeling when you taste something and immediately start planning when you’ll make it yourself? That was me, standing in her kitchen, ladder completely forgotten. She finally texted me the recipe later that night, and I’ve been tweaking it ever since. These Easy No-Bake Caramel Apple Cheesecake Bars for Fall are the result—no oven required, no fuss, and honestly, maybe even better than the original. Maybe you’ve been there, chasing a recipe that felt too good to be true? This one delivers.
Why You’ll Love This Recipe
Look, I’ve tested a lot of fall desserts over the years. Some are gorgeous but take three hours. Others are quick but taste like an afterthought. These Easy No-Bake Caramel Apple Cheesecake Bars for Fall? They’re the Goldilocks of autumn sweets—just right in every way. Here’s what makes them stand out:
- No oven needed. Seriously. Zero baking. Perfect for those warm fall afternoons when you want dessert without heating up the whole house, or when your oven is already occupied with a roast chicken or turkey.
- Simple ingredients. You probably have most of these in your pantry right now. Graham crackers, cream cheese, butter, sugar, apples, and caramel sauce. No weird specialty items that cost a fortune.
- Perfect for fall gatherings. Thanksgiving, Friendsgiving, football parties, or just a Tuesday night when you need something cozy. These bars travel well, too—I brought them to a potluck last month and got asked for the recipe four times.
- Crowd-pleaser status. Kids love the caramel and apple combo. Adults love that they’re not too sweet. Everyone loves that they’re no-bake and still taste like you spent hours in the kitchen.
- Make-ahead friendly. These actually get better after a few hours in the fridge. The flavors meld together, the crust sets perfectly, and slicing becomes effortless. You can make them a day ahead and just relax when guests arrive.
What makes this recipe different from the dozens of other cheesecake bars out there? It’s the texture combination—the crunchy graham cracker base, the silky no-bake cheesecake filling that’s neither too dense nor too airy, the tender apple topping that’s cooked just enough to soften without turning into mush, and that final drizzle of salted caramel that ties everything together. I tested this six times to get the ratios right, and let me tell you, my coworkers were not complaining about the leftovers. This isn’t just another version—it’s the version.
Honestly, this is the kind of dessert that makes you close your eyes after the first bite. It’s comfort food reimagined for busy lives—quicker, easier, but with the same soul-soothing satisfaction that fall desserts should bring.
What Ingredients You Will Need
This recipe uses simple, wholesome ingredients to deliver that big fall flavor without any fuss. Most of these are pantry staples, and the ones that aren’t are easy to find at any grocery store this time of year. Let me walk you through what you’ll need and why each one matters.
For the Crust
- 2 cups graham cracker crumbs (about 14-16 full sheets, crushed finely—I use a food processor for speed, but a ziplock bag and rolling pin work too)
- 1/2 cup unsalted butter, melted (salted butter works if that’s what you have, just skip the added salt in the crust)
- 1/4 cup granulated sugar (adds sweetness and helps the crust hold together)
- Pinch of salt (balances the sweetness—trust me, don’t skip it)
For the No-Bake Cheesecake Layer
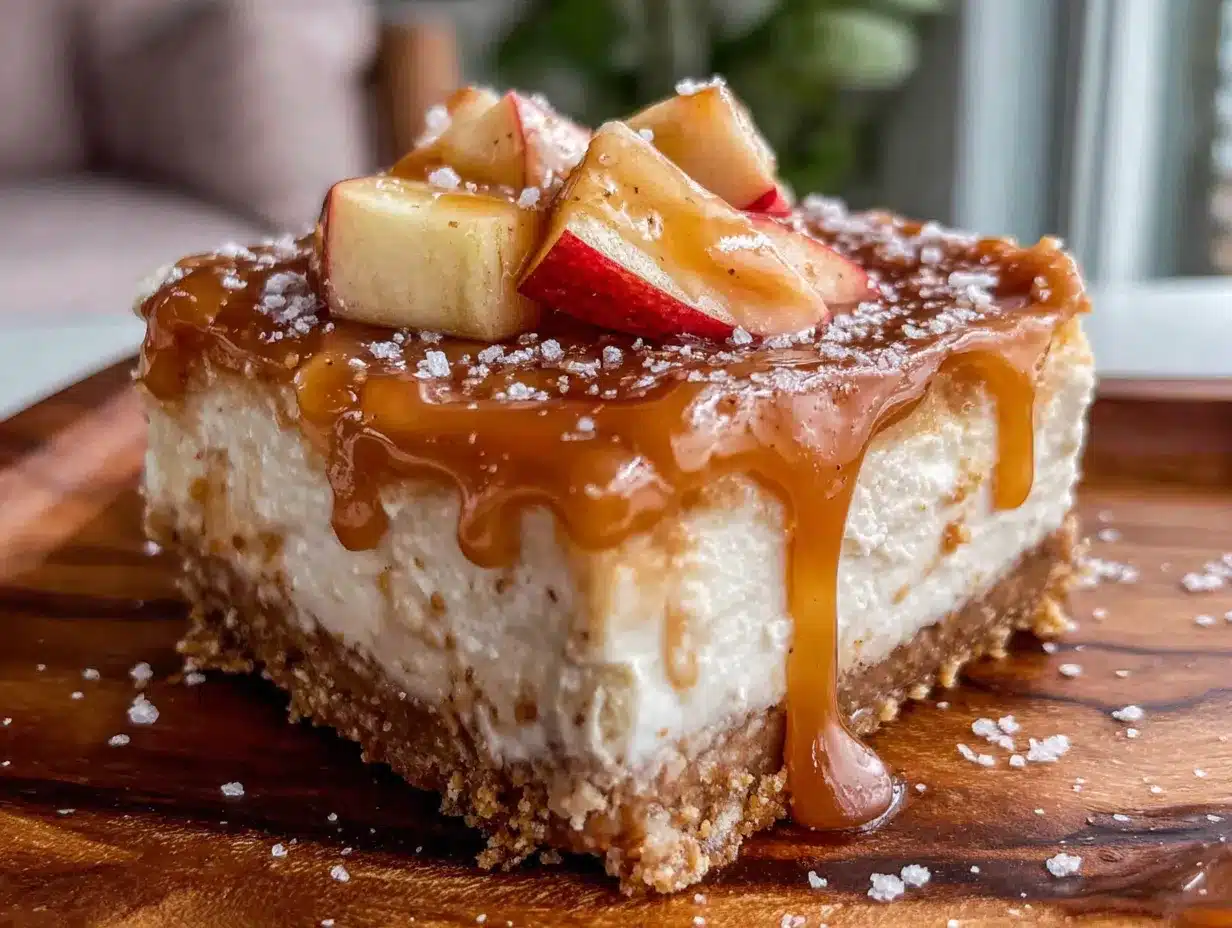
- 16 oz cream cheese, softened to room temperature (two standard blocks—this is non-negotiable for that silky texture; cold cream cheese creates lumps)
- 1/2 cup granulated sugar (just enough sweetness without overpowering the apples)
- 1 teaspoon vanilla extract (pure vanilla, not imitation—it makes a difference here)
- 1 cup heavy whipping cream (this is what makes the filling light and mousse-like instead of dense)
- 2 tablespoons powdered sugar (helps stabilize the whipped cream)
For the Apple Topping
- 3 medium apples, peeled, cored, and diced into 1/2-inch cubes (about 3 cups—I recommend Honeycrisp or Granny Smith for the best balance of sweet and tart; they hold their shape well when cooked)
- 2 tablespoons unsalted butter
- 1/4 cup brown sugar, packed (light or dark both work—dark gives a deeper molasses flavor)
- 1 teaspoon ground cinnamon (the star of fall baking, honestly)
- 1/4 teaspoon ground nutmeg (freshly grated if you’re feeling fancy)
- 1 tablespoon lemon juice (prevents the apples from browning and brightens the flavor)
- 1 tablespoon cornstarch mixed with 2 tablespoons water (this thickens the apple mixture so it’s not runny on top of the cheesecake)
For the Caramel Drizzle
- 1/2 cup store-bought or homemade caramel sauce (I personally love using homemade salted caramel sauce when I have time, but store-bought works beautifully—just warm it slightly so it drizzles smoothly)
- Flaky sea salt for finishing (optional but highly recommended—that sweet-salty contrast is everything)
A quick note on substitutions: If you need a gluten-free version, use gluten-free graham crackers or crushed gluten-free cookies. For a dairy-free option, use dairy-free cream cheese and coconut cream instead of heavy cream—just know the texture will be slightly different. And if you’re not a fan of cinnamon, you can reduce it or swap in apple pie spice instead.
Equipment Needed
One of the best things about these Easy No-Bake Caramel Apple Cheesecake Bars for Fall is that you don’t need any fancy equipment. Here’s what you’ll actually use:
- 9×9-inch square baking pan (an 8×8 works too, your bars will just be slightly taller—adjust chilling time by about 30 minutes)
- Parchment paper (for lining the pan—makes lifting the bars out so much easier; I learned this the hard way after my first batch stuck like glue)
- Food processor or ziplock bag and rolling pin (for crushing graham crackers—the processor is faster, but the bag method is oddly satisfying)
- Medium saucepan (for cooking the apple topping)
- Large mixing bowl (for the cheesecake filling)
- Hand mixer or stand mixer (you can whisk by hand for the cream cheese, but you really need electric beaters for the whipped cream unless you want a serious arm workout)
- Spatula (for spreading layers evenly—an offset spatula is my secret weapon for smooth tops)
- Sharp knife (for clean slices—run it under hot water and wipe between cuts for those Instagram-worthy bars)
If you don’t have a 9×9 pan, a 9-inch springform pan works beautifully and makes for dramatic presentation. Just make sure the sides are high enough. And honestly, I’ve made these in a disposable aluminum pan for picnics, and they turned out just fine.
Preparation Method
Alright, let’s get into the actual making of these beauties. I’ve broken this down into clear steps with all the little details that make the difference between good bars and unforgettable ones.
Step 1: Prepare the Pan
Line your 9×9-inch baking pan with parchment paper, leaving about 2 inches of overhang on two opposite sides. These become handles later—trust me, you’ll thank me when you lift the whole block of cheesecake out in one piece. Lightly grease the parchment with butter or cooking spray so nothing sticks.
Step 2: Make the Crust
In a medium bowl, combine 2 cups graham cracker crumbs, 1/4 cup granulated sugar, and a pinch of salt. Pour in 1/2 cup melted butter and stir with a fork until every crumb is moistened—it should look like wet sand. Press this mixture firmly into the bottom of your prepared pan. I use the bottom of a measuring cup to really pack it down flat. Pop this in the fridge while you work on the filling. (About 10 minutes, hands-on time: 5 minutes)
Step 3: Make the Apple Topping
In a medium saucepan over medium heat, melt 2 tablespoons butter. Add your diced apples (about 3 cups), 1/4 cup packed brown sugar, 1 teaspoon cinnamon, 1/4 teaspoon nutmeg, and 1 tablespoon lemon juice. Stir everything together and cook for 5-7 minutes, until the apples start to soften but still hold their shape. You want them tender, not mushy—think apple pie filling texture, not applesauce.
In a small bowl, whisk together 1 tablespoon cornstarch and 2 tablespoons water until smooth. Pour this into the apple mixture and stir constantly for about 1 minute—you’ll see it thicken up nicely. Remove from heat and let it cool completely. (About 10 minutes cooking, 20 minutes cooling. Hands-on time: 10 minutes)
Step 4: Make the Cheesecake Filling
In a large bowl, beat 16 oz softened cream cheese with 1/2 cup granulated sugar and 1 teaspoon vanilla extract until smooth and creamy. Scrape down the sides of the bowl halfway through—lumpy cream cheese is the enemy of good cheesecake bars. Set this aside.
In a separate bowl (chill it first if you remember—it helps the cream whip faster), pour in 1 cup heavy whipping cream and 2 tablespoons powdered sugar. Beat on medium-high speed until stiff peaks form—about 3-4 minutes. You’re looking for peaks that hold their shape when you lift the beaters, not droopy folds.
Now, gently fold the whipped cream into the cream cheese mixture. Use a spatula and a light hand—fold until just combined, no streaks of white remaining. Overmixing will deflate the cream and make your filling dense. (About 10 minutes total, hands-on time: 10 minutes)
Step 5: Assemble the Layers
Spread half of the cheesecake filling evenly over the chilled crust. Use an offset spatula or the back of a spoon to smooth it out. Spoon the cooled apple mixture over the filling, spreading it evenly. Then, dollop the remaining cheesecake filling on top and spread carefully—you want to cover the apples without mixing the layers together. It’s okay if a little apple peeks through; that’s rustic charm, not a flaw.
Drizzle about 1/4 cup of caramel sauce over the top and use a knife to swirl it gently into the surface. Don’t over-swirl or you’ll lose the distinct caramel ribbons. (About 10 minutes, hands-on time: 10 minutes)
Step 6: Chill and Set
Cover the pan with plastic wrap and refrigerate for at least 6 hours, but overnight is better. I know, I know—waiting is the hardest part. But this is where the magic happens. The crust firms up, the filling sets to a sliceable consistency, and the flavors meld together. If you try to cut them too early, you’ll end up with a delicious but messy situation. (Chilling time: 6-8 hours, hands-off)
Step 7: Slice and Serve
When you’re ready to serve, lift the bars out of the pan using the parchment handles. Place on a cutting board and use a sharp knife to slice into 9 or 16 squares (depending on how generous you’re feeling). For clean cuts, wipe the knife between each slice with a damp paper towel. Drizzle with remaining caramel sauce and sprinkle with flaky sea salt right before serving. (About 5 minutes, hands-on time: 5 minutes)
Cooking Tips & Techniques
After making these Easy No-Bake Caramel Apple Cheesecake Bars for Fall about a dozen times (I’m not exaggerating—my family staged a small intervention), I’ve picked up some tricks that make the process smoother and the results more consistent.
Room temperature cream cheese is not optional. I learned this the hard way when I was impatient and used cold cream cheese straight from the fridge. The filling turned out lumpy, and no amount of beating fixed it completely. Let your cream cheese sit on the counter for at least 30-60 minutes before starting. If you’re in a rush, cut it into cubes and microwave in 10-second bursts until just softened—not melted.
Don’t skip the cornstarch in the apple topping. The first time I made this, I thought I could get away without it. The apples released their juices, and the topping was watery, seeping into the cheesecake layer and making everything soggy. The cornstarch slurry thickens the juices into a beautiful, glossy coating that stays put.
Whip the cream to stiff peaks, not soft peaks. Soft peaks will deflate when you fold them into the cream cheese, giving you a denser filling. You want the cream to hold its shape firmly—when you lift the beaters, the peak should stand up straight without flopping over. This takes about 3-4 minutes with a hand mixer on medium-high speed.
Patience with chilling is the secret to success. I know it’s tempting to rush this step, but 6 hours is the minimum. Overnight is ideal. The bars need time to set properly so they slice cleanly. I once served these after only 4 hours, and they were delicious but messy—more of a cheesecake pudding situation than bars. Still got eaten, but not the presentation I was going for.
Use a hot knife for clean slices. Run your knife under hot water, dry it off, then slice. The heat helps the knife glide through the cheesecake without dragging. Wipe and reheat between each cut. This is the difference between clean, beautiful bars and sad, smeared ones.
One more thing—if your caramel sauce is too thick to drizzle, warm it in the microwave for 10-15 seconds. You want it pourable, not boiling. And if you’re using store-bought caramel, look for one that lists cream and butter as ingredients, not just corn syrup and artificial flavoring. The quality really shows.
Variations & Adaptations
One of the things I love about this recipe is how flexible it is. Here are some variations I’ve tried and loved:
Gluten-Free Version
Swap the graham crackers for gluten-free graham crackers or crushed gluten-free shortbread cookies. Everything else in the recipe is naturally gluten-free, so you’re good to go. I’ve used the Schär brand and couldn’t tell the difference.
Vegan Adaptation
Use dairy-free cream cheese (Miyoko’s or Violife work well), coconut cream instead of heavy whipping cream, and vegan butter. For the caramel, use a dairy-free caramel sauce. The texture will be slightly softer, so chill for the full 8 hours minimum. I made this for a vegan friend’s birthday, and she said it was the best dessert she’d had all year.
Low-Sugar Option
Use a sugar substitute like monk fruit sweetener or allulose in the crust and cheesecake filling. Skip the brown sugar in the apple topping and use a sugar-free caramel sauce. The apples will still provide natural sweetness, so it won’t taste sparse.
Flavor Twists
- Pumpkin Spice: Add 1/2 cup pumpkin puree and 1 teaspoon pumpkin pie spice to the cheesecake filling. Reduce the heavy cream by 2 tablespoons to compensate for the extra moisture.
- Chocolate Drizzle: Swap the caramel for melted dark chocolate and add a layer of chocolate ganache on top. This turns it into a turtle apple cheesecake bar situation, and it’s incredible.
- Pear and Ginger: Replace apples with ripe pears and add 1/2 teaspoon ground ginger to the topping. The warm, spicy notes pair beautifully with the creamy cheesecake.
Different Crust Options
Shortbread cookies, vanilla wafers, or even crushed gingersnaps all work as crust bases. Gingersnaps add a lovely spicy kick that complements the apples and caramel perfectly—I actually prefer this version for holiday gatherings.
Serving & Storage Suggestions
These Easy No-Bake Caramel Apple Cheesecake Bars for Fall are best served chilled, straight from the fridge. The cold temperature keeps the layers firm and distinct, and the flavors actually brighten as they warm slightly on the plate. I like to let them sit at room temperature for about 5 minutes before serving—just enough to take the chill off without losing structure.
Presentation ideas: Arrange the bars on a wooden board or white platter for that fall aesthetic. Drizzle extra caramel sauce over the top and sprinkle with flaky sea salt and a few chopped pecans or walnuts for crunch. A dusting of cinnamon looks gorgeous and adds a little aromatic pop. For individual servings, place each bar on a small plate with a dollop of whipped cream and a cinnamon stick for garnish.
What to serve with them: These bars are rich enough to stand alone, but they pair beautifully with a hot cup of apple cider, a spiced chai latte, or a strong black coffee. For a full fall dessert spread, serve alongside pumpkin spice latte cupcakes or a warm apple crisp. If you’re feeling extra indulgent, a scoop of vanilla bean ice cream on the side is never a bad idea.
Storage: Keep the bars in an airtight container in the refrigerator for up to 5 days. Place a sheet of parchment paper between layers if stacking. The crust will soften slightly over time, but the flavor actually improves after a day or two as everything melds together.
Freezing instructions: These freeze beautifully! Slice the bars and place them on a baking sheet lined with parchment paper. Freeze for 1-2 hours until solid, then transfer to a freezer-safe container or ziplock bag with parchment between layers. They’ll keep for up to 3 months. To serve, thaw in the refrigerator overnight or at room temperature for about 30 minutes. Drizzle with fresh caramel sauce after thawing—the frozen sauce can get a bit watery.
Reheating note: These are meant to be served cold, so no reheating needed. If you want a warm dessert experience, you can microwave individual bars for about 10-15 seconds—just enough to soften the cheesecake slightly without melting it completely.
Nutritional Information & Benefits
Let’s be real—these are a treat, not a health food. But knowing what’s in them helps you enjoy them mindfully. Here’s the approximate nutritional breakdown per bar (based on 9 servings):
| Nutrient | Amount Per Bar |
|---|---|
| Calories | 420-450 |
| Total Fat | 28g |
| Saturated Fat | 16g |
| Cholesterol | 85mg |
| Sodium | 320mg |
| Total Carbohydrates | 42g |
| Dietary Fiber | 2g |
| Sugars | 30g |
| Protein | 5g |
Health highlights: The apples provide a decent dose of fiber and vitamin C—about 10% of your daily needs per bar. Cinnamon has anti-inflammatory properties and may help with blood sugar regulation. The cream cheese and heavy cream offer calcium and protein, though obviously in moderation. And honestly? There’s something to be said for the mental health benefits of a truly satisfying dessert. Life’s short—enjoy the caramel.
Dietary considerations: This recipe contains dairy, gluten (unless modified), and eggs (if using homemade caramel with butter). It’s not suitable for vegans unless adapted as noted above. The sugar content is moderate for a dessert, but if you’re watching your intake, the low-sugar variation works well.
Conclusion
These Easy No-Bake Caramel Apple Cheesecake Bars for Fall are everything I want in a seasonal dessert—simple enough for a Tuesday, special enough for Thanksgiving, and so delicious that people will think you spent hours in the kitchen. The no-bake aspect is honestly a game-changer for busy fall days when you want something impressive without the oven running all afternoon.
I love that this recipe feels both familiar and fresh. It’s got that classic apple-and-caramel combo we all crave when the leaves start turning, but the creamy cheesecake layer and crunchy crust make it feel special. And the best part? You can tweak it endlessly—swap the apples for pears, add pumpkin spice, change up the crust, whatever your heart desires. That’s the beauty of a good base recipe.
I’d love to hear how yours turn out! Did you try a variation? Did your family devour them in one sitting (no judgment)? Drop a comment below and let me know—I read every single one, and your feedback helps me create better recipes for you. And if you loved these, share this post with a friend who needs a no-bake win this fall. Happy baking—well, no-baking!
Frequently Asked Questions
Can I use a different type of apple?
Absolutely! Honeycrisp and Granny Smith are my top picks because they hold their shape well and balance sweet and tart flavors. Fuji, Gala, or Braeburn also work great. Avoid Red Delicious—they get too mushy when cooked.
How far in advance can I make these bars?
You can make them up to 2 days ahead and keep them in the refrigerator. The flavors actually meld together nicely after a day. For best texture, add the final caramel drizzle and sea salt just before serving.
Can I use homemade caramel sauce?
Yes, and I actually recommend it if you have the time! Homemade salted caramel sauce takes about 15 minutes and tastes incredible. Just make sure it’s cooled slightly before drizzling so it doesn’t melt the cheesecake layer.
Why did my cheesecake filling turn out lumpy?
This usually happens when the cream cheese isn’t fully softened to room temperature. Cold cream cheese doesn’t blend smoothly, leaving tiny lumps throughout. Next time, let it sit out for at least 30 minutes, or microwave in 10-second bursts until soft but not warm.
Can I double this recipe for a larger crowd?
Yes! Double all ingredients and use a 9×13-inch baking pan. The chilling time may need to increase by 1-2 hours since the bars are thicker. You’ll get about 18-24 servings depending on how you slice them.
Pin This Recipe!
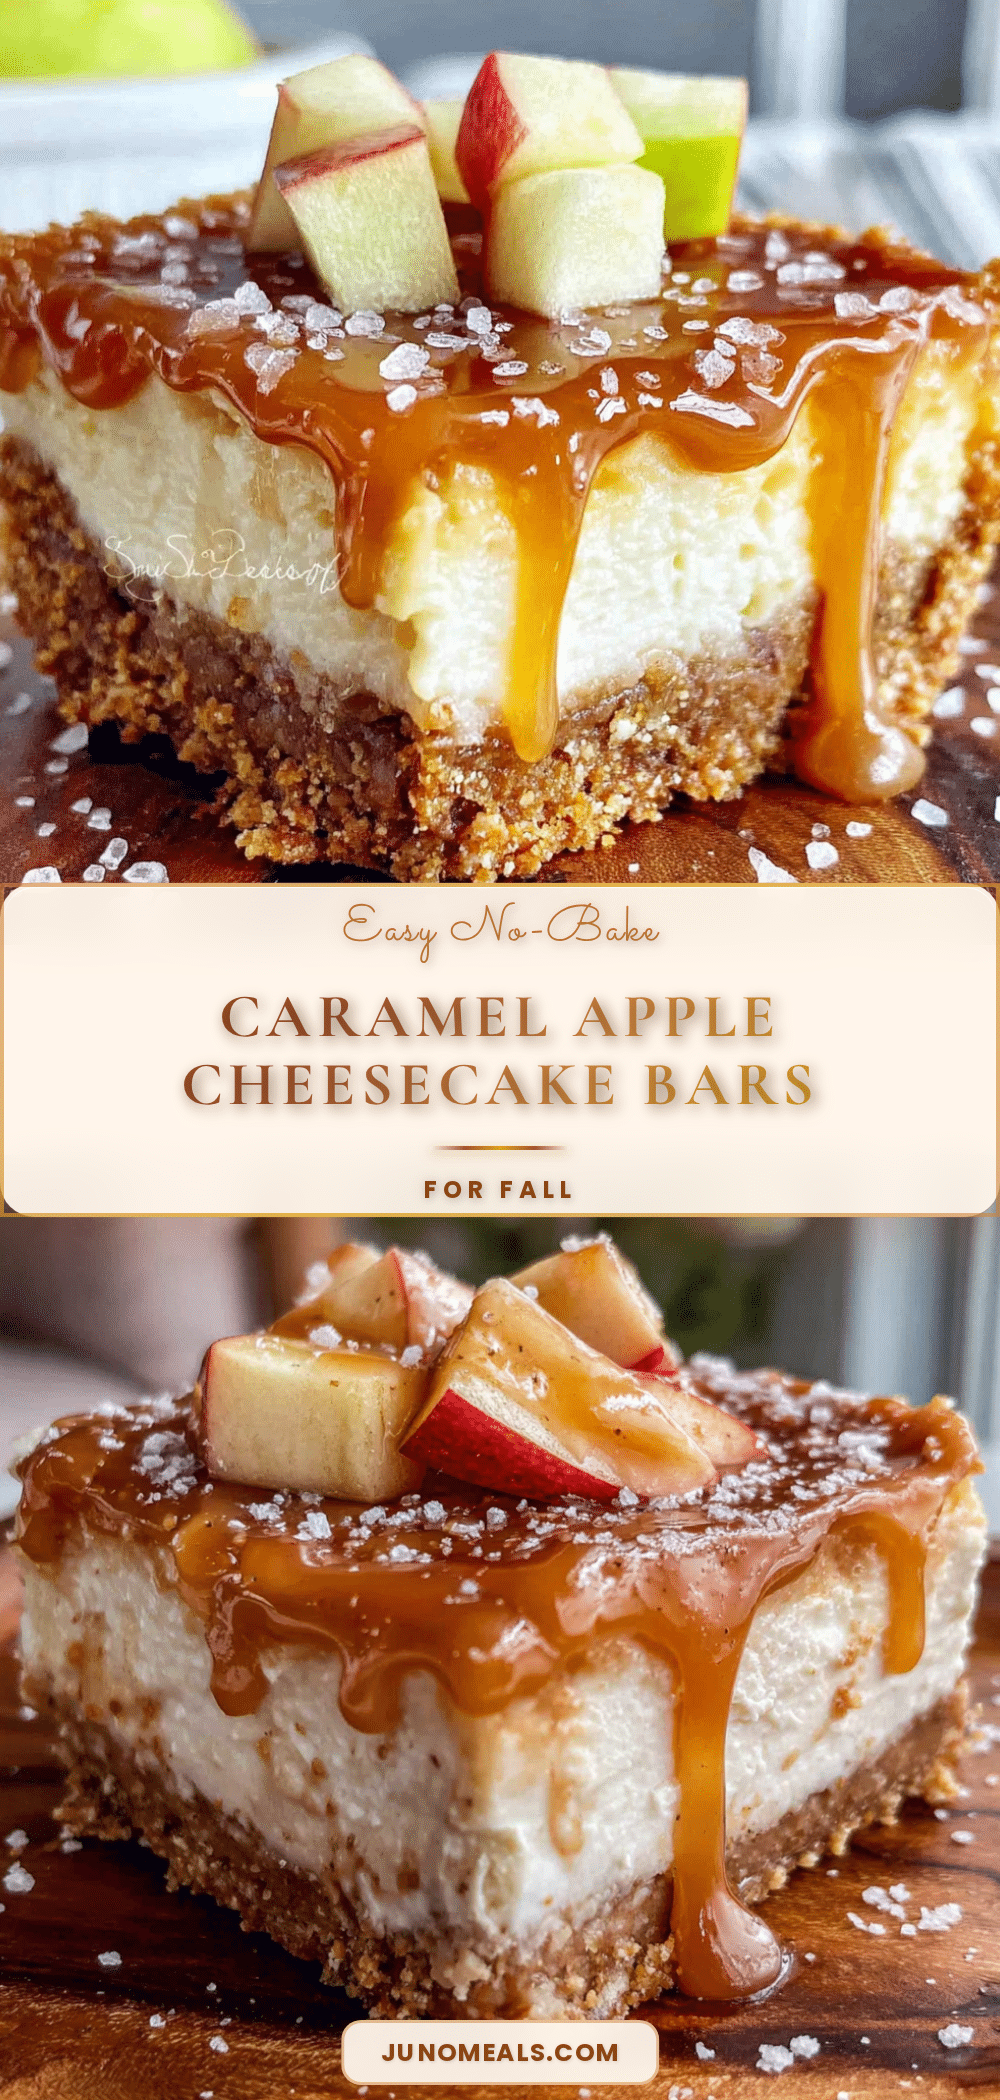
Easy No-Bake Caramel Apple Cheesecake Bars: Best Fall Dessert
These no-bake caramel apple cheesecake bars feature a buttery graham cracker crust, a silky cheesecake layer, tender apple topping, and a ribbon of caramel. Perfect for fall gatherings, they require no oven and can be made ahead.
- Prep Time: 30 minutes
- Cook Time: 15 minutes
- Total Time: 6 hours 45 minutes (includes chilling)
- Yield: 9 servings 1x
- Category: Dessert
- Cuisine: American
Ingredients
- 2 cups graham cracker crumbs (about 14–16 full sheets)
- 1/2 cup unsalted butter, melted
- 1/4 cup granulated sugar
- Pinch of salt
- 16 oz cream cheese, softened to room temperature
- 1/2 cup granulated sugar
- 1 teaspoon vanilla extract
- 1 cup heavy whipping cream
- 2 tablespoons powdered sugar
- 3 medium apples, peeled, cored, and diced into 1/2-inch cubes (about 3 cups)
- 2 tablespoons unsalted butter
- 1/4 cup brown sugar, packed
- 1 teaspoon ground cinnamon
- 1/4 teaspoon ground nutmeg
- 1 tablespoon lemon juice
- 1 tablespoon cornstarch mixed with 2 tablespoons water
- 1/2 cup store-bought or homemade caramel sauce
- Flaky sea salt for finishing (optional)
Instructions
- Line a 9×9-inch baking pan with parchment paper, leaving overhang on two sides. Lightly grease the parchment.
- In a medium bowl, combine graham cracker crumbs, 1/4 cup granulated sugar, and a pinch of salt. Pour in melted butter and stir until moistened. Press firmly into the bottom of the prepared pan. Refrigerate while making the filling.
- In a medium saucepan over medium heat, melt 2 tablespoons butter. Add diced apples, brown sugar, cinnamon, nutmeg, and lemon juice. Cook for 5-7 minutes until apples soften but still hold their shape.
- Stir in the cornstarch-water mixture and cook for 1 minute until thickened. Remove from heat and let cool completely.
- In a large bowl, beat cream cheese, 1/2 cup granulated sugar, and vanilla extract until smooth and creamy.
- In a separate chilled bowl, beat heavy whipping cream and powdered sugar on medium-high speed until stiff peaks form, about 3-4 minutes.
- Gently fold the whipped cream into the cream cheese mixture until just combined.
- Spread half of the cheesecake filling over the chilled crust. Spoon the cooled apple mixture over the filling, then dollop the remaining cheesecake filling on top and spread carefully.
- Drizzle about 1/4 cup of caramel sauce over the top and swirl gently with a knife.
- Cover and refrigerate for at least 6 hours, preferably overnight.
- Lift the bars out using the parchment handles. Slice into 9 or 16 squares using a sharp knife (run under hot water and wipe between cuts). Drizzle with remaining caramel sauce and sprinkle with flaky sea salt before serving.
Notes
Room temperature cream cheese is essential for a smooth filling. Don’t skip the cornstarch in the apple topping to prevent sogginess. Chill for at least 6 hours, preferably overnight, for clean slices. Use a hot knife for clean cuts.
Nutrition
- Serving Size: 1 bar (based on 9 se
- Calories: 420450
- Sugar: 30
- Sodium: 320
- Fat: 28
- Saturated Fat: 16
- Carbohydrates: 42
- Fiber: 2
- Protein: 5
Keywords: no-bake cheesecake bars, caramel apple dessert, fall dessert, easy cheesecake bars, apple cheesecake


