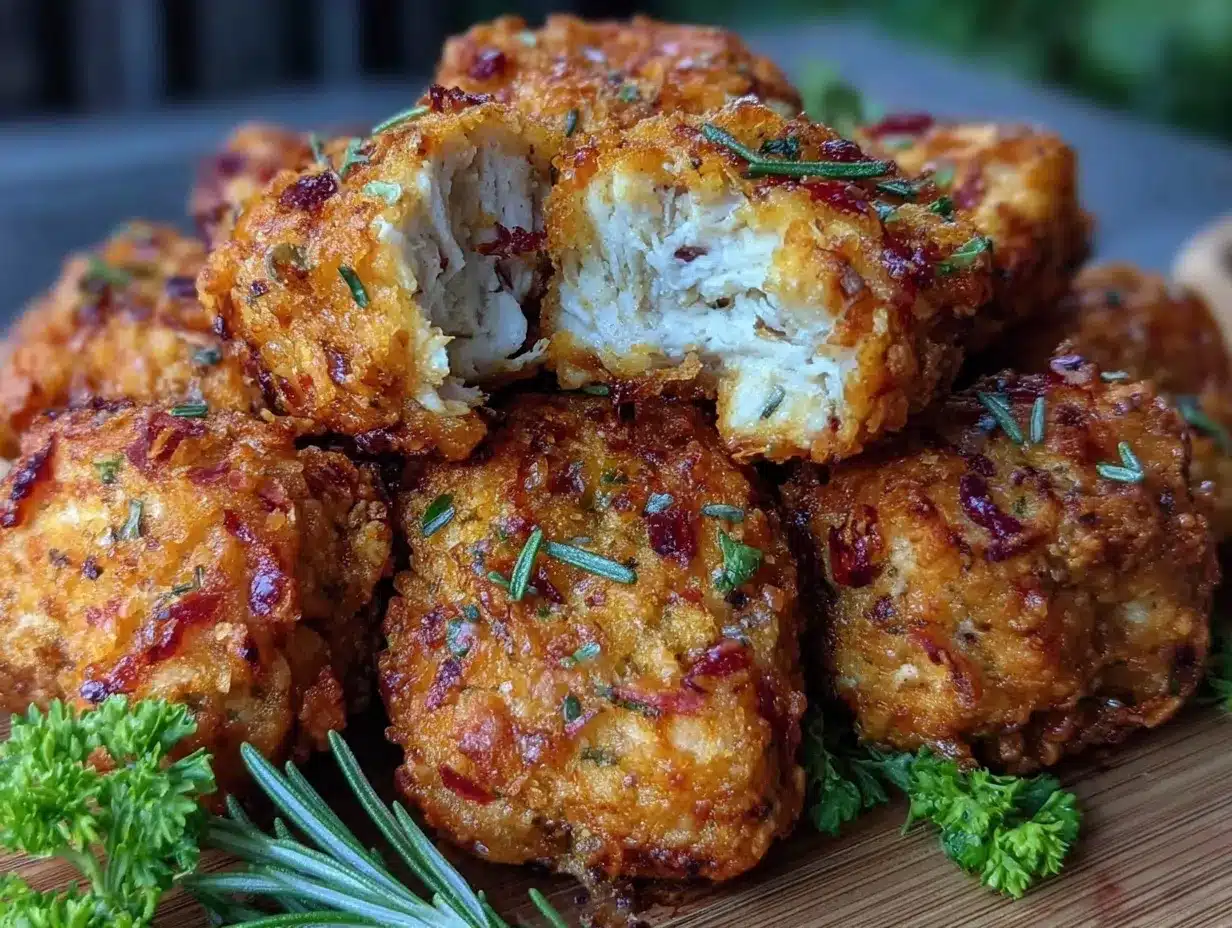
Let me tell you, the smell of golden, crispy chicken nuggets fresh out of the oven is enough to make anyone’s mouth water. The first time I baked these crispy homemade chicken nuggets, I was instantly hooked—the kind of moment where you pause, take a deep breath, and just smile because you know you’re onto something truly special. You know what? When I was knee-high to a grasshopper, chicken nuggets were always a treat from the local fast food joint, but years ago, I stumbled upon this recipe during a rainy weekend cooking adventure. I wish I’d discovered it much earlier because it’s dangerously easy and delivers pure, nostalgic comfort every single time.
My family couldn’t stop sneaking them off the cooling rack (and I can’t really blame them). Honestly, it’s perfect for potlucks, a quick sweet treat for your kids, or just brightening up your Pinterest cookie board with something savory and crispy. After testing the recipe multiple times—in the name of research, of course—it’s become a staple for family gatherings, gifting, and those days when you want something that feels like a warm hug. You’re going to want to bookmark this one.
Why You’ll Love This Recipe
Having tried countless chicken nugget recipes over the years, I can confidently say this crispy homemade chicken nuggets recipe stands out for many reasons. It’s not just another version—it’s your best version. Here’s why:
- Quick & Easy: Comes together in under 30 minutes, perfect for busy weeknights or last-minute cravings.
- Simple Ingredients: No fancy grocery trips needed; you likely already have everything in your kitchen pantry.
- Perfect for Any Occasion: Great for family dinners, kids’ lunchboxes, game day snacks, or casual get-togethers.
- Crowd-Pleaser: Always gets rave reviews from both kids and adults alike—no picky eaters here!
- Unbelievably Delicious: The perfect combo of crunchy exterior and juicy, tender chicken inside is next-level comfort food.
This recipe isn’t just good—it’s the kind that makes you close your eyes after the first bite. The secret? A perfectly balanced seasoning mix combined with a light breadcrumb coating that crisps up beautifully in the oven. Plus, baking instead of frying means less mess and a healthier twist without sacrificing texture or flavor. Whether you’re impressing guests without stress or turning a simple meal into something memorable, this recipe won’t let you down.
What Ingredients You Will Need
This recipe uses simple, wholesome ingredients to deliver bold flavor and satisfying texture without the fuss. Most of these are pantry staples, so no need to run to the store last minute.
- Chicken breasts: 2 large, boneless and skinless, cut into nugget-sized pieces (about 1.5-inch chunks)
- Buttermilk: 1 cup (adds tenderness and helps coating stick; substitute with milk + 1 tsp lemon juice if needed)
- All-purpose flour: 1 cup (for dredging; can swap for gluten-free flour blend)
- Breadcrumbs: 1.5 cups, preferably panko for extra crunch (I recommend Kikkoman for best texture)
- Parmesan cheese: ¼ cup, finely grated (adds savory depth)
- Garlic powder: 1 tsp
- Onion powder: 1 tsp
- Paprika: 1 tsp (smoky flavor boost)
- Salt and black pepper: To taste (about ½ tsp each)
- Cooking spray or olive oil: For coating the nuggets before baking (helps crispiness)
Optional add-ins:
- Chili powder or cayenne pepper for a spicy kick
- Fresh herbs like parsley or thyme mixed into the breadcrumbs for extra flavor
Equipment Needed
- Baking sheet – a rimmed cookie sheet works best to keep everything contained
- Wire rack – elevates nuggets for all-around crispiness; if you don’t have one, parchment paper works too
- Mixing bowls – at least two: one for the wet buttermilk, one for dry ingredients
- Measuring cups and spoons – for precise seasoning balance
- Tongs or fork – for coating nuggets without messy fingers
- Optional: kitchen thermometer – to check chicken doneness if you’re cautious (target internal temp 165°F / 74°C)
If you’re on a budget, a simple baking sheet lined with parchment paper will do the trick. I’ve tried both wire racks and straight baking sheets; the wire rack definitely ups the crisp factor. Keeping your equipment clean and dry helps the coating stick better—trust me, I learned that the hard way!
Preparation Method
- Preheat your oven to 425°F (220°C). Line a baking sheet with parchment paper and place a wire rack on top, if using. This setup helps the nuggets get crispy all around.
- Prepare the chicken: Cut 2 large, boneless chicken breasts into roughly 1.5-inch nugget-sized pieces. Try to keep them uniform so they cook evenly.
- Make the wet mixture: Pour 1 cup of buttermilk into a bowl. If you don’t have buttermilk, mix 1 cup milk with 1 teaspoon lemon juice and let it sit for 5 minutes.
- Mix the dry ingredients: In a separate bowl, combine 1 cup all-purpose flour, 1.5 cups panko breadcrumbs, ¼ cup grated Parmesan cheese, 1 teaspoon each of garlic powder, onion powder, and paprika, plus ½ teaspoon salt and black pepper. Stir well.
- Coat the chicken: Dip each chicken piece into the buttermilk, letting the excess drip off, then dredge thoroughly in the dry mixture. Press the coating onto the chicken so it sticks well.
- Arrange the nuggets: Place the coated nuggets on the wire rack or directly on the parchment-lined baking sheet. Make sure they’re spaced out for even cooking.
- Spray or drizzle oil: Lightly spray the nuggets with cooking spray or brush with olive oil. This step is key for that golden crunch.
- Bake for 18-22 minutes: Flip the nuggets halfway through baking to promote even browning. The nuggets should be golden brown and the internal temperature should reach 165°F (74°C).
- Let them rest: After baking, let the nuggets cool for 3-5 minutes on the rack. This helps the coating set and keeps them crispy.
Pro tip: If you notice the coating isn’t sticking well, double-dip the chicken in buttermilk and breadcrumbs before baking. Also, don’t overcrowd the baking sheet—that’s a rookie mistake that causes soggy nuggets. The smell when they’re done baking? Honestly, it’s downright irresistible.
Cooking Tips & Techniques
Here are some nuggets of wisdom (pun intended) from my kitchen adventures:
- Use panko breadcrumbs: They’re lighter and flakier than regular breadcrumbs, making your chicken nuggets extra crispy without heaviness.
- Don’t skip the buttermilk soak: It tenderizes the chicken and helps the coating stick better.
- Press the coating firmly: When dredging, press the breadcrumbs onto the chicken to avoid bare spots.
- Flip halfway through baking: This ensures both sides get that perfect golden crunch.
- Watch the oven temperature: Too low, and the nuggets get soggy; too high, and they might burn before cooking through.
- Use a wire rack: Elevating the nuggets lets air circulate and prevents steaming on the bottom.
- Let them rest: It might be tempting to dive in immediately, but a short rest keeps the crust crispy.
I remember the first time I skipped the flip step—it was a soggy disaster. Learned my lesson fast! Multitasking while these bake? Chop some fresh veggies or whip up a quick dipping sauce to save time.
Variations & Adaptations
This recipe is super flexible and can be tweaked to suit your tastes or dietary needs:
- Gluten-Free: Use gluten-free panko and flour blends to keep it crispy but safe for gluten-sensitive folks.
- Spicy Twist: Add cayenne pepper or chili powder to the breadcrumb mix for a little heat.
- Herby Flavor: Mix fresh chopped herbs like parsley, rosemary, or thyme into the coating for a fresh, aromatic boost.
- Air Fryer Option: Cook nuggets in an air fryer at 400°F (200°C) for 10-12 minutes, shaking halfway through, for ultra-crispy results with less oil.
- Dairy-Free: Swap buttermilk with dairy-free milk plus vinegar, and skip Parmesan or use a vegan cheese alternative.
One personal favorite variation I tried was adding smoked paprika and a dash of cumin to the coating—gave the nuggets a subtle smoky, earthy flavor that everyone loved!
Serving & Storage Suggestions
Serve your crispy homemade chicken nuggets warm, right out of the oven. They’re fantastic on their own, but pairing them with classic dipping sauces like honey mustard, ranch, or spicy sriracha mayo takes things up a notch. For sides, think fresh coleslaw, crunchy carrot sticks, or a simple green salad to balance the meal.
Leftovers? No problem. Store nuggets in an airtight container in the refrigerator for up to 3 days. To reheat, pop them in a preheated 375°F (190°C) oven for about 8-10 minutes—this helps restore their crispiness better than the microwave.
Freezing works well too. Flash freeze nuggets on a tray before transferring to a freezer-safe bag, then bake straight from frozen, adding a few extra minutes to cooking time. Flavors actually deepen a bit overnight, so leftovers can taste even better the next day.
Nutritional Information & Benefits
Each serving of these crispy homemade chicken nuggets offers a balanced mix of protein and carbs, making them a satisfying meal or snack. Using lean chicken breast means a good source of low-fat protein, essential for muscle repair and energy.
By baking instead of frying, this recipe cuts down on unnecessary oils and calories, making it a healthier choice for family meals. The use of Parmesan adds a bit of calcium and flavor without overwhelming the dish.
If you choose gluten-free alternatives, it becomes suitable for those with gluten sensitivities. Just keep in mind any dairy substitutions if you have allergies, and always check labels for hidden allergens.
Conclusion
In a nutshell, this crispy homemade chicken nuggets recipe is a winner for anyone craving that perfect balance of crunchy and juicy, without the fuss of deep frying. It’s quick, simple, and customizable to your taste buds. Honestly, I love this recipe because it brings back childhood memories while being a practical, wholesome meal for today’s busy lifestyle.
Feel free to experiment with flavors and share your own twists—I’d love to hear how you make it your own. Don’t forget to leave a comment or share this recipe with friends who need some crispy comfort food in their lives. Happy baking, and may your nuggets always come out perfectly golden!
FAQs
Can I use chicken thighs instead of breasts for this recipe?
Yes! Chicken thighs add more juiciness and flavor but may require slightly longer baking time due to higher fat content. Just ensure they reach an internal temp of 165°F (74°C).
How do I make these nuggets gluten-free?
Simply swap the all-purpose flour and panko breadcrumbs with certified gluten-free versions. The recipe works just as well and stays crispy.
Can I prepare the nuggets ahead of time and freeze them?
Absolutely. Freeze the breaded nuggets on a tray first, then transfer to a freezer bag. Bake from frozen, adding a few extra minutes to the cooking time.
What’s the best way to keep nuggets crispy after baking?
Use a wire rack during baking to allow air circulation and avoid soggy bottoms. Also, let them rest a few minutes after baking before serving.
Are these nuggets safe for kids?
Definitely! They’re made with simple, wholesome ingredients and baked instead of fried, making them a healthier option for little ones.
Pin This Recipe!
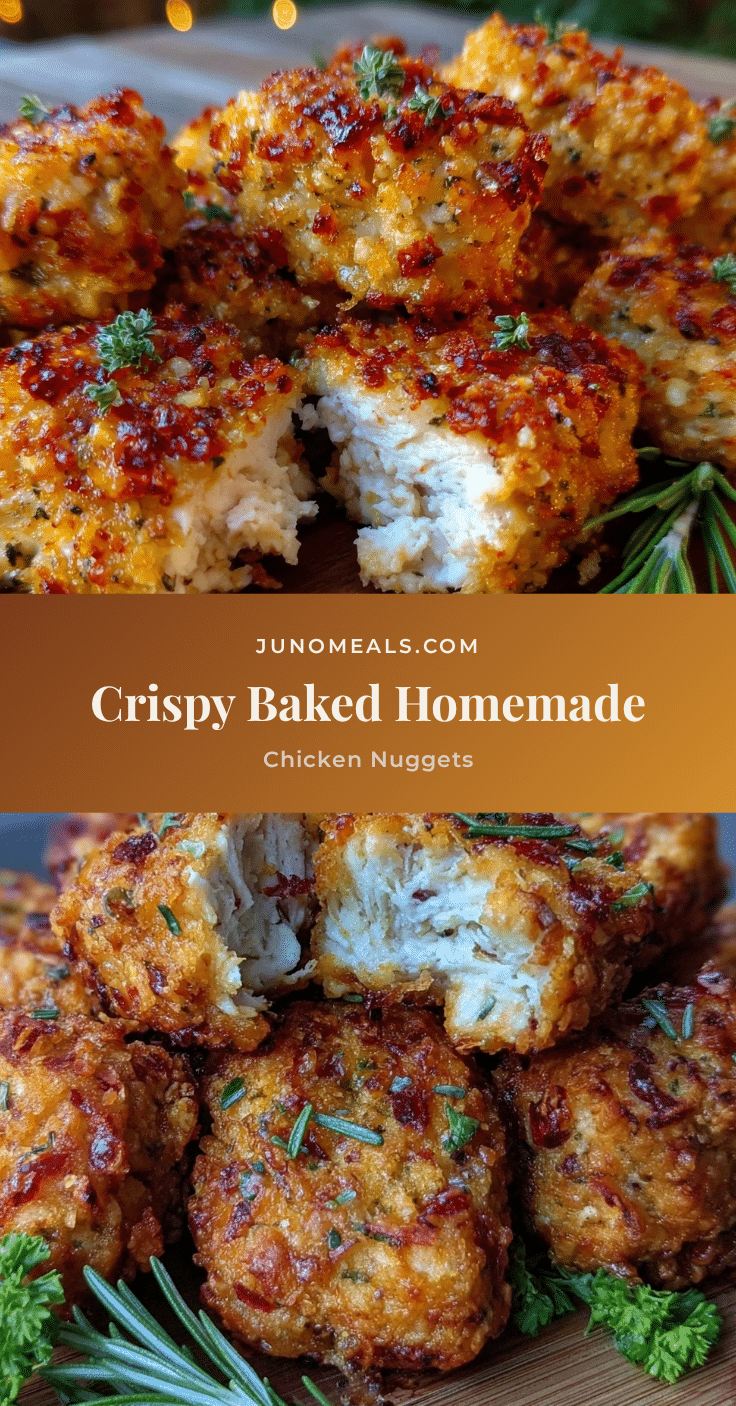
Crispy Homemade Chicken Nuggets Recipe Perfectly Baked and Easy to Make

These crispy homemade chicken nuggets are perfectly baked for a crunchy exterior and juicy interior, making them a healthier and easy-to-make alternative to fried nuggets. Ideal for family meals, snacks, and gatherings.
- Prep Time: 10 minutes
- Cook Time: 20 minutes
- Total Time: 30 minutes
- Yield: 4 servings 1x
- Category: Main Course
- Cuisine: American
Ingredients
- 2 large boneless, skinless chicken breasts, cut into 1.5-inch nugget-sized pieces
- 1 cup buttermilk (or 1 cup milk + 1 tsp lemon juice as substitute)
- 1 cup all-purpose flour (can substitute gluten-free flour blend)
- 1.5 cups panko breadcrumbs
- 1/4 cup finely grated Parmesan cheese
- 1 tsp garlic powder
- 1 tsp onion powder
- 1 tsp paprika
- 1/2 tsp salt
- 1/2 tsp black pepper
- Cooking spray or olive oil for coating
Instructions
- Preheat oven to 425°F (220°C). Line a baking sheet with parchment paper and place a wire rack on top if available.
- Cut chicken breasts into roughly 1.5-inch nugget-sized pieces, keeping them uniform.
- Pour buttermilk into a bowl. If using milk and lemon juice substitute, mix and let sit for 5 minutes.
- In a separate bowl, combine flour, panko breadcrumbs, Parmesan cheese, garlic powder, onion powder, paprika, salt, and black pepper. Stir well.
- Dip each chicken piece into the buttermilk, letting excess drip off, then dredge thoroughly in the dry mixture, pressing coating firmly onto chicken.
- Arrange coated nuggets on the wire rack or parchment-lined baking sheet, spaced out evenly.
- Lightly spray or brush nuggets with cooking spray or olive oil.
- Bake for 18-22 minutes, flipping halfway through, until golden brown and internal temperature reaches 165°F (74°C).
- Let nuggets rest on the rack for 3-5 minutes before serving to keep coating crispy.
Notes
For extra crispiness, double-dip the chicken in buttermilk and breadcrumbs. Avoid overcrowding the baking sheet to prevent soggy nuggets. Use a wire rack to allow air circulation. Let nuggets rest after baking to keep coating crispy. Variations include gluten-free, spicy, herby, dairy-free, and air fryer options.
Nutrition
- Serving Size: About 5-6 nuggets pe
- Calories: 320
- Sugar: 1
- Sodium: 450
- Fat: 10
- Saturated Fat: 3
- Carbohydrates: 25
- Fiber: 1
- Protein: 30
Keywords: chicken nuggets, homemade chicken nuggets, baked chicken nuggets, crispy chicken nuggets, easy chicken nuggets, family meal, kid-friendly, healthy chicken nuggets