My neighbor Kate wasn’t trying to impress anyone. I’d stopped by to borrow a whisk—mine had mysteriously vanished into the abyss of my kitchen drawers—and the smell hit me before I even got past her front door. It was that unmistakable, almost unfair combination of warm butter and melted chocolate, with something else underneath. Something chewy and caramel-like and just a little bit salty.
Kate was standing at her counter in sweatpants, dumping a pile of chopped-up candy bars into a bowl of cookie dough like it was the most normal thing in the world. She looked up, saw me hovering in her doorway, and just said, “Oh, these are just the Halloween leftovers. I make them every year so I don’t eat all the candy myself.” She said it like it was nothing. Like she hadn’t just created the most incredible-smelling thing I’d encountered in weeks.
I stood there holding her whisk—which I almost forgot to ask for—and watched her scoop the dough onto a baking sheet. There were pieces of Snickers and Twix and some crushed-up Reese’s cups all mixed in, and she wasn’t even measuring anything. She was just throwing candy in like it was chocolate chips. Honestly, I felt a little embarrassed by how impressed I was.
Maybe you’ve been there, staring at that bowl of half-eaten Halloween candy on November 1st, wondering what to do with it all. I’ve tried just hiding it in the back of the pantry, but let’s face it—I always find it. These cookies became my solution. They’re chewy, they’re loaded with leftover candy, and they turn your post-Halloween sugar stash into something that feels intentional. Deliberate. Like you planned it all along.
I’ve made these chewy Halloween candy cookies at least a dozen times since that afternoon at Kate’s house. They’ve become my go-to for fall gatherings, for using up the candy my kids collect but don’t actually finish, and honestly, for those nights when I want something sweet without overthinking it. The casualness of Kate’s approach is the whole point—this recipe was made like it was nothing, and that’s exactly why it works so well.
Why You’ll Love This Recipe
Let me tell you why these cookies have earned a permanent spot in my fall baking rotation. I’ve tested this recipe more times than I care to admit, tweaking the ratios and the bake times until everything landed just right. Here’s what makes them special:
- Quick & Easy: From start to finish, these come together in about 30 minutes. No chilling required, no complicated techniques. Perfect for when you need a cookie fix fast.
- Simple Ingredients: You probably have everything except the candy bars in your pantry right now. Butter, sugar, eggs, flour—the basics that make baking feel doable on a Tuesday night.
- Perfect for Post-Halloween: This is the ultimate way to use up those half-eaten candy bars sitting in your candy bowl. No more guilt about tossing perfectly good chocolate.
- Crowd-Pleaser: I’ve brought these to potlucks, to school events, and to casual get-togethers. They disappear faster than almost anything else I make. Kids and adults both go crazy for them.
- Unbelievably Chewy: The texture is the real star here. These cookies stay soft and chewy for days—if they last that long. The melted candy pieces create little pockets of gooey goodness that make every bite different.
What sets this recipe apart from other candy-loaded cookies? It’s the technique. Most recipes end up with cookies that spread too thin or turn out cakey. I’ve dialed in the butter-to-sugar ratio and the baking time to give you cookies that hold their shape, stay chewy in the center, and get just slightly crisp around the edges. Plus, I’ve figured out the best way to chop the candy bars so you get chocolate in every single bite without the pieces melting into a flat mess.
These aren’t just another cookie recipe. They’re the kind that makes you close your eyes after the first bite. The kind where you catch yourself reaching for a second one before you’ve even finished the first. They’re comfort food reimagined—a little indulgent, a little nostalgic, and exactly what you need when Halloween candy is taking over your kitchen.
What Ingredients You Will Need
This recipe uses simple, wholesome ingredients to deliver big flavor and that perfect chewy texture. Most of these are pantry staples you probably already have on hand. The star of the show, of course, is the leftover Halloween candy.
- Unsalted butter, softened — 1 cup (2 sticks or 226g). I prefer using unsalted so I can control the salt level. Let it sit out for about 30 minutes before you start baking. If you’re in a hurry, you can microwave it in 10-second bursts, but be careful not to melt it.
- Granulated sugar — ¾ cup (150g). This gives the cookies structure and helps them spread just the right amount.
- Light brown sugar, packed — ¾ cup (150g). This is the secret to that chewy texture. The molasses in brown sugar keeps cookies soft and adds a subtle caramel flavor that pairs beautifully with chocolate.
- Large eggs — 2, at room temperature. Room-temperature eggs incorporate more easily into the butter mixture, giving you a smoother dough. If you forgot to take them out early, place them in a bowl of warm water for 5 minutes.
- Vanilla extract — 2 teaspoons. Pure vanilla extract makes a difference here, but imitation works fine too. I recommend Nielsen-Massey if you want to splurge—it’s worth it for the depth of flavor.
- All-purpose flour — 2 ¼ cups (280g). Spoon and level your flour for the most accurate measurement. Scooping directly from the bag can pack in too much flour and make your cookies dry.
- Baking soda — 1 teaspoon. This helps the cookies spread and gives them a slightly chewy texture.
- Salt — ½ teaspoon. Don’t skip this. Salt balances the sweetness and makes the chocolate flavor pop.
- Leftover Halloween candy bars, chopped — 2 cups (about 300g). This is where you get creative. I recommend a mix of chocolate-based candy bars like Snickers, Twix, Reese’s cups, Milky Way, or Kit Kat. Avoid anything with a hard candy shell or very soft fillings that might melt completely. Chop them into roughly ½-inch pieces.
Ingredient Tips: For the best texture, use a mix of candy bars with different textures. Crunchy wafers, chewy caramel, and creamy chocolate all work together to create something special. I personally prefer using Snickers and Twix as my base, then adding whatever else I have on hand. If you’re using Reese’s cups, pop them in the freezer for 10 minutes before chopping—they cut much more cleanly that way.
Substitution Notes: You can substitute the all-purpose flour with a 1:1 gluten-free baking flour blend if needed. For a dairy-free version, use vegan butter and check that your candy bars are dairy-free (many dark chocolate options work well). If you don’t have leftover candy, you can use 2 cups of chocolate chips or chopped chocolate bars instead—though the texture won’t be quite as interesting.
Equipment Needed
You don’t need anything fancy to make these cookies. Here’s what I use:
- Large mixing bowl — For creaming the butter and sugars together. I prefer a glass or ceramic bowl, but anything works.
- Electric hand mixer or stand mixer — A hand mixer is totally fine here. A stand mixer with the paddle attachment makes things even easier, but honestly, you can do this by hand with a wooden spoon if you’re patient.
- Baking sheets — Two rimmed baking sheets work best so you can bake multiple batches. I use Nordic Ware aluminum sheets—they distribute heat evenly and don’t warp.
- Parchment paper or silicone baking mat — Parchment paper makes cleanup a breeze and prevents the cookies from sticking. Silicone mats work great too, though they can make cookies spread slightly less.
- Cookie scoop or tablespoon — A 1.5-tablespoon cookie scoop gives you evenly sized cookies that bake at the same rate. If you don’t have one, just use a regular tablespoon.
- Sharp knife and cutting board — For chopping the candy bars. A serrated knife works well for cutting through chocolate without shattering it.
- Wire cooling rack — Essential for letting your cookies cool evenly. If you don’t have one, you can let them cool on the baking sheet, but they’ll continue to cook from the residual heat.
Budget-Friendly Tip: You don’t need a stand mixer for this recipe. I’ve made these cookies using just a metal bowl and a sturdy whisk, then finished mixing the dough with a spatula. It takes a little more elbow grease, but the results are the same.
Preparation Method
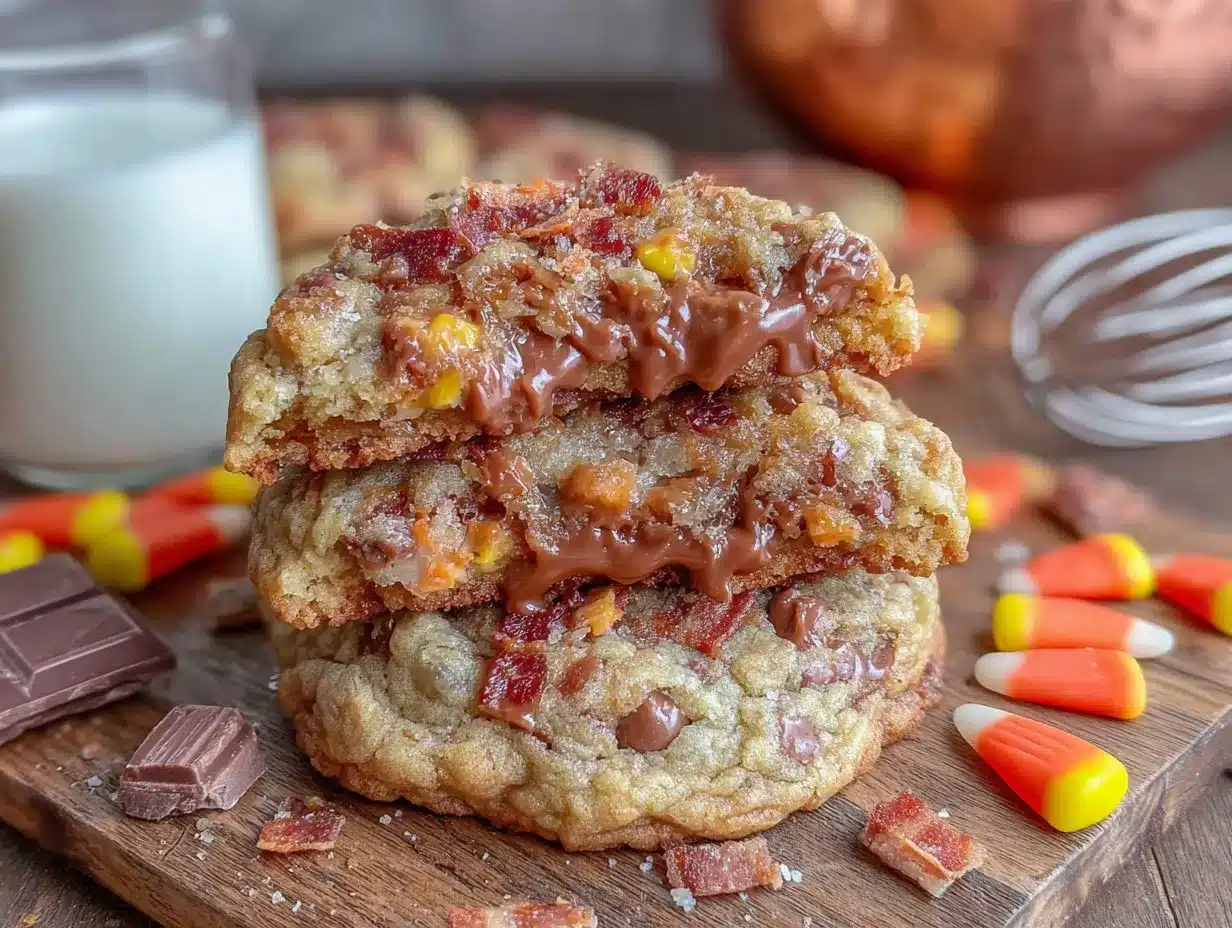
Let’s get to the fun part. Here’s how to make these chewy Halloween candy cookies step by step.
- Preheat your oven to 350°F (175°C). Line two baking sheets with parchment paper or silicone baking mats. This gives you a non-stick surface and makes cleanup practically effortless.
- Chop your candy bars. Take your leftover Halloween candy and chop it into roughly ½-inch pieces. Aim for a mix of sizes—some smaller bits that will melt into the dough, and some larger chunks that will stay intact. If you’re using candy bars with caramel, expect some stickiness. That’s fine. Just dust your knife with a little powdered sugar if things get too messy. Set the chopped candy aside.
- Cream the butter and sugars. In a large mixing bowl, combine the softened butter, granulated sugar, and packed brown sugar. Beat with an electric mixer on medium speed for 2-3 minutes until the mixture is light, fluffy, and pale in color. You want it to look like a thick, creamy paste. Scrape down the sides of the bowl with a spatula once or twice to make sure everything is incorporated.
- Add the eggs and vanilla. Crack both eggs into the butter mixture, then add the vanilla extract. Beat on medium speed for about 1 minute until everything is smooth and well combined. The mixture might look slightly curdled at this point—that’s okay, especially if your eggs were cold. It will come together once you add the dry ingredients.
- Mix the dry ingredients. In a separate medium bowl, whisk together the all-purpose flour, baking soda, and salt. This ensures the baking soda and salt are evenly distributed throughout the flour. If you skip this step, you might end up with a pocket of baking soda in one cookie—trust me, that’s not a pleasant surprise.
- Combine wet and dry ingredients. Gradually add the flour mixture to the butter mixture, about one-third at a time. Mix on low speed after each addition until just combined. Stop mixing as soon as you no longer see streaks of flour. Overmixing at this stage can make your cookies tough. The dough should be thick and slightly sticky.
- Fold in the chopped candy. Using a spatula or wooden spoon, gently fold the chopped candy bars into the dough. Make sure the candy is evenly distributed throughout. Don’t overmix here either—you want distinct pieces of candy, not a uniformly brown dough. If the dough feels too soft to handle, you can refrigerate it for 15 minutes, though it’s usually fine to scoop right away.
- Scoop the dough. Using a 1.5-tablespoon cookie scoop or a regular tablespoon, scoop rounded balls of dough onto your prepared baking sheets. Space them about 2 inches apart—these cookies spread a little, but not excessively. You should get about 24 to 28 cookies depending on how generous you are with your scooping.
- Bake the cookies. Place one baking sheet at a time on the center rack of your preheated oven. Bake for 10-12 minutes. The cookies are done when the edges are lightly golden and the centers look slightly underdone and puffy. They will continue to set as they cool on the baking sheet. For chewier cookies, bake on the shorter end. For slightly crisper edges, go closer to 12 minutes.
- Cool and transfer. Let the cookies cool on the baking sheet for 5 minutes. This step is important—the cookies are very soft when they come out of the oven, and trying to move them too soon will cause them to fall apart. After 5 minutes, transfer them to a wire cooling rack to cool completely. Or, you know, eat one warm. I won’t judge.
Sensory Cue: Your kitchen should smell like a bakery at this point. The cookies should look golden around the edges with slightly puffy, pale centers. The candy pieces will be melted and gooey, creating little pools of chocolate and caramel. If you see any candy pieces that look like they’re burning, your oven might be running hot—adjust the temperature down by 25 degrees for the next batch.
Troubleshooting Tip: If your cookies spread too much and turn into flat discs, your butter was probably too soft or your dough was too warm. Pop the scooped dough in the refrigerator for 20 minutes before baking. If they don’t spread enough, your flour measurement might have been too generous. Next time, spoon and level your flour rather than scooping it directly from the bag.
Cooking Tips & Techniques
I’ve made these cookies enough times to learn a few things the hard way. Here are my best tips for getting perfect results every time.
Chill the candy bars before chopping. This is a game-changer. Pop your candy bars in the freezer for 10-15 minutes before you chop them. They’ll cut much more cleanly, and you won’t end up with chocolate smeared all over your cutting board. This is especially helpful for candy bars with caramel or nougat fillings.
Don’t overmix the dough. I know I’ve said this already, but it’s worth repeating. Once you add the flour, mix only until the streaks disappear. Overmixing develops gluten, which makes cookies tough instead of tender. The same goes for folding in the candy—gentle strokes are all you need.
Use a mix of candy textures. The most successful batches I’ve made combine crunchy wafers (like Kit Kat or Twix), chewy caramel (like Milky Way or Snickers), and creamy chocolate (like Reese’s cups). Each texture behaves differently in the oven, creating a cookie that’s interesting from the first bite to the last.
Watch the bake time carefully. Ovens vary, and even a minute can make a big difference with these cookies. Start checking at 9 minutes. You want the edges to be set and golden, but the centers should still look slightly soft and puffy. They’ll continue to cook from the residual heat of the baking sheet after you pull them out. If you wait until the centers look fully done, they’ll be overbaked once they cool.
Let them cool properly. That 5-minute rest on the baking sheet isn’t optional. The cookies need that time to set up so they don’t fall apart when you move them. If you’re impatient like me, you can sneak one off the sheet after 3 minutes, but be prepared for it to crumble a little. Worth it, honestly.
Make ahead and freeze. This dough freezes beautifully. Scoop the dough balls onto a baking sheet, freeze until solid (about an hour), then transfer them to a freezer bag. You can bake them straight from frozen—just add 2-3 minutes to the bake time. This is perfect for when you want fresh cookies but don’t want to make the whole batch at once.
Variations & Adaptations
One of the best things about this recipe is how adaptable it is. Here are some variations I’ve tried and loved.
White Chocolate & Peppermint: Swap the assorted candy bars for chopped white chocolate and crushed peppermint candies. This is perfect for the holiday season, and the peppermint adds a refreshing contrast to the sweet, chewy cookie base.
Peanut Butter Lovers: Replace ¼ cup of the all-purpose flour with ¼ cup of peanut butter powder (or use ½ cup creamy peanut butter, reducing the butter by ¼ cup). Add 1 cup of chopped Reese’s cups and ½ cup of salted peanuts. The extra peanut flavor takes these cookies to another level.
Gluten-Free Version: Substitute the all-purpose flour with a 1:1 gluten-free baking flour blend that contains xanthan gum. I’ve had good results with Bob’s Red Mill 1:1 Baking Flour. The texture will be slightly more tender, but the cookies still hold together beautifully. Make sure your candy bars are also gluten-free—most plain chocolate bars are, but check the labels on anything with wafer or cookie components.
Vegan Adaptation: Use vegan butter (I like Miyoko’s or Earth Balance) and replace the eggs with flax eggs (2 tablespoons ground flaxseed mixed with 6 tablespoons water, let sit for 5 minutes). Most dark chocolate candy bars are vegan, but check labels for milk solids. The texture will be slightly less chewy, but still delicious.
Small Batch: Halve the recipe if you don’t want 2 dozen cookies staring at you from the counter. Use 1 egg (beat it first and use half), and reduce everything else by half. Bake time stays the same.
Serving & Storage Suggestions
These cookies are best served slightly warm, when the chocolate and caramel are still a little gooey. Let them cool for 5-10 minutes after baking, then serve them with a tall glass of cold milk or a hot cup of coffee. They’re also fantastic crumbled over vanilla ice cream for an impromptu sundae.
For a cookie platter: Arrange the cookies on a large plate or wooden board. They look beautiful next to other fall treats like pumpkin bars or apple cider donuts. The colorful candy pieces peeking out from the dough make them visually appealing without any extra effort.
Storage: Store baked cookies in an airtight container at room temperature for up to 5 days. Place a slice of bread in the container to keep them extra soft—the cookies will absorb moisture from the bread. Replace the bread slice every other day if you’re storing them longer.
Freezing: Baked cookies freeze well for up to 3 months. Layer them between sheets of parchment paper in a freezer-safe container. Thaw at room temperature for about 30 minutes, or warm them in a 300°F oven for 5 minutes for that fresh-baked feel.
Reheating: Pop a cookie in the microwave for 10-15 seconds to revive that warm, gooey texture. For a larger batch, place them on a baking sheet in a 300°F oven for 5 minutes. The caramel and chocolate will soften without the cookies getting too warm.
Flavor Development: Honestly, these cookies taste even better the next day. The flavors meld together as they sit, and the texture stays perfectly chewy. If you can resist eating them all on day one, you’re in for a treat on day two.
Nutritional Information & Benefits
Let’s be real—these are cookies, not health food. But I do think there’s something to be said for the simple pleasure of a homemade treat made with real ingredients. Here’s the estimated nutritional breakdown per cookie (based on 24 cookies):
| Nutrient | Amount per Cookie |
|---|---|
| Calories | 185 |
| Total Fat | 9g |
| Saturated Fat | 5g |
| Cholesterol | 28mg |
| Sodium | 115mg |
| Total Carbohydrates | 25g |
| Dietary Fiber | 1g |
| Sugars | 16g |
| Protein | 2g |
Dietary Considerations: This recipe contains gluten, dairy, and eggs. For allergen-friendly versions, see the variations section above.
Health Perspective: I’m not here to pretend cookies are a health food, but I do believe in the value of homemade treats made with intention. These cookies use real butter, real eggs, and real chocolate—ingredients you can recognize and feel good about. Plus, the portion control of a cookie (as opposed to eating straight from the candy bowl) helps keep things reasonable. Everything in moderation, right?
Conclusion
These chewy Halloween candy cookies have become a staple in my kitchen every fall, and I think they deserve a spot in yours too. They’re the perfect answer to that universal November problem: what to do with all that leftover candy. Instead of picking at it piece by piece until it’s gone, you can transform it into something intentional. Something that feels like you planned it all along.
I love this recipe because it’s forgiving. It doesn’t require precision or fancy techniques. You can throw in whatever candy you have, adjust the quantities based on what’s left in your bowl, and still end up with cookies that make people ask for the recipe. That’s the magic of a good base recipe—it works with you, not against you.
I’d love to hear what candy combinations you try. Do you stick with all chocolate, or do you throw in some fruity candies too? Have you tried freezing the dough for later? Drop a comment below and let me know how these turn out in your kitchen. And if you’re looking for another way to use up seasonal ingredients, you might enjoy my pumpkin chocolate chip cookies for another fall favorite.
Happy baking, and may your Halloween candy find a delicious second life!
Frequently Asked Questions
Can I use any type of Halloween candy for these cookies?
Most chocolate-based candy bars work well—Snickers, Twix, Reese’s cups, Milky Way, and Kit Kat are all great choices. Avoid candies with hard shells (like M&Ms) or very soft fillings that might melt completely. Gummy candies don’t work well either, as they become tough and rubbery when baked.
Why did my cookies spread too much?
This usually happens when the butter is too soft or the dough is too warm. Make sure your butter is softened but not melted. If your kitchen is warm, refrigerate the scooped dough for 20 minutes before baking. Also, check that you measured your flour correctly—too little flour can cause excess spreading.
Can I make the dough ahead of time?
Absolutely. You can refrigerate the dough for up to 48 hours before baking. Just scoop it into balls first, cover tightly with plastic wrap, and bake directly from the fridge. You might need to add 1-2 minutes to the bake time. The dough also freezes beautifully for up to 3 months.
How do I keep the cookies chewy for several days?
Store them in an airtight container with a slice of bread. The bread absorbs excess moisture and releases it slowly, keeping the cookies soft and chewy. Replace the bread slice every other day if the cookies last that long. Avoid storing them in a humid environment, which can make them soggy.
Can I use chocolate chips instead of candy bars?
Yes, you can substitute 2 cups of chocolate chips or chopped chocolate bars for the candy. However, the texture will be more uniform—you’ll lose the interesting pockets of caramel, wafer, and nougat that make these cookies special. If you’re using chocolate chips, I recommend adding ½ cup of chopped nuts or toffee bits for extra texture.
Pin This Recipe!

Chewy Halloween Candy Cookies: Best Use for Leftover Candy Bars

These chewy Halloween candy cookies are the perfect way to use up leftover candy bars. Loaded with chopped Snickers, Twix, and Reese’s cups, they’re quick, easy, and irresistibly delicious.
- Prep Time: 15 minutes
- Cook Time: 12 minutes
- Total Time: 27 minutes
- Yield: 24 cookies 1x
- Category: Dessert
- Cuisine: American
Ingredients
- 1 cup (2 sticks or 226g) unsalted butter, softened
- ¾ cup (150g) granulated sugar
- ¾ cup (150g) light brown sugar, packed
- 2 large eggs, at room temperature
- 2 teaspoons vanilla extract
- 2 ¼ cups (280g) all-purpose flour
- 1 teaspoon baking soda
- ½ teaspoon salt
- 2 cups (about 300g) leftover Halloween candy bars, chopped (such as Snickers, Twix, Reese’s cups, Milky Way, or Kit Kat)
Instructions
- Preheat your oven to 350°F (175°C). Line two baking sheets with parchment paper or silicone baking mats.
- Chop your candy bars into roughly ½-inch pieces. Set aside.
- In a large mixing bowl, cream together the softened butter, granulated sugar, and packed brown sugar with an electric mixer on medium speed for 2-3 minutes until light, fluffy, and pale.
- Add the eggs and vanilla extract. Beat on medium speed for about 1 minute until smooth and well combined.
- In a separate medium bowl, whisk together the all-purpose flour, baking soda, and salt.
- Gradually add the flour mixture to the butter mixture, about one-third at a time, mixing on low speed after each addition until just combined.
- Gently fold the chopped candy bars into the dough with a spatula until evenly distributed.
- Using a 1.5-tablespoon cookie scoop or tablespoon, scoop rounded balls of dough onto the prepared baking sheets, spacing them about 2 inches apart.
- Bake one sheet at a time on the center rack for 10-12 minutes, until edges are lightly golden and centers look slightly underdone and puffy.
- Let the cookies cool on the baking sheet for 5 minutes, then transfer to a wire cooling rack to cool completely.
Notes
For best results, chill candy bars in the freezer for 10-15 minutes before chopping. Don’t overmix the dough. Use a mix of candy textures for interesting pockets. Bake on the shorter end for chewier cookies. Let cookies cool on the baking sheet for 5 minutes before transferring.
Nutrition
- Serving Size: 1 cookie
- Calories: 185
- Sugar: 16
- Sodium: 115
- Fat: 9
- Saturated Fat: 5
- Carbohydrates: 25
- Fiber: 1
- Protein: 2
Keywords: Halloween cookies, chewy cookies, leftover candy, candy bar cookies, fall baking, easy cookie recipe


