Late October, and the only thing I want is a snack board that looks like it crawled out of a haunted house. The fog machine was already running in the living room, and I had a block of brie softening on the counter while my kid tested how many plastic spiders one person can reasonably own. That’s when it hit me—why not make the cheese look like it’s part of the decoration? I grabbed a tiny ghost-shaped cookie cutter I’d bought on a whim last year, pressed it into the brie, and suddenly had a little cheese ghost staring back at me. It was ridiculous. It was perfect.
This board came together in a panic (as most good Halloween ideas do) and ended up being the star of the party. People kept circling back for “just one more ghost,” even after the chips ran out. That’s the thing about a Spooky Halloween Charcuterie Board with Ghost Brie Bites—it’s equal parts creepy and delicious, and honestly, it’s the kind of recipe that makes you feel like a kitchen genius without actually working that hard. (My favorite kind.)
The best part? You don’t need to be a trained chef or a Pinterest pro to pull this off. If you can arrange things on a platter and cut cheese with a cookie cutter, you’re already there. So grab your board, dim the lights, and let’s make something spooky.
Why You’ll Love This Recipe
This isn’t just another snack board. It’s a conversation starter, a crowd-pleaser, and honestly, one of the easiest things you’ll make this Halloween season. Here’s why you’ll keep coming back to it:
- Quick & Easy: Comes together in under 20 minutes. No cooking required. Seriously—if you can unwrap cheese and arrange crackers, you can do this.
- Simple Ingredients: You probably already have most of these in your pantry. No weird specialty items that you’ll use once and forget about.
- Perfect for Halloween Parties: Whether it’s a kid-friendly gathering, a spooky movie night, or an adult costume party, this board fits right in.
- Crowd-Pleaser: I’ve served this at three different Halloween events now, and it’s always the first thing to disappear. Kids love the ghost shapes. Adults love the brie.
- Unbelievably Delicious: The creamy brie paired with salty crackers, sweet grapes, and tangy pickles? It’s the kind of flavor combination that makes you close your eyes after the first bite.
What makes this recipe different from all the other charcuterie boards out there? It’s the ghost brie bites. That one little detail transforms a standard snack spread into something memorable. Plus, I’ve tested this with multiple types of cheese, crackers, and fillings, so you’re getting the best version—not just a thrown-together afterthought.
This is comfort food reimagined for Halloween. It’s festive without being fussy, impressive without being stressful, and delicious without requiring hours in the kitchen. Honestly, that’s my favorite kind of recipe.
What Ingredients You Will Need
This Spooky Halloween Charcuterie Board with Ghost Brie Bites uses simple, pantry-friendly ingredients to deliver bold flavor and a creepy-cute presentation. Most of these are easy to find at any grocery store, and you can swap things out based on what you already have at home.
For the Ghost Brie Bites
- 1 wheel of brie cheese (8 oz) – Look for one that’s firm but not rock hard. Soft, ripe brie works best for clean ghost shapes. I prefer the brand Président for consistent texture.
- 1-2 tbsp honey (optional) – A light drizzle over the ghost brie adds sweetness and a subtle glow under candlelight. (Use vegan honey if needed.)
- Black sesame seeds or poppy seeds – For the ghost eyes. Just a tiny pinch per ghost.
- 1 small ghost-shaped cookie cutter – About 1.5 to 2 inches wide works best. You can find these at craft stores or online.
For the Charcuterie Board
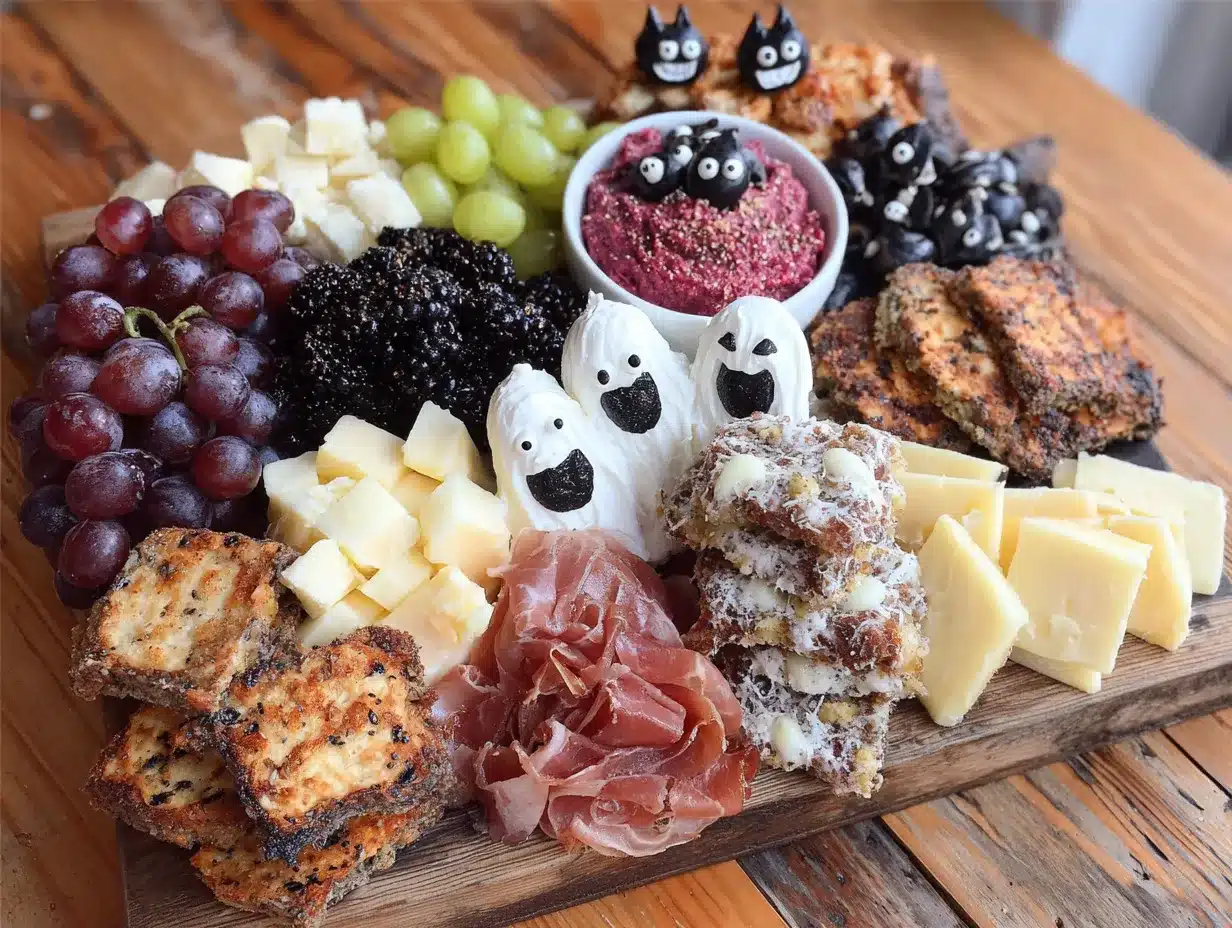
- 8-10 oz assorted cured meats – Prosciutto, salami, and pepperoni are all great options. I like to use a mix of textures. (Turkey or plant-based deli slices work too.)
- 1 cup assorted crackers – Choose a mix of plain, seeded, and flavored crackers for variety. Gluten-free crackers are fine.
- 1 cup fresh grapes (red or green) – Adds sweetness and a pop of color. Wash and pat dry before serving.
- 1/2 cup dried apricots or figs – Chewy, sweet, and perfect for balancing salty meats.
- 1/2 cup mixed nuts (almonds, walnuts, or pecans) – Adds crunch. Toasted nuts have more flavor.
- 1/4 cup pickled vegetables (cornichons, pickled onions, or pickled okra) – The acidity cuts through the richness of the cheese and meats.
- Fresh rosemary or thyme sprigs (for garnish) – Optional but makes the board look professional.
Substitution Guidance: If you’re dairy-free, use a plant-based brie-style cheese (Miyoko’s makes a good one). For a gluten-free board, swap crackers for rice cakes or gluten-free breadsticks. You can also swap the honey for maple syrup if you prefer.
I recommend sourcing your brie from a local cheese shop if you can—they often have fresher options than the grocery store. But honestly, the supermarket brie works just fine for this recipe.
Equipment Needed
- Large wooden or slate serving board – At least 12×18 inches to hold everything comfortably. A cutting board works in a pinch.
- Small ghost-shaped cookie cutter – Essential for the ghost brie bites. If you don’t have one, you can use a tiny knife to cut freehand ghosts.
- Cheese knife or small offset spatula – For spreading brie and arranging the board.
- Small bowls or ramekins – For holding honey, nuts, or pickles. Keeps things tidy.
- Paring knife – For cutting fruit and trimming cheese edges if needed.
- Tweezers or toothpicks – For placing the sesame seed eyes on the ghost brie. Sounds fiddly, but it’s worth it.
I’ve made this board with a cheap plastic cookie cutter from a Halloween costume store, and it worked beautifully. You don’t need fancy equipment—just a steady hand and a little patience.
Preparation Method
This Spooky Halloween Charcuterie Board with Ghost Brie Bites comes together in about 15-20 minutes. Here’s how to do it step by step.
- Prepare the ghost brie bites (5 minutes)
Place the wheel of brie on a cutting board. Using your ghost-shaped cookie cutter, press firmly into the brie and twist slightly. Lift the cutter and gently push the ghost out. Repeat until you’ve used most of the brie. You should get about 6-8 ghost shapes from one wheel. (Save the scraps for snacking or melting later.) - Add ghost faces (2 minutes)
Using tweezers or a toothpick, place two tiny black sesame seeds on each ghost for eyes. You can also add a small dot of honey to help them stick. Don’t stress if they’re not perfectly aligned—slightly crooked ghosts are actually cuter. - Arrange the meats (3 minutes)
Fold or roll the cured meats into loose piles or waves. Place them in clusters around the board, leaving space for the cheese and other items. I like to put the prosciutto in one corner and the salami in another for visual balance. - Add the crackers (2 minutes)
Arrange crackers in small groups or fan them out across the board. Mix plain and flavored crackers for variety. Leave gaps for the fruit and nuts. - Place the ghost brie bites (2 minutes)
Position the ghost brie bites in the center or along one side of the board. If you’re using honey, drizzle a tiny amount over the ghosts right before serving. (Do this just before guests arrive so the honey doesn’t soak in.) - Fill in with fruit, nuts, and pickles (3 minutes)
Scatter grapes, dried apricots, and mixed nuts in the empty spaces. Place the pickled vegetables in a small bowl or directly on the board. Tuck fresh rosemary or thyme sprigs around the edges for a professional look. - Final check and serve (1 minute)
Step back and look at your board. Add any missing items. Make sure the ghost brie bites are visible and not hidden behind crackers. Serve immediately at room temperature for best flavor.
Pro tip: If the brie is too soft and the ghost shapes are messy, refrigerate the brie for 15 minutes before cutting. Firmer cheese cuts cleaner.
Cooking Tips & Techniques
I’ve made this board at least a dozen times now, and I’ve learned a few things the hard way. Here are my best tips for getting it right every time.
Chill the brie first. The first time I made ghost brie bites, the cheese was too warm and the shapes came out looking like sad blobs. Pop the brie in the freezer for 10 minutes before cutting. It makes a huge difference.
Don’t overthink the arrangement. I used to stress about making everything look perfect, but honestly, a slightly messy board feels more inviting. Just group similar items together and leave some breathing room.
Use a sharp cutter. A dull cookie cutter will squish the brie instead of cutting it. If your cutter isn’t sharp, you can lightly oil the edges to help it slide through.
Keep wet ingredients separate. If you’re adding honey, drizzle it right before serving. If you add it too early, it’ll make the crackers soggy and the brie slide around.
Make extra ghosts. People will eat more than you expect. I usually make twice as many ghost brie bites as I think I need, and they still disappear.
Timing is everything. Assemble the board no more than 30 minutes before serving. Brie is best at room temperature, but crackers can get stale if left out too long.
I once forgot to chill the brie and ended up with ghost-shaped puddles. It still tasted great, but it didn’t look nearly as spooky. Learn from my mistakes.
Variations & Adaptations
This Spooky Halloween Charcuterie Board with Ghost Brie Bites is endlessly customizable. Here are some variations I’ve tried and loved.
Vegan Version
Swap the brie for a plant-based brie-style cheese (Miyoko’s is my go-to). Use vegan honey or maple syrup for the drizzle. Replace the cured meats with marinated mushrooms, roasted red peppers, or plant-based salami. Everything else stays the same.
Kid-Friendly Board
Skip the pickles and strong cheeses. Add more sweet items like apple slices, chocolate chips, or Halloween-themed fruit snacks. Use cheddar cheese cut into ghost shapes instead of brie (it’s firmer and easier for little hands).
Spicy Twist
Add a small bowl of hot honey for drizzling over the ghost brie. Include spicy salami or chorizo. Add pickled jalapeños or hot pepper rings for a kick. The heat pairs surprisingly well with the creamy brie.
Sweet & Savory Board
Add dark chocolate squares, caramel dip, or candied pecans alongside the savory items. The combination of sweet and salty is always a hit.
Gluten-Free Option
Use gluten-free crackers or rice cakes. Skip any crackers that contain wheat. Everything else on the board is naturally gluten-free.
I’ve made the vegan version for a friend with dairy allergies, and honestly, it was just as good as the original. Don’t be afraid to experiment.
Serving & Storage Suggestions
Serving Temperature: Serve the board at room temperature for the best flavor. Brie is most creamy and flavorful when it’s not straight from the fridge. Let the board sit out for about 20 minutes before serving.
Presentation: Arrange everything on a large wooden board or slate platter. If you’re serving a crowd, use two smaller boards instead of one big one. Place the ghost brie bites front and center so they’re the first thing people see.
Complementary Dishes: This board pairs beautifully with a crisp white wine like Sauvignon Blanc or a light red like Pinot Noir. For a non-alcoholic option, try sparkling apple cider or a spooky mocktail. If you’re serving this as part of a larger Halloween spread, it also works great alongside mini lemon blueberry cheesecakes for a sweet finish.
Storage: Leftovers can be stored in the refrigerator for up to 2 days. Keep the meats, cheese, and crackers in separate airtight containers to prevent sogginess. The ghost brie bites will lose their shape slightly, but they’ll still taste great.
Reheating: This board is served cold or at room temperature, so no reheating is needed. If you want to serve warm brie, you can pop the ghosts in the microwave for 10-15 seconds, but they’ll lose their shape.
Flavor Development: The flavors actually meld together beautifully after a few hours in the fridge. I’ve made the board a day ahead (minus the crackers and honey) and it was even better the next day.
Nutritional Information & Benefits
This Spooky Halloween Charcuterie Board with Ghost Brie Bites is naturally high in protein and healthy fats, making it a satisfying snack that won’t leave you crashing. Here’s an approximate breakdown per serving (based on 6 servings):
- Calories: 350-400
- Protein: 18-22g
- Fat: 24-28g (mostly from cheese and nuts)
- Carbohydrates: 18-22g
- Fiber: 3-5g
- Sugar: 10-12g (from fruit and honey)
Health Benefits: Brie is a good source of calcium and protein. Nuts provide healthy fats and vitamin E. Grapes and dried fruit offer antioxidants and natural sweetness. The pickled vegetables add probiotics for gut health.
Dietary Considerations: This recipe can be made gluten-free, vegetarian, or vegan with simple substitutions. It’s naturally low-carb and keto-friendly if you skip the fruit and honey. Always check labels if you’re serving someone with food allergies.
Potential Allergens: Dairy (brie), tree nuts (almonds, walnuts), gluten (crackers).
I love that this board feels indulgent but isn’t actually that heavy. It’s the kind of snack that keeps you going through a long Halloween party without weighing you down.
Conclusion
Look, I get it—Halloween can be stressful. Between the costumes, the decorations, and the constant sugar rush, sometimes you just need something easy that still feels special. That’s exactly what this Spooky Halloween Charcuterie Board with Ghost Brie Bites is. It’s simple enough to throw together in 20 minutes, but impressive enough that everyone will think you spent hours on it.
I love this board because it brings people together. There’s something about gathering around a shared platter of snacks that makes any party feel more intimate and fun. And those little ghost brie bites? They never fail to make someone smile.
So go ahead and customize it however you like—swap the meats, change up the crackers, add your favorite Halloween candy. The beauty of a charcuterie board is that there are no rules. Just make it your own and enjoy every bite.
If you try this recipe, I’d love to hear about it. Leave a comment below and let me know how your board turned out. Did you add anything unexpected? Did the ghosts survive the party? Share your spooky creations—I can’t wait to see them.
Happy Halloween, and happy snacking!
Frequently Asked Questions
Can I make this board ahead of time?
Yes, you can prepare the components up to 24 hours in advance. Store the meats, cheese, crackers, and fruit in separate airtight containers in the refrigerator. Assemble the board no more than 30 minutes before serving for the best texture and presentation.
What if I can’t find a ghost-shaped cookie cutter?
No problem! You can use a small knife to cut freehand ghost shapes, or use any Halloween-themed cutter (pumpkin, bat, or skull shapes work great). If you don’t have any cookie cutters, just cut the brie into small squares or triangles—it’ll still taste amazing.
How do I prevent the ghost brie from sticking to the cookie cutter?
Lightly oil the inside of the cookie cutter with a neutral oil like avocado or grapeseed oil. You can also dip the cutter in cold water between cuts. Chilling the brie for 10-15 minutes before cutting also helps reduce sticking.
Can I serve this board for a non-Halloween party?
Absolutely. Just skip the ghost shapes and arrange the brie in a different pattern. You can use a flower-shaped cookie cutter for spring, a star for New Year’s, or just leave the brie whole. The board itself is versatile enough for any occasion.
What’s the best way to store leftover ghost brie bites?
Place leftover brie ghosts in an airtight container and refrigerate for up to 3 days. They’ll lose their shape slightly, but they’re perfect for melting on crackers or adding to a grilled cheese sandwich. Just don’t freeze them—the texture gets weird.
Pin This Recipe!
Best Easy Spooky Halloween Charcuterie Board with Ghost Brie Bites
A quick and easy Halloween charcuterie board featuring adorable ghost-shaped brie bites, cured meats, crackers, fruit, nuts, and pickles. Perfect for parties, movie nights, or any spooky gathering.
- Prep Time: 15 minutes
- Cook Time: 0 minutes
- Total Time: 15 minutes
- Yield: 6 servings 1x
- Category: Appetizer
- Cuisine: American
Ingredients
- 1 wheel of brie cheese (8 oz)
- 1–2 tbsp honey (optional)
- Black sesame seeds or poppy seeds (for ghost eyes)
- 1 small ghost-shaped cookie cutter
- 8–10 oz assorted cured meats (prosciutto, salami, pepperoni)
- 1 cup assorted crackers
- 1 cup fresh grapes (red or green)
- 1/2 cup dried apricots or figs
- 1/2 cup mixed nuts (almonds, walnuts, or pecans)
- 1/4 cup pickled vegetables (cornichons, pickled onions, or pickled okra)
- Fresh rosemary or thyme sprigs (for garnish, optional)
Instructions
- Prepare the ghost brie bites: Place the wheel of brie on a cutting board. Using your ghost-shaped cookie cutter, press firmly into the brie and twist slightly. Lift the cutter and gently push the ghost out. Repeat until you’ve used most of the brie. You should get about 6-8 ghost shapes from one wheel. Save the scraps for snacking or melting later.
- Add ghost faces: Using tweezers or a toothpick, place two tiny black sesame seeds on each ghost for eyes. You can also add a small dot of honey to help them stick. Slightly crooked ghosts are cuter.
- Arrange the meats: Fold or roll the cured meats into loose piles or waves. Place them in clusters around the board, leaving space for the cheese and other items.
- Add the crackers: Arrange crackers in small groups or fan them out across the board. Mix plain and flavored crackers for variety. Leave gaps for the fruit and nuts.
- Place the ghost brie bites: Position the ghost brie bites in the center or along one side of the board. If using honey, drizzle a tiny amount over the ghosts right before serving.
- Fill in with fruit, nuts, and pickles: Scatter grapes, dried apricots, and mixed nuts in the empty spaces. Place the pickled vegetables in a small bowl or directly on the board. Tuck fresh rosemary or thyme sprigs around the edges for a professional look.
- Final check and serve: Step back and look at your board. Add any missing items. Make sure the ghost brie bites are visible and not hidden behind crackers. Serve immediately at room temperature for best flavor.
Notes
Chill the brie for 10-15 minutes before cutting for cleaner ghost shapes. Assemble the board no more than 30 minutes before serving. Drizzle honey just before serving to prevent sogginess. Make extra ghost brie bites as they tend to disappear quickly.
Nutrition
- Serving Size: 1 serving (approxima
- Calories: 375
- Sugar: 11
- Sodium: 680
- Fat: 26
- Saturated Fat: 10
- Carbohydrates: 20
- Fiber: 4
- Protein: 20
Keywords: Halloween charcuterie board, ghost brie bites, spooky snack board, easy Halloween appetizer, party platter


