My husband had claimed to hate Halloween for years. The whole thing. The costumes, the decorations, the doorbell ringing every ten minutes. “It’s just an excuse to eat bad candy,” he’d grumble every October. Then last year, I made this Halloween snack mix “just for the kids” on a Tuesday afternoon when I was trying to use up the last of a bag of pretzels. I found him standing over the kitchen counter at 10 PM, eating it straight from the bowl with his fingers. “This isn’t Halloween food,” he said, mouth full. “This is just… good.” And honestly? He wasn’t wrong.
This budget-friendly Halloween snack mix started as a way to use up odds and ends from the pantry. You know that feeling when you have half a bag of cereal, some chocolate chips, and a few pretzels that are going stale? That was me. I needed something to keep the kids busy while I made dinner, and I wasn’t about to spend money on another bag of overpriced “spooky” snacks from the store. Let me tell you, the first batch was a mess. I used too much melted chocolate and everything turned into a sticky, sad clump. But the kids didn’t care. They ate it anyway, grinning with chocolate-covered teeth. And that’s when I realized I was onto something.
What makes this snack mix special isn’t fancy ingredients or complicated techniques. It’s the fact that you can throw it together in fifteen minutes with stuff you probably already have. Maybe you’ve been there—staring at a pantry full of half-empty boxes, wondering how to turn them into something the kids will actually eat. This is that recipe. It’s forgiving. It’s flexible. And it’s cheap. I mean, honestly, you can make a huge batch for under five dollars. Try doing that with a bag of pre-made Halloween mix from the store. I’ll wait.
So here it is. The snack mix that converted my Halloween-hating husband and has become our go-to for every October movie night, school party, and lazy afternoon. It’s proof that you don’t need to spend a lot of money or time to make something that feels special. And maybe it’ll change someone’s mind in your house too.
Why You’ll Love This Recipe
This isn’t just another snack mix recipe. After testing about twelve different versions (my family is very patient), I’ve landed on the one that works every single time. Here’s why it’s become a staple in our house:
- Quick & Easy: From start to finish, this takes about 15 minutes. No baking, no complicated steps. If you can stir, you can make this.
- Simple Ingredients: Everything comes from the pantry. No special trips to a craft store or fancy grocery store. I’m talking cereal, pretzels, chocolate chips—stuff you probably already have.
- Perfect for Halloween: Great for class parties, trick-or-treat alternatives, or just a fun snack while watching Hocus Pocus. The kids love the spooky shapes and colors.
- Crowd-Pleaser: I’ve brought this to three different school events and it disappeared every time. Parents ask for the recipe. Kids ask for seconds.
- Unbelievably Delicious: The combination of salty pretzels, sweet chocolate, and crunchy cereal is basically perfect. It’s that snack you keep reaching for long after you’re full.
What makes this different from other Halloween snack mixes? It’s not overloaded with candy. Most recipes dump in a bunch of cheap Halloween candy that gets stale and weird. Instead, I use simple chocolate chips and candy corn (which is already cheap) and let the cereal and pretzels do the heavy lifting. The result is a mix that’s balanced—not too sweet, not too salty, and not a sugar bomb that leaves your kids bouncing off the walls.
This recipe is also incredibly forgiving. You can swap ingredients based on what you have. You can make it with your kids without worrying about messing it up. And it keeps for weeks in an airtight container, which means you can make it ahead for parties. Honestly, it’s the kind of recipe that makes you feel like a genius with zero effort.
What Ingredients You Will Need
This recipe uses simple, affordable ingredients to create a snack mix that looks and tastes like you spent way more time and money than you actually did. Most of these are pantry staples you probably already have on hand.
- Chex cereal (or any similar crispy rice or corn cereal): This is the base of the mix. I prefer Rice Chex or Corn Chex because they stay crunchy and don’t get soggy. You can also use a store brand—honestly, they all work the same.
- Pretzel sticks or mini pretzels: The saltiness balances the sweetness. I like pretzel sticks because they look like little witch fingers, but mini pretzels work great too. If you only have regular pretzels, just break them into pieces.
- Halloween candy corn: This is optional but adds that classic Halloween look. You can find it at any grocery store for about two dollars. If you hate candy corn (I know some people do), you can skip it or use candy pumpkins instead.
- White chocolate chips or vanilla candy melts: This is what coats everything and makes it feel fancy. I use white chocolate chips from the baking aisle because they’re cheaper than candy melts. Ghirardelli white chocolate chips melt really smoothly, but any brand works.
- Orange and black sprinkles (optional): These make the mix look festive without any extra effort. You can find Halloween sprinkles at the dollar store for a buck.
- Mini chocolate chips or M&M’s: For color and extra chocolate flavor. I use mini chocolate chips because they’re cheaper, but Halloween-themed M&M’s are fun if they’re on sale.
- Pumpkin seeds (pepitas) or peanuts: Adds a little protein and crunch. If you’re making this for a school party, check for nut allergies first. Pumpkin seeds are a safe alternative and they look very Halloween-y.
- Optional: Dried cranberries or raisins: My kids actually like the tartness against the sweet chocolate. It’s not traditional, but it works. Leave them out if you’re a purist.
One thing I’ve learned: don’t skimp on the quality of the white chocolate. Cheap white chocolate chips sometimes have weird additives that make them seize up when melted. I’ve had good luck with Ghirardelli or even the store brand from Target. If you want to be extra safe, use vanilla candy melts from the craft store—they’re designed to melt smoothly.
For the cereal, I recommend Chex because it stays crunchy even after being coated in chocolate. Cheerios or other ring-shaped cereals can get soggy. If all you have is off-brand crispy rice cereal, that’s fine—just use it within a day or two before it starts to soften.
Equipment Needed
You don’t need any fancy equipment for this recipe. That’s part of the beauty of it. Here’s what you’ll need:
- Large mixing bowl: Go for the biggest one you have. You need room to stir everything without spilling. My favorite is a stainless steel bowl because it’s light and easy to clean, but any large bowl works.
- Microwave-safe bowl or double boiler: For melting the white chocolate. I use a glass measuring cup because the spout makes it easy to drizzle. If you don’t have a microwave, you can use a double boiler on the stove—just be careful not to overheat the chocolate.
- Spatula or wooden spoon: For stirring. A silicone spatula is great because you can scrape every last bit of chocolate out of the bowl.
- Baking sheet or large plate: For spreading the mix out to set. I line mine with parchment paper for easy cleanup. Wax paper works too, but parchment is better because it doesn’t stick.
- Parchment paper: Not strictly necessary, but it makes cleanup so much easier. If you don’t have it, you can spray the baking sheet with non-stick spray.
- Airtight container: For storing the finished mix. A large mason jar or a plastic container with a tight lid works perfectly.
If you don’t have a microwave, you can melt the white chocolate in a heatproof bowl set over a pot of simmering water. Just make sure the bowl doesn’t touch the water. I’ve also used a double boiler from a thrift store that cost me three dollars. It works great and looks fancy on the counter.
One tip: if you’re making this with kids, use a big bowl and expect some spills. It’s fine. The mix still tastes good even if it’s a little messy.
Preparation Method
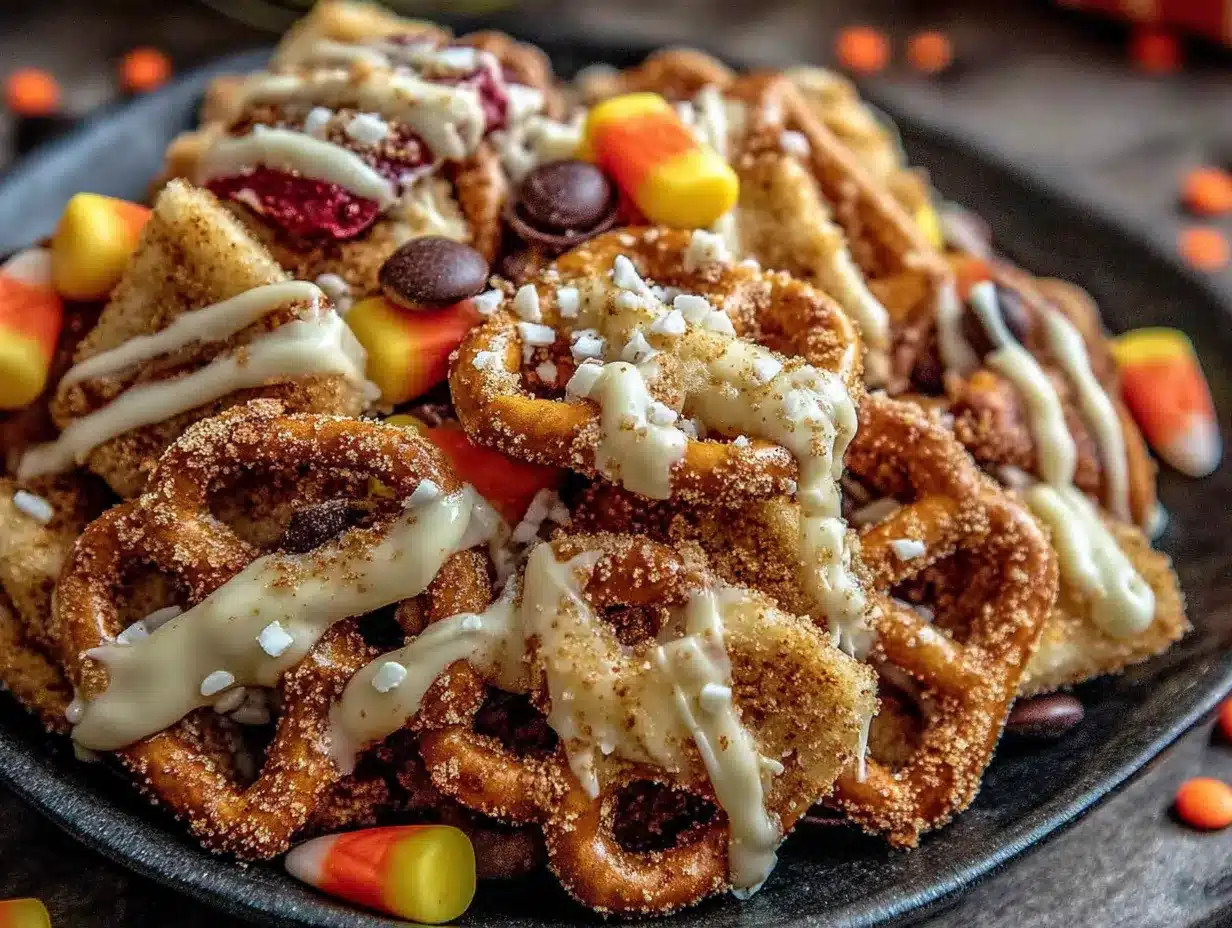
This recipe comes together in about 15 minutes. The hardest part is waiting for the chocolate to set. Here’s how to do it:
- Measure your cereal and pretzels: In a large mixing bowl, combine 4 cups of Chex cereal (about half a standard box) and 1 cup of pretzel sticks. If you’re using mini pretzels, use about 1.5 cups. Give everything a gentle stir to mix it up.
- Add the extras: Toss in 1/2 cup of candy corn (if using), 1/4 cup of pumpkin seeds or peanuts, and 1/4 cup of dried cranberries (if using). Stir again. This is where your kids can help—they love dumping things in and mixing.
- Melt the white chocolate: Place 1 cup of white chocolate chips in a microwave-safe bowl. Microwave in 30-second intervals, stirring after each, until smooth. This usually takes about 1.5 to 2 minutes total. Be careful not to overheat—white chocolate burns easily and gets grainy. If it starts to look lumpy, stop microwaving and stir vigorously. Sometimes it just needs a little extra stirring to come together.
- Pour and stir: Drizzle the melted white chocolate over the cereal mixture. Use a spatula to gently fold everything together until the cereal and pretzels are evenly coated. Don’t stir too hard or you’ll crush the cereal. You want every piece to have a little bit of chocolate on it.
- Spread it out: Line a baking sheet with parchment paper. Pour the coated mixture onto the sheet and spread it into an even layer. While it’s still wet, sprinkle 1/4 cup of mini chocolate chips (or M&M’s) and Halloween sprinkles over the top. Press them in gently so they stick.
- Let it set: Let the mix sit at room temperature for about 30 minutes, or until the white chocolate is firm. If you’re in a hurry, you can pop it in the fridge for 15 minutes. Just don’t leave it in too long or the cereal might get a little soft from condensation.
- Break it apart: Once the chocolate is set, break the mix into clusters. Some pieces will be stuck together—that’s fine. In fact, the clusters are the best part. My kids fight over the big ones.
A few things I’ve learned the hard way: First, don’t use a metal bowl in the microwave. I did that once and the sparks were terrifying. Second, if your white chocolate seizes up (gets thick and grainy), add a teaspoon of coconut oil or vegetable shortening and stir. It usually smooths right out. Third, this recipe is very forgiving. If you add too much chocolate, it’s still delicious—it just takes longer to set.
One more tip: if you’re making this for a class party, double the recipe. Trust me. It goes fast.
Cooking Tips & Techniques
After making this snack mix about fifteen times last October alone, I’ve picked up a few tricks that make the process smoother and the results better.
The biggest mistake people make is overheating the white chocolate. I did this on my third batch and ended up with a grainy, clumpy mess that looked like cottage cheese. White chocolate is delicate. It burns at a lower temperature than regular chocolate. Always use 30-second intervals in the microwave and stir between each. If you’re using a double boiler, keep the water at a gentle simmer, not a rolling boil. The steam should be barely visible.
Another common issue is soggy cereal. This happens when you add too much melted chocolate or when you stir too aggressively. The cereal absorbs the chocolate and loses its crunch. To avoid this, use just enough chocolate to lightly coat everything. You don’t need to drown it. I aim for a thin, even coating that leaves some of the cereal still visible. If you accidentally use too much chocolate, add a little more dry cereal to balance it out.
For the best texture, let the mix set completely before storing. If you put it in a container while it’s still warm, the steam will make everything soft. I learned this the hard way when I was rushing to make a batch for a school party. The next day, the mix was chewy instead of crunchy. Still tasted good, but not as good as it could have been.
Timing strategy: Make this in the morning before school or work. Let it set during the day, then break it apart and store it in the evening. That way it’s ready for the next day’s party or movie night. If you’re making it the night before, leave it uncovered on the counter overnight to ensure it stays crunchy.
One last tip: If you’re adding sprinkles, do it immediately after pouring the mix onto the baking sheet. Once the chocolate starts to set, the sprinkles won’t stick. I learned this when I got distracted by a phone call and ended up with sprinkles rolling off the mix and onto the counter. Not a disaster, but definitely less festive.
Variations & Adaptations
This recipe is incredibly flexible. Here are some variations I’ve tried and loved:
Nut-Free Version: Simply omit the peanuts and pumpkin seeds. Add extra pretzels or cereal instead. This makes the mix safe for school parties where nut allergies are a concern. My son’s school has a strict no-nut policy, so this is our go-to.
Chocolate Lovers Version: Use dark or milk chocolate instead of white chocolate. Melt 1 cup of chocolate chips and proceed with the recipe. You can also add chocolate-covered pretzels or chocolate candies for extra richness. My husband prefers this version—he says it’s less sweet and more satisfying.
Spicy-Sweet Version: Add 1/2 teaspoon of cinnamon and a pinch of cayenne pepper to the melted chocolate. The warmth of the spices pairs surprisingly well with the sweet and salty flavors. I made this for a Halloween party and got rave reviews from the adults. The kids didn’t notice the spice at all.
Gluten-Free Version: Use gluten-free pretzels and a gluten-free crispy rice cereal. Most Chex cereals are already gluten-free, but check the label to be sure. This version tastes exactly the same as the original—nobody will know the difference.
Vegan Version: Use dairy-free white chocolate chips and skip the candy corn (which often contains gelatin). You can find vegan white chocolate at most health food stores. Add extra dried fruit for sweetness instead.
My personal favorite variation is the “Fall Harvest” version. I swap the Halloween sprinkles for autumn-colored ones (orange, yellow, brown) and add dried apple pieces and roasted pumpkin seeds. It’s perfect for Thanksgiving snacking or fall gatherings. I made this for a Friendsgiving party last year and it was gone within an hour.
Serving & Storage Suggestions
This snack mix is best served at room temperature. The chocolate is firm but not hard, and the cereal stays perfectly crunchy. If you’ve stored it in the fridge, let it sit out for about 10 minutes before serving to take the chill off.
Presentation ideas: For Halloween parties, serve the mix in a large pumpkin-shaped bowl or a cauldron. You can also portion it into small cellophane bags tied with orange and black ribbon for party favors. My kids love taking these to school for their classmates. For a movie night, just pile it into a big bowl and let everyone dig in.
What goes well with it: This mix pairs beautifully with apple cider or hot chocolate. It’s also great alongside a cheese board—the sweet and salty flavors complement sharp cheddar or creamy brie. For a full Halloween spread, serve it with caramel apples, popcorn balls, and pumpkin-shaped cookies.
Storage instructions: Store the mix in an airtight container at room temperature for up to 2 weeks. Do not refrigerate—the moisture in the fridge can make the cereal soft. If you live in a humid climate, add a silica gel packet (the kind that comes in shoe boxes) to the container to absorb excess moisture. It sounds weird, but it works.
Freezing instructions: You can freeze this mix for up to 3 months. Place it in a freezer-safe bag or container, squeeze out as much air as possible, and seal. To thaw, let it sit at room temperature for about 30 minutes. The texture might be slightly softer than fresh, but it’s still delicious.
Flavor development: Honestly, this mix tastes best after it’s been sitting for a day. The flavors meld together and the chocolate sets perfectly. If you can, make it the day before you plan to serve it. Your future self will thank you.
Nutritional Information & Benefits
I’m not a nutritionist, but I can tell you what’s in this mix and let you decide. For a 1/2 cup serving (about a handful), here’s the approximate breakdown:
- Calories: 180-220 (depending on mix-ins)
- Fat: 8-10g (mostly from chocolate and seeds)
- Carbohydrates: 28-32g
- Protein: 3-4g
- Fiber: 1-2g
- Sugar: 12-16g
This mix isn’t health food, but it’s not junk food either. The whole grains from the cereal provide some fiber and complex carbs. The pumpkin seeds add protein, healthy fats, and magnesium. The pretzels offer a little salt to balance the sweetness. And the white chocolate… well, that’s just for fun.
Dietary considerations: This recipe can be made gluten-free, nut-free, and vegan with simple substitutions. It contains dairy (from the white chocolate) unless you use a dairy-free alternative. The candy corn may contain gelatin, so check the label if you’re serving vegetarians or vegans.
My personal take: This is a treat, not a meal. I don’t stress about the nutritional content because my kids are active and eat balanced meals otherwise. But I do appreciate that this mix has less sugar than most Halloween candy and actually has some nutritional value from the whole grains and seeds. It’s a compromise I feel good about.
Conclusion
This budget-friendly Halloween snack mix is proof that you don’t need to spend a lot of money or time to create something special. It’s the recipe that changed my husband’s mind about Halloween and has become a tradition in our house. The kids love helping make it. I love that it uses up pantry odds and ends. And everyone loves eating it.
I hope you’ll try this recipe and make it your own. Add your favorite mix-ins. Adjust the sweetness to your taste. Make it with your kids and let them get messy. That’s the beauty of this snack mix—it’s forgiving, flexible, and always delicious.
I’d love to hear how it turns out for you. Did your family love it? Did you try a fun variation? Leave a comment below and let me know. And if you’re looking for more easy, budget-friendly recipes, check out my easy Halloween treats and kid-friendly snacks for more ideas. Happy snacking!
Frequently Asked Questions
Can I use milk chocolate instead of white chocolate?
Absolutely. Milk chocolate or dark chocolate both work great. Just melt them the same way—in 30-second intervals in the microwave. The flavor will be richer and less sweet, which some people prefer. My husband actually likes the milk chocolate version better.
How long does this snack mix stay fresh?
Stored in an airtight container at room temperature, it stays fresh for up to 2 weeks. After that, the cereal starts to soften slightly. It’s still safe to eat, just not as crunchy. I recommend making it within a week of when you plan to serve it for the best texture.
Can I make this without candy corn?
Yes. Candy corn is optional. If you don’t like it or can’t find it, just leave it out. You can add extra chocolate chips, dried fruit, or even popcorn to make up the volume. The mix will still be delicious and Halloween-themed with the sprinkles and orange colors.
My white chocolate seized up. Can I fix it?
Yes, don’t panic. Add 1 teaspoon of coconut oil or vegetable shortening to the seized chocolate and stir vigorously. The fat will help smooth it out. If it’s still clumpy, add another teaspoon. This trick has saved me more times than I can count.
Can I double this recipe?
Definitely. This recipe doubles beautifully. Just make sure you have a big enough bowl and a large enough baking sheet to spread everything out. If you’re making a double batch, melt the white chocolate in two separate batches to avoid overheating it. Store the extra in an airtight container or freeze it for later.
Pin This Recipe!

Best Budget-Friendly Halloween Snack Mix: Kid-Approved & Easy
This budget-friendly Halloween snack mix is a quick and easy treat made with pantry staples like cereal, pretzels, and white chocolate. It’s perfect for parties, movie nights, or a fun Halloween snack that kids and adults love.
- Prep Time: 15 minutes
- Cook Time: 0 minutes
- Total Time: 45 minutes (including setting time)
- Yield: 8 servings 1x
- Category: Snack
- Cuisine: American
Ingredients
- 4 cups Chex cereal (or similar crispy rice or corn cereal)
- 1 cup pretzel sticks (or 1.5 cups mini pretzels)
- 1/2 cup Halloween candy corn (optional)
- 1/4 cup pumpkin seeds (pepitas) or peanuts
- 1/4 cup dried cranberries or raisins (optional)
- 1 cup white chocolate chips or vanilla candy melts
- 1/4 cup mini chocolate chips or Halloween M&M’s
- Orange and black sprinkles (optional)
Instructions
- In a large mixing bowl, combine 4 cups of Chex cereal and 1 cup of pretzel sticks. If using mini pretzels, use about 1.5 cups. Stir gently.
- Add 1/2 cup candy corn (if using), 1/4 cup pumpkin seeds or peanuts, and 1/4 cup dried cranberries (if using). Stir again.
- Place 1 cup of white chocolate chips in a microwave-safe bowl. Microwave in 30-second intervals, stirring after each, until smooth (about 1.5 to 2 minutes total). Be careful not to overheat.
- Drizzle the melted white chocolate over the cereal mixture. Use a spatula to gently fold everything together until evenly coated.
- Line a baking sheet with parchment paper. Pour the coated mixture onto the sheet and spread into an even layer. While still wet, sprinkle 1/4 cup of mini chocolate chips (or M&M’s) and Halloween sprinkles over the top. Press them in gently.
- Let the mix sit at room temperature for about 30 minutes, or until the white chocolate is firm. For faster setting, refrigerate for 15 minutes.
- Once set, break the mix into clusters. Store in an airtight container.
Notes
Don’t overheat the white chocolate; use 30-second intervals. If chocolate seizes, add 1 teaspoon of coconut oil or vegetable shortening and stir. For best texture, let mix set completely before storing. Can be made ahead and stored for up to 2 weeks.
Nutrition
- Serving Size: 1/2 cup
- Calories: 200
- Sugar: 14
- Sodium: 180
- Fat: 9
- Saturated Fat: 5
- Carbohydrates: 30
- Fiber: 1
- Protein: 3
Keywords: Halloween snack mix, budget-friendly, kid-friendly, easy snack mix, white chocolate snack mix, Halloween treats


