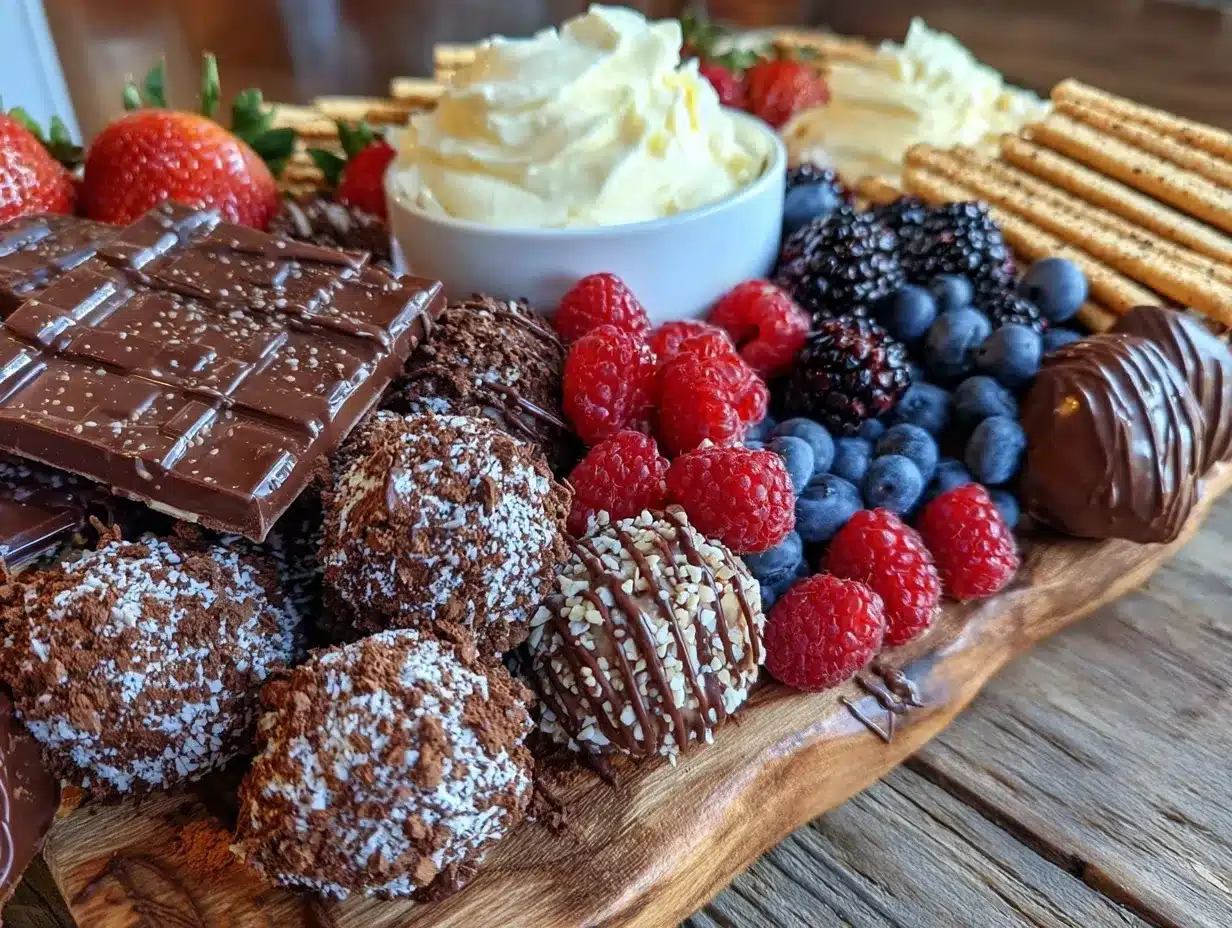
Let me tell you, the sight of a perfect dessert charcuterie board with chocolate spread out before you is enough to make anyone’s mouth water. The rich, glossy sheen of dark chocolate truffles nestled beside colorful berries and crunchy nuts creates a feast for the eyes and the taste buds alike. The first time I put together one of these boards, I was instantly hooked—the kind of moment where you pause, take a deep breath, and just smile because you know you’re onto something truly special.
Years ago, when I was knee-high to a grasshopper, dessert was all about simple cookies or a slice of pie. But stumbling upon the idea of a dessert charcuterie board on a rainy weekend changed everything. It felt like a grown-up way to celebrate sweet treats, mixing textures and flavors in a way that’s dangerously easy and endlessly fun. Honestly, my family couldn’t stop sneaking pieces off the board while it was cooling (and I can’t really blame them).
You know what makes this perfect dessert charcuterie board with chocolate stand out? It’s not just the chocolate (though that’s a huge part), but the way it brings together everything from salty to sweet, creamy to crunchy, in one beautiful display. Whether you’re looking for an easy crowd-pleaser for your next gathering or a sweet treat to brighten up your Pinterest cookie board, this dessert charcuterie board delivers pure, nostalgic comfort with zero fuss. After testing this recipe multiple times—in the name of research, of course—it’s become a staple for family gatherings, gifting, and those moments when you just want to feel like you’re indulging in a warm hug.
Why You’ll Love This Recipe
When it comes to entertaining, nothing beats the charm and versatility of a perfect dessert charcuterie board with chocolate. Here’s why you’ll find yourself turning to this recipe again and again:
- Quick & Easy: Comes together in under 30 minutes, perfect for last-minute gatherings or those unexpected guests.
- Simple Ingredients: No need for fancy grocery store runs—you probably have most of these goodies tucked away in your pantry or fridge.
- Perfect for Entertaining: Whether it’s a cozy dinner party, holiday celebration, or casual get-together, this board fits right in.
- Crowd-Pleaser: Kids and adults alike can’t get enough of the mix of chocolate, fresh fruit, and crunchy delights.
- Unbelievably Delicious: The combination of velvety chocolate, tart berries, and salty nuts hits all the right notes.
This is not just any dessert board. I’ve tested various chocolate brands and found that using a mix of dark, milk, and white chocolates adds layers of flavor that keep everyone intrigued. Plus, the subtle sprinkle of sea salt on some of the chocolate pieces creates that irresistible sweet-salty dance on your tongue. It’s comfort food with a twist—fast, fuss-free, yet feels like a fancy treat. You’re going to want to bookmark this one for your next party or even a quiet night in when you feel like spoiling yourself.
What Ingredients You Will Need
This dessert charcuterie board uses simple, wholesome ingredients to deliver bold flavor and satisfying texture without the fuss. Most are pantry staples or easy to grab during your weekly shop.
- Chocolates (choose a variety):
- Dark chocolate squares or chunks (70% cocoa recommended for richness)
- Milk chocolate pieces (adds creaminess and sweetness)
- White chocolate bark or chips (for a contrasting color and mild flavor)
- Fresh Fruits:
- Strawberries, halved (bright and juicy)
- Raspberries (tart pop)
- Seedless grapes (for freshness)
- Blueberries (small bursts of sweetness)
- Nuts & Seeds:
- Roasted almonds (for crunch)
- Cashews (creamy texture)
- Pistachios, shelled (adds color and flavor)
- Sweet Treats & Extras:
- Mini marshmallows (soft and fluffy)
- Caramel drizzle or caramel-filled chocolates (optional, adds gooey richness)
- Chocolate-covered pretzels (salty-sweet combo)
- Dips & Spreads:
- Nutella or chocolate hazelnut spread (for dipping)
- Honey or maple syrup (drizzle for extra sweetness)
- Extras:
- Fresh mint leaves (for garnish and freshness)
- Sea salt flakes (to sprinkle over chocolate pieces for contrast)
If you want to switch things up, almond flour crackers or gluten-free pretzels make great crunchy bases. I personally love to pick up Valrhona chocolate when I’m feeling fancy—it melts beautifully and has a depth of flavor that’s unmatched. For seasonal variations, swap fresh berries for dried fruits like apricots or figs in winter months. And if you need dairy-free options, opt for dark chocolate that’s vegan-friendly and swap Nutella for a coconut-based spread.
Equipment Needed
Assembling a dessert charcuterie board doesn’t require fancy tools, which is part of its appeal. Here’s what you’ll want to have on hand:
- Serving Board or Platter: A large wooden cutting board or a flat platter works perfectly. I’ve used everything from bamboo boards to marble slabs—each brings its own charm.
- Small Bowls or Ramekins: For dips, spreads, and tiny treats like marshmallows or nuts.
- Sharp Knife: To slice fruits and chop some chocolate pieces if needed. A serrated knife helps with softer fruits.
- Tongs or Small Serving Spoons: For guests to grab dips and smaller items hygienically.
- Optional: Parchment Paper: To line the board if you want to keep it extra tidy or protect delicate surfaces.
If you don’t have a fancy wooden board, don’t sweat it—any large plate or tray will do. I’ve also used tiered cake stands for a vertical display that’s perfect for limited table space. Just remember to clean your boards well after using chocolate to avoid staining; a quick scrub with warm soapy water usually does the trick.
Preparation Method
- Prepare the Board Surface: Start by selecting a clean, flat serving board (around 16” x 12” or larger). If you want, line it with parchment paper for easy cleanup. This step takes about 2 minutes.
- Slice and Prep Fruits: Wash and dry all fresh fruits. Hull and halve strawberries, remove grapes from stems, and pat berries dry gently with paper towels. This keeps juices from making the board soggy. Prep time: 10 minutes.
- Arrange Chocolates: Break larger chocolate bars into bite-sized chunks. Place a mix of dark, milk, and white chocolates spaced evenly around the board. Leave some room for other ingredients. Tip: sprinkle a pinch of sea salt flakes on dark chocolate pieces for an extra flavor punch.
- Fill Small Bowls: Spoon Nutella or chocolate hazelnut spread into ramekins. Add mini marshmallows or caramel drizzle in other small bowls. Distribute these evenly on the board for balance. Takes about 5 minutes.
- Add Nuts and Crunchy Treats: Scatter roasted almonds, cashews, and pistachios in small piles between the chocolates and fruits. Place chocolate-covered pretzels strategically for a salty-sweet surprise. Prep time: 5 minutes.
- Place Fresh Fruits: Cluster berries and grapes near the chocolates, creating groups of colors and textures. This visual contrast makes the board pop. Takes about 5 minutes.
- Garnish and Final Touches: Add fresh mint leaves here and there for a refreshing touch. Drizzle honey or maple syrup lightly over some fruits or nuts if desired. Step takes 3 minutes.
- Set Up Serving Tools: Place small tongs or spoons near dips and on the board for easy serving. Keep napkins handy—chocolate boards can get delightfully messy!
If you want to prep ahead, chop fruits and nuts up to a day before and store separately in airtight containers. Assemble right before serving to keep everything fresh and vibrant. And hey, if you notice the chocolate starting to soften too soon, pop the board briefly in a cool spot (not the fridge) to firm things back up.
Cooking Tips & Techniques
Honestly, putting together a dessert charcuterie board is more art than science, but here are some tips to get it just right:
- Balance Flavors and Textures: Think about contrast—soft vs. crunchy, sweet vs. salty, rich vs. fresh. This keeps your board interesting bite after bite.
- Use a Color Palette: Mixing reds, greens, browns, and whites makes the board visually appealing. I usually start with the darkest chocolate and bright fruits.
- Don’t Overcrowd the Board: Give each item room to shine. Crowding makes it harder to grab what you want and can look messy.
- Room Temperature Chocolate: Let chocolate come to room temperature before serving. Cold chocolate can dull flavors and feel chalky.
- Watch for Moisture: Dry fruits and nuts well, so moisture doesn’t make chocolate melt prematurely or fruits soggy.
- Multitasking: Prep fruits while the chocolate is coming to room temp. You can even assemble dips during downtime.
- Learn from Experience: The first time I made one, I piled everything in one spot, and guests had to dig through. Spreading ingredients out makes it easier and prettier.
Variations & Adaptations
You can easily customize this dessert charcuterie board with chocolate to suit your tastes or dietary needs. Here are a few variations I’ve tried and loved:
- Vegan Version: Use dairy-free dark chocolate and coconut-based spreads. Swap honey drizzle for pure maple syrup. Add coconut flakes or dried fruits for extra texture.
- Seasonal Twist: In fall, add spiced nuts, candied ginger, and apple slices. For summer, include tropical fruits like pineapple chunks or mango slices alongside the chocolate.
- Nut-Free Option: Instead of nuts, use seeds like pumpkin or sunflower seeds, and add crunchy granola clusters for texture. Be sure to double-check all chocolate is nut-free.
- Extra Decadent: Add mini chocolate mousse cups or chocolate-dipped strawberries for an indulgent touch.
One personal favorite is swapping traditional milk chocolate for chili-infused chocolate pieces—adds a surprising kick that guests love. Also, you can swap the wooden board for tiered cake stands to save table space and create height.
Serving & Storage Suggestions
Serve your dessert charcuterie board at room temperature so the chocolate melts slightly on the tongue, and fruits taste fresh. I like to pair it with a light sparkling wine or a cup of rich coffee for a balanced experience.
Leftovers? Cover the board tightly with plastic wrap and store in the fridge for up to two days. Before serving again, bring it back to room temperature for at least 30 minutes to soften the chocolate and freshen fruits. Some fruits may release juices, so it’s best to eat within a day for peak enjoyment.
If you want to store components separately, keep nuts and chocolates in airtight containers at room temperature, while fruits should be refrigerated and added fresh when ready to serve. This helps maintain textures and flavors.
Over time, flavors meld beautifully—especially if you drizzle a bit of honey or syrup before serving again. This board is perfect for casual nibbling, so encourage guests to grab a little bit of everything and savor the mix.
Nutritional Information & Benefits
This dessert charcuterie board offers a delightful mix of indulgence and nutrition. Here’s a rough estimate per serving (assuming 6 servings):
| Nutrient | Amount |
|---|---|
| Calories | 280-320 |
| Fat | 18g (mostly healthy fats from nuts) |
| Carbohydrates | 25g (natural sugars from fruits and chocolate) |
| Protein | 4g |
| Fiber | 3g (from nuts and fruits) |
Dark chocolate contains antioxidants and can support heart health when consumed in moderation. Nuts provide healthy fats and protein, helping you feel satisfied without overindulging. The fresh fruits add vitamins, fiber, and natural sweetness without extra calories. This board can easily be adapted for gluten-free or vegan diets, making it accessible for many.
Conclusion
So, why is this perfect dessert charcuterie board with chocolate worth trying? Because it turns simple ingredients into a stunning, shareable feast that brings smiles and happy bellies. Whether you’re hosting a casual brunch or an elegant dinner party, this board delivers variety, flavor, and a bit of wow factor with minimal effort.
Feel free to customize it to fit your style, tastes, and dietary needs—after all, the best boards are the ones that reflect the people enjoying them. Personally, I love how this board brings everyone together, sparking conversations and sweet moments that linger long after the last bite.
If you give this recipe a try, please come back and share your tweaks, favorite combos, or even your board photos. I’d love to hear how you make it your own! Remember, good food is all about sharing and enjoying, so grab your favorite chocolate, invite some friends, and treat yourself to a little happiness on a board.
FAQs
What types of chocolate work best on a dessert charcuterie board?
Using a mix of dark, milk, and white chocolates adds variety in flavor and texture. Look for good-quality bars or bite-sized pieces that are easy to grab.
Can I prepare the dessert board in advance?
You can prep fruits and nuts a day ahead, but it’s best to assemble the board shortly before serving to keep everything fresh and appealing.
What if I have guests with nut allergies?
Simply omit nuts and replace them with seeds like pumpkin or sunflower seeds, or crunchy granola clusters to maintain texture without allergens.
How should I store leftovers?
Cover the board and refrigerate for up to two days. Bring it back to room temperature before serving to soften the chocolate and freshen the fruits.
Can I make a dairy-free version of this dessert board?
Absolutely! Use dairy-free dark chocolate and coconut or almond-based spreads. Swap honey for maple syrup to keep it vegan-friendly.
Pin This Recipe!

Perfect Dessert Charcuterie Board with Chocolate

A stunning and easy-to-assemble dessert charcuterie board featuring a variety of chocolates, fresh fruits, nuts, and sweet treats, perfect for entertaining and casual gatherings.
- Prep Time: 20 minutes
- Cook Time: 0 minutes
- Total Time: 20 minutes
- Yield: 6 servings
- Category: Dessert
- Cuisine: American
Ingredients
- Dark chocolate squares or chunks (70% cocoa recommended)
- Milk chocolate pieces
- White chocolate bark or chips
- Strawberries, halved
- Raspberries
- Seedless grapes
- Blueberries
- Roasted almonds
- Cashews
- Pistachios, shelled
- Mini marshmallows
- Caramel drizzle or caramel-filled chocolates (optional)
- Chocolate-covered pretzels
- Nutella or chocolate hazelnut spread
- Honey or maple syrup
- Fresh mint leaves
- Sea salt flakes
Instructions
- Prepare the board surface by selecting a clean, flat serving board (around 16” x 12” or larger). Optionally, line it with parchment paper for easy cleanup.
- Wash and dry all fresh fruits. Hull and halve strawberries, remove grapes from stems, and pat berries dry gently with paper towels.
- Break larger chocolate bars into bite-sized chunks. Place a mix of dark, milk, and white chocolates spaced evenly around the board. Sprinkle a pinch of sea salt flakes on dark chocolate pieces.
- Spoon Nutella or chocolate hazelnut spread into ramekins. Add mini marshmallows or caramel drizzle in other small bowls. Distribute these evenly on the board.
- Scatter roasted almonds, cashews, and pistachios in small piles between the chocolates and fruits. Place chocolate-covered pretzels strategically.
- Cluster berries and grapes near the chocolates, creating groups of colors and textures.
- Add fresh mint leaves here and there for garnish. Drizzle honey or maple syrup lightly over some fruits or nuts if desired.
- Place small tongs or spoons near dips and on the board for easy serving. Keep napkins handy.
Notes
Let chocolate come to room temperature before serving to enhance flavor and texture. Prep fruits and nuts up to a day ahead and store separately in airtight containers. Assemble the board shortly before serving to keep everything fresh. For nut allergies, substitute nuts with seeds or granola clusters. Store leftovers covered in the fridge for up to two days and bring to room temperature before serving.
Nutrition
- Serving Size: Approximately 1/6th
- Calories: 280320
- Fat: 18
- Carbohydrates: 25
- Fiber: 3
- Protein: 4
Keywords: dessert charcuterie board, chocolate dessert board, easy entertaining, chocolate, fresh fruit, nuts, sweet treats, party dessert