The summer I turned thirty, my neighbor Marta watched me struggle with a wobbly picnic table on her back porch. I was trying to set up for a small get-together, and the thing had a mind of its own. She didn’t say anything at first. She just walked over, steadied the table with one hand, and slid a folded napkin under the short leg. Then she looked at me—really looked—and said, “You need something simple that looks like a lot of work. I’ll bring my eggs.”
She came back an hour later with a platter of the most perfectly deviled eggs I’d ever seen. They weren’t fancy, but they had this little twist that made everyone stop and smile. That was the first time I realized a recipe could be a conversation starter. Marta never gave me a written recipe—she just showed me, right there in her tiny kitchen, talking about her grandmother’s trick for getting the yolks perfectly creamy. Honestly, I think I learned more from watching her hands than from any cookbook.
So when Halloween rolled around last year, and I was staring at a carton of eggs wondering what to bring to the neighborhood party, Marta’s voice popped into my head. “Keep it simple,” she’d said. “Let the ingredients do the talking.” I wanted something festive but not over-the-top, something that felt like a treat without being a sugar bomb. These Light & Spooky Halloween Deviled Eggs were born from that memory. They’re the kind of thing you can whip up in 20 minutes, and they disappear before you can even set the platter down. Maybe you’ve been there—standing in the kitchen, wanting to contribute something memorable but not having hours to spend. These eggs are your answer.
Why You’ll Love This Recipe
Let’s face it—Halloween food can be a total letdown. Either it’s all candy and sugar, or it’s something that looks scary but tastes like cardboard. These deviled eggs are the perfect middle ground. They look fun and festive, but they actually taste amazing. Here’s why you’ll keep coming back to this recipe:
- Quick & Easy: From start to finish, you’re looking at about 25 minutes. Hard-boil the eggs, mix the filling, and pipe it in. That’s it. Perfect for busy weeknights or last-minute Halloween parties.
- Simple Ingredients: You probably have everything in your fridge right now. Eggs, mayonnaise, mustard, paprika—that’s the base. No fancy grocery store runs required.
- Perfect for Parties: These are the first thing to disappear at any gathering. Kids love the spooky look, and adults appreciate that they’re actually light and not loaded with extra fat or sugar.
- Crowd-Pleaser: I’ve brought these to Halloween potlucks, neighborhood block parties, and even casual dinner with friends. Every single time, someone asks for the recipe.
- Unbelievably Delicious: The filling is silky and tangy, with just the right amount of creaminess. The paprika adds a smoky depth that makes these eggs feel like comfort food, not diet food.
What makes this recipe different from the rest? It’s the little tricks I picked up from Marta—like using a touch of pickle juice in the filling for extra tang, and letting the eggs sit in cold water after boiling to make peeling a breeze. This isn’t just another deviled egg recipe. It’s the one that makes you close your eyes after the first bite and think, “Okay, this is it.” It’s comfort food reimagined—lighter, faster, but with the same soul-soothing satisfaction. Perfect for impressing guests without stress, or turning a simple Halloween snack into something memorable.
What Ingredients You Will Need
This recipe uses simple, wholesome ingredients to deliver bold flavor and satisfying texture without the fuss. Most of these are pantry staples, which makes this recipe a total lifesaver when you’re short on time.
For the Deviled Eggs
- 6 large eggs (room temperature works best for even cooking)
- 3 tablespoons mayonnaise (I prefer Hellmann’s or Duke’s for that classic creamy texture)
- 1 teaspoon yellow mustard (adds a nice tang without overpowering)
- 1 teaspoon pickle juice (trust me on this—it makes the filling extra zesty)
- ¼ teaspoon salt (adjust to taste)
- ⅛ teaspoon black pepper (freshly ground if you have it)
- ½ teaspoon paprika (plus extra for garnish—smoked paprika works beautifully too)
For the Spooky Decoration
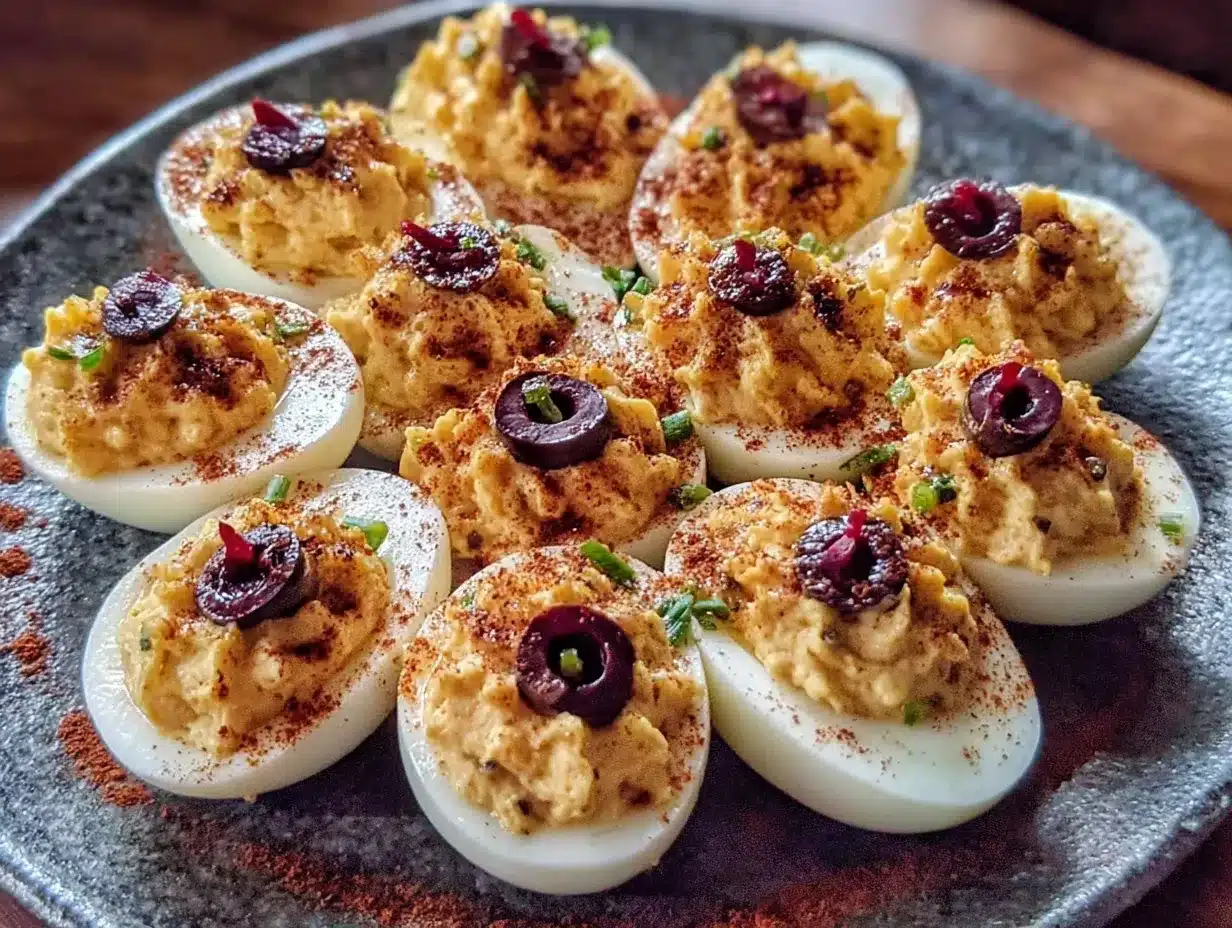
- Black olives (sliced into thin rounds to make spider bodies)
- Chives or green onion strips (for spider legs—cut into 1-inch pieces)
- Optional: Red bell pepper strips (for little devil horns, if you want to get creative)
A few ingredient notes from my kitchen to yours: Look for eggs that are at least a week old—they peel much easier than super fresh ones. If you’re using a dairy-free mayonnaise like Vegenaise, it works perfectly here. And if you don’t have pickle juice on hand, a splash of white vinegar or lemon juice does the trick. For the olives, I like the canned sliced ones for convenience, but you can also buy whole black olives and slice them yourself for thicker rounds.
Equipment Needed
You don’t need any fancy gadgets for this recipe, which is part of its charm. Here’s what you’ll need:
- A medium saucepan (for boiling the eggs—any size works, as long as the eggs fit in a single layer)
- A slotted spoon (for gently lowering eggs into the water and fishing them out)
- A mixing bowl (medium size is fine)
- A fork or potato masher (for mashing the yolks into a smooth paste)
- A piping bag or zip-top bag (for filling the eggs neatly—I use a gallon-sized zip-top bag with the corner snipped off)
- A small knife (for slicing the olives and chives)
- A serving platter (something with a little edge works best to keep the eggs from sliding around)
If you don’t have a piping bag, don’t stress. A zip-top bag works just as well. I’ve even used a small spoon to fill the eggs in a pinch, and they still looked great. Honestly, the piping bag just makes it look a little more polished, but it’s not a dealbreaker.
Preparation Method
Alright, let’s get cooking. Here’s how to make these Light & Spooky Halloween Deviled Eggs step by step.
- Hard-boil the eggs. Place the eggs in a single layer in your saucepan and cover them with cold water by about an inch. Bring the water to a rolling boil over high heat. Once it’s boiling, turn off the heat, cover the pot, and let the eggs sit for exactly 10 minutes. This gives you perfectly cooked yolks—no green ring around them.
- Ice bath time. While the eggs are sitting, fill a bowl with ice and cold water. After 10 minutes, use your slotted spoon to transfer the eggs to the ice bath. Let them chill for at least 5 minutes. This stops the cooking process and makes peeling a million times easier. I’ve skipped this step before, and let me tell you—it was a disaster. The shells stuck like glue.
- Peel the eggs. Gently tap each egg on the counter to crack the shell all over, then roll it between your hands to loosen the shell. Start peeling from the wider end—there’s usually an air pocket there that makes it easier. Rinse the peeled eggs under cold water to remove any tiny shell fragments.
- Cut the eggs in half. Using a sharp knife, slice each egg lengthwise. Wipe the knife clean between cuts for neat edges. Gently pop out the yolks into your mixing bowl. Arrange the egg white halves on your serving platter, cut side up.
- Make the filling. Add the mayonnaise, mustard, pickle juice, salt, pepper, and paprika to the bowl with the yolks. Mash everything together with a fork until it’s completely smooth. You want it silky, not lumpy. Taste it and adjust the seasoning—I always add a pinch more paprika at this stage.
- Fill the eggs. Spoon the yolk mixture into your piping bag or zip-top bag. Twist the top to push the filling down toward the corner. Snip off about ¼ inch from the corner. Pipe the filling into each egg white half, swirling slightly at the top for a pretty finish. If you don’t have a bag, just use a small spoon—it’ll still taste amazing.
- Add the spooky decorations. Here’s where the fun begins. For each deviled egg, place a slice of black olive in the center of the filling to make the spider body. Then arrange 4 chive or green onion pieces on each side to create the legs. If you’re feeling extra creative, add a tiny strip of red bell pepper on top for little devil horns. The contrast of the black olive against the creamy yellow filling is seriously adorable.
- Finish with paprika. Lightly dust the filled eggs with a pinch of paprika. This adds a pop of color and a hint of smoky flavor. Serve immediately or refrigerate until ready to serve.
Cooking Tips & Techniques
I’ve made deviled eggs more times than I can count, and I’ve learned a few things the hard way. Here are my best tips for getting it right every time.
The peeling struggle is real. If you’ve ever spent 15 minutes fighting with an eggshell, you know the pain. The trick is using older eggs—ones that have been in your fridge for at least a week. Fresh eggs are a nightmare to peel. Also, shocking them in an ice bath is non-negotiable. I once skipped it because I was in a hurry, and I ended up with eggs that looked like they’d been through a war.
Don’t overmix the filling. I know it’s tempting to keep mashing until it’s perfectly smooth, but overmixing can make the filling gummy. Stop as soon as it’s creamy and uniform. If it seems too thick, add a tiny splash of pickle juice or milk to loosen it up.
Pipe with confidence. When you’re piping the filling, hold the bag steady and apply even pressure. If you mess up, just scrape the filling back into the bag and try again. No one will know. And if you’re using a spoon, a small offset spatula helps create that nice swirl on top.
Make ahead tip. You can hard-boil and peel the eggs up to 2 days in advance. Store them in the fridge in a covered container. But don’t fill them until the day you’re serving—the filling can make the whites soggy if it sits too long.
Temperature matters. Serve these eggs chilled but not ice-cold. Take them out of the fridge about 10 minutes before serving. The flavor really shines at cool room temperature.
Variations & Adaptations
One of the best things about this recipe is how easy it is to adapt. Here are some of my favorite variations.
Spicy version: Add a pinch of cayenne pepper or a few drops of hot sauce to the filling. The heat pairs beautifully with the creamy yolk and smoky paprika. I’ve also used sriracha for a slightly different kick.
Herb garden twist: Stir in a tablespoon of finely chopped fresh dill or chives into the filling. It adds a bright, fresh flavor that’s perfect for spring or summer gatherings. I tried this last Easter, and it was a huge hit.
Guacamole deviled eggs: Mash half an avocado into the yolk mixture along with a squeeze of lime juice. It makes the filling extra creamy and gives it a lovely green tint—perfect for a monster-themed Halloween spread. Just be sure to serve them right away, since avocado browns quickly.
Bacon lover’s version: Crumble a slice of crispy bacon over each filled egg before adding the olive spider. The salty crunch is incredible against the smooth filling. I do this for game-day parties, and they vanish in minutes.
Dairy-free option: Use a vegan mayonnaise and skip the pickle juice if you’re avoiding vinegar. The filling will still be creamy and delicious. I’ve tested this with Vegenaise, and honestly, I couldn’t tell the difference.
Serving & Storage Suggestions
These deviled eggs are best served chilled, right out of the fridge. Arrange them on a platter with a little garnish of fresh chives or a sprinkle of extra paprika for color. They look especially striking on a dark slate board or a black platter—the contrast really makes the spooky spiders pop.
For a Halloween party, I like to serve them alongside other finger foods like mini sliders, veggie sticks with dip, or a simple cheese board. They also pair beautifully with a crisp white wine or a light beer. If you’re going for a non-alcoholic option, sparkling water with a slice of lemon is perfect.
Storage: Leftover deviled eggs can be stored in an airtight container in the refrigerator for up to 2 days. But honestly, they’re best eaten within 24 hours. The filling can make the whites a little soft if they sit too long. If you’re making them ahead, store the filling and whites separately and assemble just before serving.
Reheating: You don’t want to reheat deviled eggs—they’re meant to be served cold. If you’ve stored them in the fridge, just let them sit at room temperature for about 10 minutes before serving to take the chill off.
One thing I love about this recipe is that the flavors actually get better after a few hours in the fridge. The paprika and mustard meld together, and the filling becomes even more flavorful. So don’t be afraid to make them the night before—just keep the decorations off until you’re ready to serve.
Nutritional Information & Benefits
These Light & Spooky Halloween Deviled Eggs are surprisingly nutritious for a party snack. Here’s the breakdown per egg half (based on the recipe as written):
| Nutrient | Amount per serving |
|---|---|
| Calories | 65 |
| Protein | 5g |
| Fat | 4.5g |
| Carbohydrates | 1g |
| Fiber | 0g |
| Sugar | 0.5g |
Eggs are a fantastic source of high-quality protein and healthy fats. They’re also rich in choline, which supports brain health, and vitamin D, which is important for bone health. The paprika adds a dose of antioxidants, and the olives provide healthy monounsaturated fats. This recipe is naturally gluten-free and low-carb, making it a great option for anyone watching their carb intake. If you’re using a dairy-free mayonnaise, it’s also suitable for a dairy-free diet.
Personally, I love that this recipe lets me enjoy a classic party food without feeling like I’ve derailed my healthy eating. It’s proof that you can have something indulgent and still feel good about what you’re putting into your body.
Conclusion
These Light & Spooky Halloween Deviled Eggs are exactly what a party snack should be—fun, delicious, and surprisingly easy to make. They look like they took hours of effort, but honestly, they come together in under 30 minutes. The creamy, tangy filling is a perfect canvas for the cute spider decorations, and the flavor is so good that you’ll find yourself making them long after Halloween is over.
I love that this recipe is so adaptable. You can make it spicy, herby, or even dairy-free, and it always turns out great. It’s the kind of recipe that makes you look like a kitchen pro, even if you’re just starting out. So go ahead—give it a try. Customize it with your favorite toppings, and don’t be afraid to get creative with the decorations. And when you do, I’d love to hear about it. Leave a comment below and let me know how yours turned out. Share a photo on Pinterest or Instagram—tag me so I can see your spooky creations. Happy Halloween, and happy cooking!
Frequently Asked Questions
Can I make these deviled eggs ahead of time?
Absolutely! You can hard-boil and peel the eggs up to 2 days in advance. Store them in the fridge in a covered container. For best results, prepare the filling and assemble the eggs on the day you plan to serve them. The whites can get a little soft if they sit with the filling for too long.
How do I get perfectly hard-boiled eggs that peel easily?
The key is using older eggs—ones that have been in your fridge for at least a week. Start with cold water, bring it to a boil, then turn off the heat and let the eggs sit for 10 minutes. Immediately transfer them to an ice bath for 5 minutes. This stops the cooking and makes peeling a breeze.
Can I use a different type of olive for the spider decoration?
Sure! Sliced black olives are the classic choice because they look like little spider bodies. But you can also use sliced kalamata olives for a saltier flavor, or even capers if you want a smaller decoration. Just make sure whatever you use is firm enough to hold its shape on top of the filling.
What can I use instead of mayonnaise to make this lighter?
Greek yogurt is a great substitute—it adds creaminess with less fat and more protein. You can also use mashed avocado for a dairy-free option. Just keep in mind that avocado will brown over time, so serve these right away. Another option is a light or olive oil-based mayonnaise if you want to cut calories without changing the flavor too much.
How should I store leftover deviled eggs?
Place any leftover deviled eggs in an airtight container and store them in the refrigerator for up to 2 days. They’re best eaten within 24 hours. If you’re transporting them to a party, keep them chilled in a cooler with ice packs. And remember—never leave deviled eggs out at room temperature for more than 2 hours.
Pin This Recipe!

Light & Spooky Halloween Deviled Eggs: Easy Recipe
These Light & Spooky Halloween Deviled Eggs are a fun, festive, and surprisingly easy party snack. With a creamy, tangy filling and cute spider decorations, they come together in under 30 minutes and are perfect for Halloween gatherings.
- Prep Time: 15 minutes
- Cook Time: 10 minutes
- Total Time: 25 minutes
- Yield: 12 servings (1 egg half per serving) 1x
- Category: Appetizer
- Cuisine: American
Ingredients
- 6 large eggs (room temperature)
- 3 tablespoons mayonnaise (Hellmann’s or Duke’s recommended)
- 1 teaspoon yellow mustard
- 1 teaspoon pickle juice
- ¼ teaspoon salt
- ⅛ teaspoon black pepper (freshly ground preferred)
- ½ teaspoon paprika (plus extra for garnish; smoked paprika works too)
- Black olives (sliced into thin rounds for spider bodies)
- Chives or green onion strips (cut into 1-inch pieces for spider legs)
- Optional: Red bell pepper strips (for devil horns)
Instructions
- Hard-boil the eggs: Place eggs in a single layer in a saucepan and cover with cold water by about an inch. Bring to a rolling boil over high heat, then turn off heat, cover, and let sit for exactly 10 minutes.
- Ice bath: While eggs sit, fill a bowl with ice and cold water. After 10 minutes, transfer eggs to the ice bath using a slotted spoon. Let chill for at least 5 minutes.
- Peel the eggs: Gently tap each egg on the counter to crack the shell, then roll between hands to loosen. Start peeling from the wider end. Rinse under cold water to remove shell fragments.
- Cut eggs in half: Slice each egg lengthwise with a sharp knife. Pop out yolks into a mixing bowl. Arrange egg white halves on a serving platter, cut side up.
- Make the filling: Add mayonnaise, mustard, pickle juice, salt, pepper, and paprika to the yolks. Mash with a fork until completely smooth. Taste and adjust seasoning.
- Fill the eggs: Spoon yolk mixture into a piping bag or zip-top bag. Twist top to push filling down, snip off about ¼ inch from corner. Pipe filling into each egg white half, swirling slightly at the top.
- Add spooky decorations: Place a slice of black olive in the center of each filled egg for the spider body. Arrange 4 chive or green onion pieces on each side for legs. Optionally, add a tiny strip of red bell pepper for devil horns.
- Finish with paprika: Lightly dust filled eggs with a pinch of paprika. Serve immediately or refrigerate until ready to serve.
Notes
Use older eggs (at least a week old) for easier peeling. The ice bath is essential for easy peeling. Do not overmix the filling to avoid gumminess. For make-ahead, hard-boil and peel eggs up to 2 days in advance, but fill and decorate on the day of serving. Serve chilled but not ice-cold; let sit at room temperature for 10 minutes before serving.
Nutrition
- Serving Size: 1 egg half
- Calories: 65
- Sugar: 0.5
- Sodium: 120
- Fat: 4.5
- Saturated Fat: 1.5
- Carbohydrates: 1
- Protein: 5
Keywords: Halloween deviled eggs, spooky deviled eggs, easy deviled eggs, party appetizer, Halloween snack, deviled eggs recipe