Homemade Garlic Honey Fermented Immune Tonic
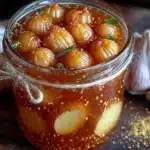
A simple two-ingredient fermented tonic made with raw honey and fresh garlic, offering natural immune support and gut-healthy probiotics. This old-world preparation requires patience but rewards you with a sweet, savory, and slightly tangy elixir that can be taken by the spoonful or used in cooking.
- Prep Time: 15 minutes
- Cook Time: 0 minutes
- Total Time: 15 minutes (plus 2-6 weeks fermentation)
- Yield: 1 cup (about 16 servings of 1 tablespoon each) 1x
- Category: Condiment / Tonic
- Cuisine: American / Traditional
Ingredients
- 1 cup (340g) raw, unfiltered honey
- 1 cup (about 140g) fresh garlic cloves, peeled
Instructions
- Prepare the Garlic: Separate the garlic bulbs into individual cloves. Peel each clove by pressing down firmly with the flat side of your knife—the skin will crack and slide right off. Discard any cloves that are bruised, soft, or discolored. You want about 1 cup of peeled cloves.
- Fill the Jar: Place the peeled garlic cloves into your clean, dry glass jar. Pack them in somewhat tightly, but leave about an inch of headspace at the top. The cloves will float as the fermentation progresses, so you want room for them to move.
- Cover with Honey: Pour the raw honey over the garlic cloves, completely submerging them. Use a clean spoon or chopstick to gently stir and release any trapped air bubbles. Make sure every clove is fully coated. The honey will be thick at first—that’s normal.
- Seal and Swirl: Tighten the lid on the jar. Give it a gentle swirl to distribute the honey evenly. Do not shake vigorously; you want to avoid introducing too much oxygen.
- Start the Fermentation: Place the jar in a cool, dark place in your kitchen, away from direct sunlight. A cupboard or pantry shelf works perfectly. The ideal temperature range is 60-75°F (15-24°C). Avoid spots that are too warm, as that can cause the honey to crystallize or the garlic to spoil.
- Daily Burping: For the first week, you need to ‘burp’ the jar once a day. Simply open the lid for a second to release any built-up gas. You will see tiny bubbles forming in the honey—that is a sign of active fermentation. If you forget a day, it’s usually fine, but consistent burping prevents pressure buildup.
- Stir and Rotate: Every few days, use a clean spoon to gently stir the mixture, ensuring the garlic cloves stay submerged. If any cloves are floating above the honey line, push them back down. This prevents mold from forming on exposed garlic.
- Wait: The fermentation takes a minimum of 2 weeks, but the flavor really develops after 4-6 weeks. The honey will gradually thin out and become more liquid. The garlic cloves will soften and turn a darker, amber color. The taste will shift from sharp and sweet to complex, savory, and slightly tangy.
- Taste and Test: After two weeks, take a tiny taste. If it’s to your liking, you can start using it. If you want a deeper, more fermented flavor, let it go longer. I personally prefer mine at the 6-week mark, when the garlic has become almost spreadable.
- Store: Once the tonic has reached your desired flavor, you can move it to the refrigerator to slow down the fermentation. It will keep for 6-12 months. The honey may crystallize in the fridge, but that’s fine—just let it come to room temperature before using.
Notes
Use only raw, unfiltered honey—pasteurized honey will not ferment. Fresh garlic is essential; avoid old or sprouting cloves. Burp the jar daily for the first week to release gas. If any garlic floats above the honey, push it down to prevent mold. The tonic is ready after 2 weeks but develops best flavor at 4-6 weeks. Store in the refrigerator for up to 12 months. If honey crystallizes, warm the jar in a bowl of warm water—do not microwave.
Nutrition
- Serving Size: 1 tablespoon (15g) h
- Calories: 4560
- Sugar: 1012
- Carbohydrates: 1215
Keywords: garlic honey, fermented garlic, immune tonic, raw honey, garlic honey ferment, homemade tonic, natural immune support, probiotic, gut health