The platter came back empty. Not just picked over, but wiped clean—like someone had licked it. My buddy Mike, who usually just grunts and nods at appetizers, actually walked across the yard to find me and say, “Hey, you got more of those roll-up things?” That’s when I knew I had stumbled onto something.
I wasn’t trying to create a tailgate legend that day. Honestly, I was just tired of the same old chips and dip situation. You know how it is—everyone brings the same stuff, and by the third quarter, you’re just eating sad, soggy salsa. I had a pack of tortillas, some bacon I’d cooked that morning, and a tub of ranch. I figured, why not roll it all up and see what happens? That first batch was gone before halftime. The second batch? That’s when people started asking for the recipe.
These Smoky Bacon Ranch Tailgate Pinwheels are the kind of thing that makes you look like you planned it all along. They’re creamy, smoky, and packed with that familiar ranch flavor everyone loves, but with a little extra something—a touch of heat, a bit of crunch. I’ve made them for every game day since, and they never last. There’s a quiet satisfaction in watching people reach for one, then another, then another. It’s not about the compliments (though those are nice). It’s about making something that actually gets eaten. That’s the real win.
Why You’ll Love This Recipe
Let me tell you why these pinwheels have become my go-to for every tailgate, party, and casual get-together. I’ve tested this recipe more times than I can count, tweaking the ratios and trying different fillings until it was just right. Here’s what makes them special:
- Quick & Easy: These come together in about 20 minutes of active prep time. No cooking required (except the bacon, which you can do ahead). Just mix, spread, roll, and slice. Perfect for when you’re running late to the game.
- Simple Ingredients: You probably have most of this stuff in your fridge right now. Cream cheese, ranch seasoning, bacon, cheese—nothing fancy. No special trips to the store for obscure ingredients.
- Perfect for Tailgating: These are made for the parking lot. They travel well, they’re easy to eat standing up, and they don’t need to be hot. Set them out and watch them disappear.
- Crowd-Pleaser: I’ve served these to kids, picky eaters, and serious foodies. Everyone loves them. The smoky bacon and creamy ranch combo is basically irresistible.
- Unbelievably Delicious: The texture is what gets me—creamy filling, soft tortilla, crunchy bacon bits, and a little snap from the green onions. It’s a party in every bite.
What makes these different from other pinwheel recipes? It’s the smoky element. Most recipes just use regular bacon, but I add a touch of smoked paprika to the cream cheese mixture. That little hint of campfire flavor makes all the difference. It’s the kind of detail that makes people pause and say, “What’s in this?” It’s not just another version—it’s the version.
These pinwheels are comfort food at its best. They’re the appetizer that makes you close your eyes after the first bite, the one that turns a regular game day into something memorable. And the best part? You can make them without stress, without fuss, and without a million dirty dishes.
What Ingredients You Will Need
This recipe uses simple, everyday ingredients to create something that tastes way more complicated than it is. Most of these are pantry and fridge staples, so you probably don’t need to buy much. Let me walk you through what you’ll need and why each ingredient matters.
- 8 ounces cream cheese, softened: This is the base of our filling. Make sure it’s at room temperature so it mixes smoothly. I prefer Philadelphia brand for the creamiest texture, but any full-fat cream cheese works great. (Low-fat works too, but the filling won’t be as rich.)
- 1/2 cup sour cream: This adds tanginess and helps the filling spread more easily. It also lightens up the cream cheese so the filling isn’t too dense.
- 1 packet (1 ounce) ranch seasoning mix: The star of the show. I use Hidden Valley, but any brand works. If you’re feeling ambitious, you can make your own with dried buttermilk, parsley, dill, garlic powder, and onion powder.
- 1 teaspoon smoked paprika: This is my secret ingredient. It adds that subtle smoky flavor that makes these pinwheels different from every other ranch pinwheel out there. Don’t skip it—regular paprika won’t give you the same effect.
- 1/2 teaspoon garlic powder: Because you can never have too much garlic. This adds depth and rounds out the ranch flavor.
- 1/4 teaspoon cayenne pepper (optional): This gives a tiny kick of heat. I like using it because it cuts through the richness of the cream cheese and bacon. If you’re serving kids or spice-sensitive folks, leave it out or reduce it to a pinch.
- 8 slices bacon, cooked and crumbled: Thick-cut bacon works best here—it gives you more crunch and bacon flavor in every bite. Cook it until it’s nice and crispy, then let it cool before crumbling. (Pro tip: cook your bacon in the oven on a sheet pan at 400°F for about 15 minutes. It cooks evenly and doesn’t splatter everywhere.)
- 1 cup shredded sharp cheddar cheese: Sharp cheddar adds a nice bite that stands up to the smoky bacon. I prefer to shred my own from a block—pre-shredded cheese has anti-caking agents that can make the filling a bit grainy.
- 1/2 cup chopped green onions: These add freshness and a little crunch. Use both the white and green parts for the best flavor. You can substitute chives if that’s what you have.
- 4 large flour tortillas (10-inch): Burrito-size tortillas work best because they give you enough surface area for a good amount of filling. Look for soft, pliable tortillas—if they’re too stiff, they’ll crack when you roll them. I like Mission brand or any store-brand flour tortillas.
Substitution Notes: If you’re looking for a lighter option, you can use reduced-fat cream cheese and sour cream. For a gluten-free version, use corn or gluten-free tortillas (just warm them slightly so they’re pliable). You can also swap the bacon for turkey bacon or even chopped ham if you prefer. And if you’re not a fan of green onions, finely chopped red onion or even bell pepper would work nicely.
Equipment Needed
You don’t need a lot of fancy equipment for these pinwheels. Here’s what I use:
- Mixing bowls: One medium bowl for the filling. Nothing fancy needed.
- Electric hand mixer or stand mixer: This makes whipping the cream cheese mixture super easy and ensures it’s smooth and lump-free. You can do it by hand with a wooden spoon, but your arm will get tired.
- Rubber spatula: For scraping every last bit of filling out of the bowl. Also helpful for spreading the filling evenly on the tortillas.
- Offset spatula or butter knife: For spreading the filling onto the tortillas. An offset spatula gives you more control, but a regular butter knife works just fine.
- Sharp knife: A good, sharp chef’s knife makes cutting the pinwheels clean without squishing them. I learned this the hard way—a dull knife will crush your beautiful rolls.
- Cutting board: For rolling and slicing. Any size works.
- Plastic wrap: For wrapping the rolls tightly before chilling. This is crucial—without it, the rolls will dry out and the edges won’t seal properly.
- Baking sheet (optional): For cooking the bacon. If you’re using the oven method, a rimmed baking sheet with parchment paper makes cleanup a breeze.
If you don’t have an electric mixer, you can absolutely do this by hand. Just make sure your cream cheese is really soft—like, leave it out for an hour—and beat it vigorously with a wooden spoon until smooth. It takes a little more effort, but the result is the same.
Preparation Method
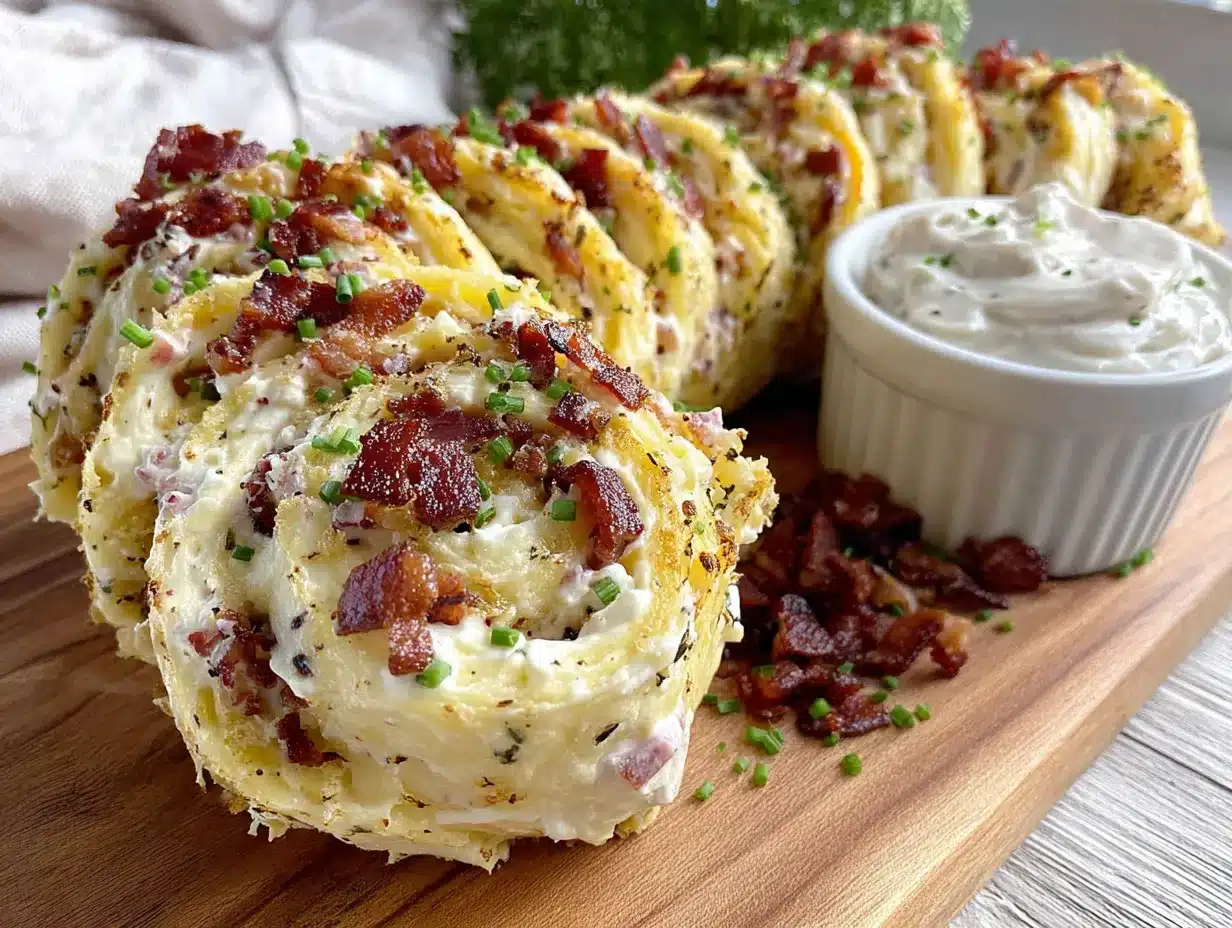
Okay, let’s get into the actual making of these pinwheels. I’ve broken it down step by step, with all the little details I’ve learned from making these about fifty times. Trust me on the timing and the little tricks—they make a difference.
Step 1: Cook the Bacon
Start by cooking your bacon until it’s nice and crispy. I prefer the oven method because it’s hands-off and cooks evenly. Preheat your oven to 400°F (200°C). Line a rimmed baking sheet with parchment paper or foil. Lay the bacon slices in a single layer—don’t overlap them. Bake for 15-18 minutes, until the bacon is golden brown and crispy. Transfer the bacon to a paper towel-lined plate to drain and cool. Once it’s cool enough to handle, crumble it into small pieces. Set aside. (You can do this up to 2 days ahead and store the crumbled bacon in the fridge.)
Step 2: Make the Filling
In a medium mixing bowl, add the softened cream cheese and sour cream. Using an electric hand mixer on medium speed, beat them together until smooth and completely combined—about 1 minute. Scrape down the sides of the bowl with a rubber spatula. Add the ranch seasoning mix, smoked paprika, garlic powder, and cayenne pepper (if using). Beat again until everything is evenly incorporated. The mixture should be creamy, pale orange, and smell amazing.
Step 3: Add the Mix-Ins
Fold in the crumbled bacon, shredded cheddar cheese, and chopped green onions using a rubber spatula. Stir until everything is evenly distributed. Take a taste—yes, it’s safe to eat at this point. Adjust the seasoning if needed. You want the filling to be creamy, smoky, and tangy, with little pops of salty bacon and sharp cheese. If it seems too thick, you can add a tablespoon of milk or extra sour cream to loosen it up.
Step 4: Prepare the Tortillas
Lay your flour tortillas flat on a clean work surface. If they seem a little stiff or dry, you can microwave them for about 10 seconds to make them more pliable. This is especially helpful if you’re using a brand that tends to crack when rolled. Spread about 1/2 cup of the filling evenly over each tortilla, leaving about a 1/2-inch border around the edges. Use your offset spatula or butter knife to spread it all the way to the edges—you want every bite to have filling.
Step 5: Roll ‘Em Up
Starting at one edge, roll the tortilla tightly but gently. Don’t squeeze too hard or the filling will squish out the ends. Roll it like you’re rolling a burrito—firm enough to hold together, but not so tight that it bursts. Once you’ve rolled it all the way, place it seam-side down on the cutting board. Repeat with the remaining tortillas.
Step 6: Wrap and Chill
Wrap each rolled tortilla tightly in plastic wrap. I mean tightly—you want the plastic to hug the roll so it holds its shape. Place the wrapped rolls in the refrigerator for at least 2 hours, but overnight is even better. This chilling step is non-negotiable. It allows the filling to firm up, which makes slicing much easier and cleaner. Trust me, I’ve tried slicing them right away, and it’s a mess. The filling oozes out, the rolls fall apart, and you end up with a sad pile of ingredients.
Step 7: Slice and Serve
When you’re ready to serve, unwrap the rolls and place them on a cutting board. Using a sharp knife, slice each roll into 1-inch pieces. A gentle sawing motion works better than pressing straight down—it cuts through the tortilla without squishing the filling. You should get about 8-10 pinwheels per tortilla, depending on how thick you slice them. Arrange them on a serving platter, cut-side up, so everyone can see those beautiful spirals of filling.
Cooking Tips & Techniques
After making these pinwheels more times than I can count, I’ve picked up a few tricks that make the process smoother and the results better. Here are my best tips:
Softening cream cheese the right way: Don’t microwave your cream cheese to soften it—you’ll end up with hot spots and melted edges. Just leave it on the counter for 30-60 minutes. If you’re in a hurry, cut it into small cubes and let them sit for 15 minutes. They’ll soften much faster.
Don’t overfill the tortillas: I know it’s tempting to pile on the filling, but too much will make rolling difficult and cause the filling to squish out the ends. Stick to about 1/2 cup per tortilla. You want a nice, even layer that’s about 1/4-inch thick.
Chill time matters: I cannot stress this enough—chill the rolls for at least 2 hours. I once tried to rush this step and ended up with a plate of mushy, misshapen pinwheels. The filling needs time to set so you can slice cleanly. Overnight is ideal; the flavors meld together and the pinwheels hold their shape perfectly.
Use a serrated knife for cleaner cuts: A serrated knife works better than a straight-edged knife for slicing these. The teeth grab the tortilla and cut through without crushing it. If you don’t have a serrated knife, use the sharpest straight-edged knife you have and use a gentle sawing motion.
Make ahead for better flavor: These pinwheels actually taste better the next day. The flavors have time to meld, and the filling firms up perfectly. I often make them the night before a tailgate and just slice them right before I leave. It saves so much stress on game day.
Keep them cold until serving: These are best served cold or at room temperature. If it’s a hot day, keep them on ice or in a cooler until you’re ready to serve. The filling can get soft if it sits out too long.
Variations & Adaptations
One of the best things about this recipe is how easy it is to customize. Here are some variations I’ve tried and loved:
Spicy Southwest Version: Add 1/4 cup diced pickled jalapeños and 1/2 cup corn kernels (drained if canned) to the filling. Swap the cheddar for pepper jack cheese. The heat from the jalapeños and pepper jack pairs beautifully with the smoky bacon. I made this version for a friend’s taco-themed party, and it was a hit.
Buffalo Chicken Pinwheels: Replace the bacon with 1 cup shredded cooked chicken (rotisserie chicken works great) and add 1/4 cup buffalo sauce to the cream cheese mixture. Use blue cheese crumbles instead of cheddar, and add some chopped celery for crunch. These are perfect for game day when you want that buffalo wing flavor without the mess.
Vegetarian Version: Skip the bacon and add 1/2 cup finely chopped roasted red peppers, 1/4 cup sun-dried tomatoes (drained and chopped), and 1/2 cup chopped artichoke hearts. The smoky paprika still gives you that smoky flavor, and the vegetables add texture and color. I made these for a vegetarian friend, and she asked for the recipe on the spot.
Low-Carb/Keto Version: Use large lettuce leaves (like butter lettuce or romaine) instead of tortillas. Just spoon the filling onto the lettuce leaves and roll them up like little wraps. You can also use low-carb tortillas if you prefer. The filling itself is already low-carb, so this is an easy swap.
Herb and Garlic Version: Add 2 tablespoons of fresh chopped herbs—parsley, dill, and chives work well. Increase the garlic powder to 1 teaspoon and add 1/4 cup finely chopped roasted garlic (from a jar or homemade). This version is more elegant and works great for brunch or baby showers.
Serving & Storage Suggestions
These pinwheels are incredibly versatile when it comes to serving. Here’s how I like to serve them and keep them fresh:
Serving Temperature: They’re best served cold or at room temperature. If you’re serving them at a tailgate, take them out of the cooler about 15 minutes before serving so they soften slightly. The flavors really come through at room temperature.
Presentation: Arrange the pinwheels on a large platter in concentric circles or in neat rows. Garnish with extra chopped green onions, a sprinkle of smoked paprika, or some fresh parsley. A small bowl of extra ranch dressing on the side for dipping is always a good idea—though honestly, they’re so flavorful on their own, most people don’t need it.
What to Serve With Them: These pinwheels pair beautifully with other cold appetizers. I love serving them alongside mini lemon blueberry cheesecakes for a sweet-savory combo that always impresses. They’re also great with veggie sticks, a cheese board, or some spicy buffalo wings. For drinks, they go well with cold beer, margaritas, or even a crisp white wine.
Storage: Store leftover pinwheels in an airtight container in the refrigerator for up to 3 days. Place a paper towel at the bottom of the container to absorb any excess moisture. The pinwheels might soften slightly over time, but they’ll still taste great.
Freezing: You can freeze the uncut rolls for up to 1 month. Wrap each roll tightly in plastic wrap, then place them in a freezer bag. When you’re ready to serve, thaw them in the refrigerator overnight, then slice and serve. I don’t recommend freezing already-sliced pinwheels—they get mushy when thawed.
Reheating: These are best enjoyed cold or at room temperature, so reheating isn’t really necessary. If you prefer them slightly warm, you can pop them in a 300°F oven for about 5 minutes, but keep an eye on them—the tortillas can dry out quickly.
Flavor Development: These pinwheels actually taste better the next day. The flavors meld together overnight, and the filling sets up perfectly. If you can, make them a day ahead and slice them just before serving. The texture is better, and the flavor is more developed.
For more recipe inspiration, check out our full collection of recipes for more crowd-pleasing ideas.
Nutritional Information & Benefits
Here’s a rough estimate of the nutritional values per pinwheel (based on 32 pinwheels total):
| Nutrient | Amount Per Pinwheel |
|---|---|
| Calories | 120 |
| Total Fat | 8g |
| Saturated Fat | 4g |
| Cholesterol | 25mg |
| Sodium | 280mg |
| Total Carbohydrates | 7g |
| Dietary Fiber | 0g |
| Sugars | 1g |
| Protein | 5g |
Health Benefits: While these are definitely a treat, there are some redeeming qualities. The cream cheese and sour cream provide calcium and protein. The bacon adds protein and B vitamins. And the green onions offer a small dose of vitamin K and antioxidants. The smoked paprika contains capsaicin, which may have anti-inflammatory properties.
Dietary Considerations: This recipe contains dairy (cream cheese, sour cream, cheddar) and gluten (flour tortillas). For a gluten-free version, use corn or gluten-free tortillas. For a dairy-free version, use dairy-free cream cheese and sour cream alternatives, and skip the cheddar cheese or use a dairy-free shred. The recipe is naturally low-carb if you use low-carb tortillas or lettuce wraps.
Allergen Notes: This recipe contains dairy and gluten. It may also contain traces of soy (in some bacon brands and tortillas). Always check labels if you’re serving someone with allergies.
My Take: Look, these aren’t health food. They’re a celebration food—something you make for game day, parties, and special occasions. And that’s okay. Food is about more than just nutrients; it’s about gathering, sharing, and enjoying. These pinwheels bring people together, and that’s a pretty good thing in my book.
Conclusion
These Smoky Bacon Ranch Tailgate Pinwheels have become my signature party dish for a reason. They’re simple to make, impossible to resist, and they always, always disappear. The combination of creamy ranch filling, smoky bacon, sharp cheddar, and a hint of heat is just perfect. They’re the kind of appetizer that makes you look like you spent hours in the kitchen when really, they came together in about 20 minutes.
What I love most about this recipe is how adaptable it is. You can make it your own—add more heat, swap in different cheeses, or go vegetarian. The base recipe is solid, but there’s so much room to play. That’s what cooking is all about, right? Taking something good and making it yours.
I’d love to hear how these turn out for you. Did you try a variation? Did they disappear at your tailgate? Drop a comment below and let me know. And if you have your own twist on these pinwheels, share that too—I’m always looking for new ideas. Until next time, happy cooking, and may your pinwheels always be perfectly rolled.
Frequently Asked Questions
Can I make these pinwheels ahead of time?
Absolutely! In fact, they’re better when made ahead. You can prepare the rolls up to 24 hours in advance, keep them wrapped in plastic wrap in the refrigerator, and slice them just before serving. The flavors meld together beautifully overnight.
Why are my pinwheels falling apart when I slice them?
This usually happens for one of two reasons: either the rolls weren’t chilled long enough, or your knife isn’t sharp enough. Make sure you chill the rolls for at least 2 hours (overnight is best), and use a sharp serrated knife with a gentle sawing motion. A dull knife will crush the tortilla and squish out the filling.
Can I use low-fat cream cheese and sour cream?
Yes, you can. The filling won’t be quite as rich and creamy, but it will still work. Just make sure the cream cheese is softened to room temperature so it mixes smoothly. I’ve used Neufchatel cheese (which is lower in fat) with good results.
How do I keep the pinwheels from getting soggy?
The key is to make sure your bacon is completely cool and dry before adding it to the filling. Any residual grease or moisture from warm bacon can make the filling watery. Also, don’t overmix the filling—overmixing can break down the cream cheese and make it loose. And always store them in an airtight container with a paper towel to absorb excess moisture.
Can I freeze these pinwheels?
Yes, but only the whole rolls, not the sliced pinwheels. Wrap each roll tightly in plastic wrap, then place them in a freezer bag. They’ll keep for up to 1 month. Thaw overnight in the refrigerator before slicing and serving. Sliced pinwheels don’t freeze well because they get mushy when thawed.
Pin This Recipe!

Easy Smoky Bacon Ranch Pinwheels: Best Tailgate Appetizer

These Smoky Bacon Ranch Tailgate Pinwheels are creamy, smoky, and packed with ranch flavor. They’re quick to make, perfect for tailgating, and always disappear fast.
- Prep Time: 20 minutes
- Cook Time: 18 minutes
- Total Time: 2 hours 38 minutes (includes chilling)
- Yield: 32 pinwheels 1x
- Category: Appetizer
- Cuisine: American
Ingredients
- 8 ounces cream cheese, softened
- 1/2 cup sour cream
- 1 packet (1 ounce) ranch seasoning mix
- 1 teaspoon smoked paprika
- 1/2 teaspoon garlic powder
- 1/4 teaspoon cayenne pepper (optional)
- 8 slices bacon, cooked and crumbled
- 1 cup shredded sharp cheddar cheese
- 1/2 cup chopped green onions
- 4 large flour tortillas (10-inch)
Instructions
- Cook the bacon until crispy. Preheat oven to 400°F (200°C). Line a rimmed baking sheet with parchment paper. Lay bacon slices in a single layer and bake for 15-18 minutes until golden brown and crispy. Transfer to a paper towel-lined plate to drain and cool, then crumble into small pieces.
- In a medium mixing bowl, beat softened cream cheese and sour cream with an electric hand mixer on medium speed until smooth and combined, about 1 minute. Scrape down the sides.
- Add ranch seasoning mix, smoked paprika, garlic powder, and cayenne pepper (if using). Beat until evenly incorporated. The mixture should be creamy and pale orange.
- Fold in crumbled bacon, shredded cheddar cheese, and chopped green onions using a rubber spatula until evenly distributed. Taste and adjust seasoning if needed.
- Lay flour tortillas flat on a clean work surface. If stiff, microwave for about 10 seconds to make pliable. Spread about 1/2 cup of filling evenly over each tortilla, leaving a 1/2-inch border around the edges.
- Starting at one edge, roll each tortilla tightly but gently, like rolling a burrito. Place seam-side down on a cutting board.
- Wrap each rolled tortilla tightly in plastic wrap. Refrigerate for at least 2 hours, preferably overnight, to firm up the filling.
- When ready to serve, unwrap the rolls and place on a cutting board. Using a sharp knife, slice each roll into 1-inch pieces using a gentle sawing motion. Arrange on a serving platter cut-side up.
Notes
Chill the rolls for at least 2 hours for clean slicing. Overnight chilling enhances flavor. Use a serrated knife for cleaner cuts. Keep pinwheels cold until serving. Make ahead for best results.
Nutrition
- Serving Size: 1 pinwheel
- Calories: 120
- Sugar: 1
- Sodium: 280
- Fat: 8
- Saturated Fat: 4
- Carbohydrates: 7
- Protein: 5
Keywords: bacon ranch pinwheels, tailgate appetizer, easy appetizer, party food, game day snack