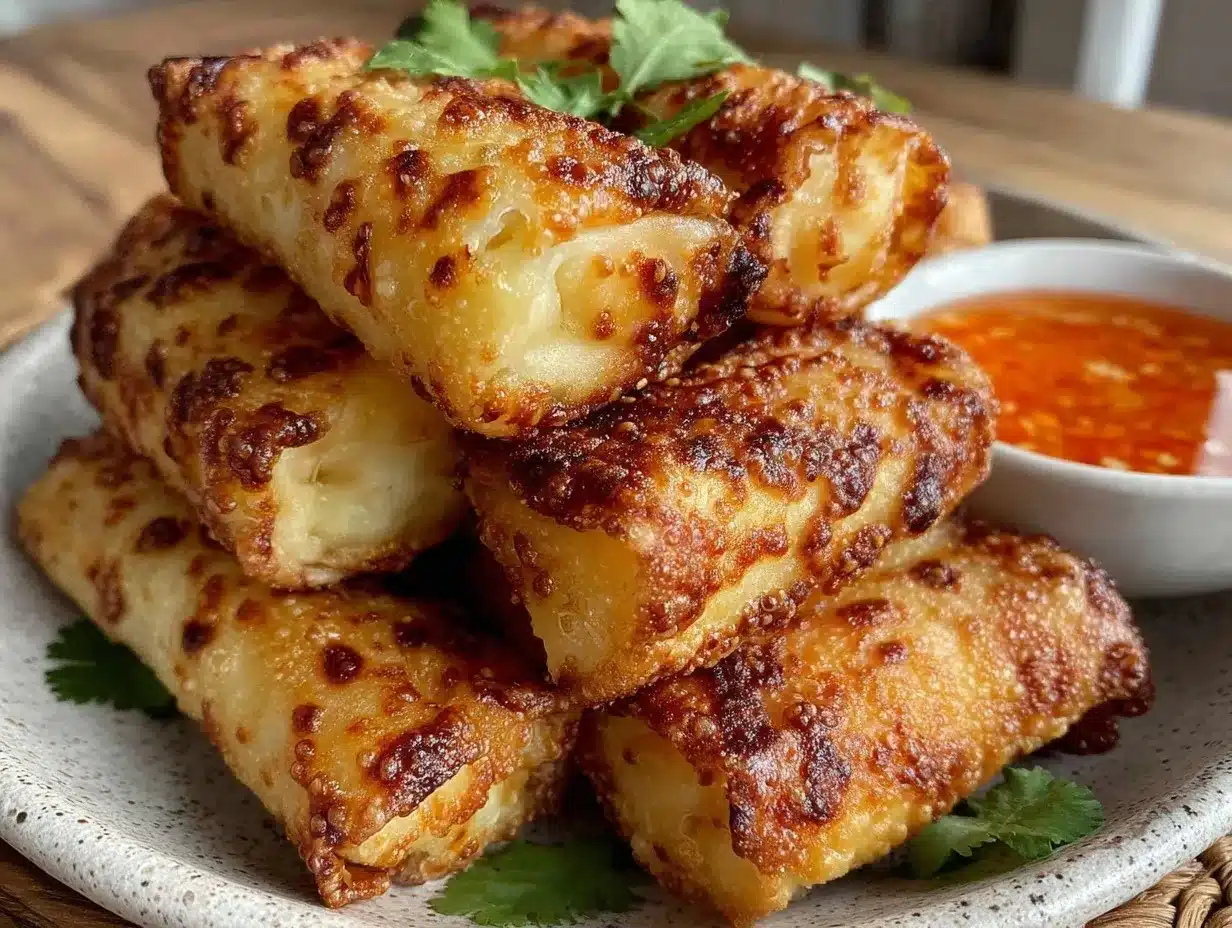
Let me tell you, the moment the aroma of sizzling spring rolls filled my kitchen, I was hooked. The crisp crackle as I bit into the golden shell, revealing a warm, savory filling, is the kind of moment where you pause, take a deep breath, and just smile because you know you’re onto something truly special. The first time I made these crispy air fryer spring rolls, I was knee-high to a grasshopper experimenting in my mom’s kitchen during a rainy weekend. My family couldn’t stop sneaking them off the cooling rack (and I can’t really blame them). Honestly, these spring rolls deliver pure, nostalgic comfort with none of the greasy mess of traditional frying.
You know what makes these spring rolls a winner? They’re dangerously easy to whip up, perfect for a quick snack or a party appetizer that’ll brighten your Pinterest cookie board. Years ago, I wish I’d discovered this recipe — it’s become a staple for family gatherings and last-minute cravings alike (tested multiple times in the name of research, of course!). Whether you’re looking for a crunchy treat to impress guests or a savory bite to satisfy your snack attack, this recipe will feel like a warm hug wrapped in a crispy wrapper.
Why You’ll Love This Recipe
After countless trials and feedback from friends and family, I can say with confidence that this crispy air fryer spring rolls recipe stands out for many reasons:
- Quick & Easy: Comes together in under 30 minutes, perfect for busy weeknights or last-minute cravings.
- Simple Ingredients: No fancy grocery trips needed; you likely already have everything in your kitchen.
- Perfect for Any Occasion: Great for potlucks, cozy dinners, or as a delightful snack to brighten your day.
- Crowd-Pleaser: Always gets rave reviews from kids and adults alike—trust me, no leftovers here!
- Unbelievably Delicious: The crisp exterior and savory filling combo is next-level comfort food, without the guilt of deep frying.
What makes this recipe different? Using the air fryer means you get that perfect crunch with minimal oil, and the filling is balanced just right—savory with a hint of sweetness and a touch of spice. The wrapper crisps up beautifully without sogginess, thanks to a simple brushing technique. This isn’t just another spring roll recipe; it’s your best version. Honestly, it’s the kind of snack that makes you close your eyes after the first bite, savoring every crisp, flavorful moment.
What Ingredients You Will Need
This recipe uses simple, wholesome ingredients to deliver bold flavor and satisfying texture without the fuss. Most are pantry staples, and substitutions are easy if you’re feeling adventurous or need allergen-friendly options.
- Spring Roll Wrappers: Thin, square wrappers, preferably from brands like Bibigo or fresh from your local Asian market for the best texture.
- Vegetables:
- Shredded cabbage (about 2 cups) – adds crunch and freshness
- Grated carrot (1 cup) – for sweetness and color
- Chopped green onions (3-4 stalks) – adds a mild onion flavor
- Minced garlic (2 cloves) – for aromatic depth
- Protein: Finely chopped cooked shrimp or ground chicken (about 1 cup) – optional but adds a savory boost.
- Sauce & Seasonings:
- Soy sauce (2 tablespoons) – choose low-sodium for a balanced taste
- Oyster sauce (1 tablespoon) – adds umami (can swap with hoisin for a sweeter profile)
- Sesame oil (1 teaspoon) – a little goes a long way for that nutty aroma
- Freshly ground black pepper (to taste)
- Optional: A pinch of chili flakes if you like a mild kick
- For Wrapping & Crisping:
- Water (for sealing edges)
- Cooking oil spray or a light brush of vegetable or avocado oil (for air fryer crispiness)
Substitution tips: Use gluten-free wrappers and tamari sauce for a gluten-free version. Swap shrimp or chicken with tofu or mushrooms for a vegetarian twist. Fresh seasonal veggies like bell peppers or bean sprouts can be tossed in for variety.
Equipment Needed
- Air Fryer: Essential for that perfect crisp without deep frying. Models like the Philips or Ninja work great, but any air fryer with a basket and adjustable temperature will do.
- Mixing Bowls: For combining your filling ingredients.
- Sharp Knife and Cutting Board: For prepping your veggies and protein finely.
- Brush or Spray Bottle: To lightly oil the spring rolls before air frying (helps with browning).
- Measuring Spoons: For accurate seasoning amounts.
If you don’t have an air fryer, a conventional oven with a convection setting can work, though the texture won’t be quite the same. For maintenance, keep your air fryer basket clean with a quick wipe after each use to prevent residue buildup and ensure even cooking every time.
Preparation Method
- Prepare the Filling (10 minutes): In a large bowl, combine shredded cabbage, grated carrot, chopped green onions, minced garlic, and your choice of protein. Add soy sauce, oyster sauce, sesame oil, black pepper, and chili flakes if using. Mix thoroughly until well combined. The filling should smell savory and look well coated but not soggy.
- Prepare Spring Roll Wrappers (5 minutes): Lay a wrapper flat on a clean surface. Keep the rest covered with a damp cloth to prevent drying out.
- Fill the Wrappers (10 minutes): Place about 2 tablespoons (30g) of filling near one corner of the wrapper. Fold that corner over the filling, then fold in the sides tightly, and roll it up firmly towards the opposite corner. Use a little water to moisten the final edge and seal the roll securely. Repeat with remaining wrappers and filling.
- Preheat the Air Fryer (3 minutes): Set your air fryer to 375°F (190°C) and let it warm up.
- Prepare Spring Rolls for Air Frying (2 minutes): Lightly brush or spray each spring roll with oil on all sides. This step is key for that irresistible crunch.
- Air Fry (10-12 minutes): Place spring rolls in a single layer in the air fryer basket, leaving space between each. Cook for 10-12 minutes, flipping halfway through to ensure even browning. They should be golden brown and crispy when done.
- Serve Immediately: Let them cool for a minute or two (the filling will be hot), then serve with your favorite dipping sauce like sweet chili or soy sauce with a splash of lime.
Pro tip: If the filling feels too wet, squeeze it gently in a clean kitchen towel before wrapping to avoid soggy rolls. Also, don’t overcrowd the air fryer basket—cook in batches if needed for perfect crispiness.
Cooking Tips & Techniques
Mastering crispy air fryer spring rolls is easier than it looks, but a few tricks make all the difference. First off, finely chopping your veggies and protein ensures the filling cooks evenly and fits snugly inside the wrapper. If the filling is too chunky, rolling becomes tricky and the rolls may burst during cooking.
Let’s face it, nobody wants a soggy spring roll, so brushing a thin layer of oil is a must. I’ve tried spraying only, brushing only, and a mix of both—brushing wins hands down for even coverage and a deep golden hue.
Timing is everything. Cooking too long can dry out the filling, too short and the wrapper stays pale and limp. I’ve found 10-12 minutes at 375°F (190°C) flips the rolls to crispy perfection every time. Don’t forget to flip halfway through — it’s the secret to that all-around crunch.
When multitasking, prepare your filling and wrap all rolls first, then air fry in batches. This keeps everything moving smoothly and the rolls fresh and ready to serve hot.
Variations & Adaptations
Feeling creative? Here are some tasty ways to switch things up:
- Vegetarian Delight: Use tofu, shredded mushrooms, and bean sprouts instead of meat. Add a dash of soy sauce and a sprinkle of five-spice powder for a flavor twist.
- Spicy Kick: Mix finely chopped jalapeños or add sriracha to the filling for a fiery bite.
- Gluten-Free Version: Swap traditional wrappers for rice paper sheets (softened before wrapping) and use tamari in place of soy sauce.
- Baking Option: If you don’t have an air fryer, bake at 400°F (200°C) on a parchment-lined sheet for 15-18 minutes, flipping halfway, although the air fryer still gives the best crunch.
- Sweet & Savory: Add shredded apple or pineapple to the filling for a fruity surprise that pairs beautifully with a honey-soy dipping sauce.
Personally, I once tried adding crushed peanuts and fresh mint to the filling — a game changer for texture and freshness!
Serving & Storage Suggestions
Serve these crispy air fryer spring rolls hot and fresh for the best experience. They’re fantastic alongside dipping sauces like sweet chili, peanut sauce, or a tangy soy-lime mix. Pair with a crisp Asian slaw or steamed jasmine rice for a fuller meal.
If you have leftovers (rare, but it happens!), store them in an airtight container in the fridge for up to 2 days. To reheat, pop them back in the air fryer at 350°F (175°C) for 4-5 minutes to regain that crunch—oven reheating works too but takes longer.
Flavors actually meld better after a few hours in the fridge, making them a great make-ahead snack or party appetizer.
Nutritional Information & Benefits
Each crispy air fryer spring roll contains approximately 120-150 calories, depending on filling choices. They’re a lighter alternative to deep-fried versions, with less oil and fat.
The cabbage and carrots add fiber and vitamins A and C, while lean proteins like shrimp or chicken provide satisfying protein. Using an air fryer keeps the recipe low in saturated fat, making it a smart snack or appetizer.
This recipe can easily be adapted to fit gluten-free, vegetarian, or low-carb diets by swapping ingredients accordingly. Just be mindful of allergens like shellfish or soy when serving guests.
Conclusion
In a nutshell, these crispy air fryer spring rolls are a must-try for anyone craving a delicious snack that’s easy, quick, and packed with flavor. They’re flexible enough to suit any dietary preference and perfect for sharing (or not, I won’t judge!). I love how they bring a little crunch and comfort to any day, with zero greasy cleanup.
Give this recipe a whirl, tweak it to your liking, and let me know how your crispy air fryer spring rolls turn out! Don’t forget to leave a comment, share your favorite dipping sauces, or any fun variations you invent. Happy snacking!
Frequently Asked Questions
Can I freeze air fryer spring rolls?
Yes! Freeze them uncooked on a tray, then transfer to a freezer bag. Air fry straight from frozen, adding a few extra minutes to cooking time.
What’s the best dipping sauce for spring rolls?
Sweet chili sauce is a classic, but peanut sauce, soy-lime dip, or even hoisin mixed with a bit of sriracha work wonderfully.
Can I make these vegetarian or vegan?
Absolutely! Just swap the meat for tofu, mushrooms, or extra veggies, and use vegan-friendly sauces.
How do I prevent spring rolls from bursting while cooking?
Don’t overfill the wrappers and seal the edges well with water. Also, avoid stacking them while air frying to ensure even cooking.
Can I bake these instead of using an air fryer?
You can bake at 400°F (200°C) for 15-18 minutes, flipping halfway, but the air fryer creates a crispier texture with less oil.
Pin This Recipe!

Crispy Air Fryer Spring Rolls

These crispy air fryer spring rolls are an easy, quick snack with a golden, crunchy exterior and a savory, balanced filling. Perfect for parties, family gatherings, or a satisfying snack without the greasy mess of deep frying.
- Prep Time: 25 minutes
- Cook Time: 12 minutes
- Total Time: 37 minutes
- Yield: 12 spring rolls 1x
- Category: Snack
- Cuisine: Asian
Ingredients
- Spring roll wrappers (thin, square)
- 2 cups shredded cabbage
- 1 cup grated carrot
- 3–4 stalks chopped green onions
- 2 cloves minced garlic
- 1 cup finely chopped cooked shrimp or ground chicken (optional)
- 2 tablespoons soy sauce (low-sodium preferred)
- 1 tablespoon oyster sauce (or hoisin sauce for sweeter flavor)
- 1 teaspoon sesame oil
- Freshly ground black pepper to taste
- Pinch of chili flakes (optional)
- Water (for sealing edges)
- Cooking oil spray or light brush of vegetable or avocado oil
Instructions
- Prepare the filling: In a large bowl, combine shredded cabbage, grated carrot, chopped green onions, minced garlic, and your choice of protein. Add soy sauce, oyster sauce, sesame oil, black pepper, and chili flakes if using. Mix thoroughly until well combined.
- Prepare spring roll wrappers: Lay a wrapper flat on a clean surface. Keep the rest covered with a damp cloth to prevent drying out.
- Fill the wrappers: Place about 2 tablespoons (30g) of filling near one corner of the wrapper. Fold that corner over the filling, then fold in the sides tightly, and roll it up firmly towards the opposite corner. Use a little water to moisten the final edge and seal the roll securely. Repeat with remaining wrappers and filling.
- Preheat the air fryer to 375°F (190°C) and let it warm up.
- Lightly brush or spray each spring roll with oil on all sides.
- Place spring rolls in a single layer in the air fryer basket, leaving space between each. Cook for 10-12 minutes, flipping halfway through to ensure even browning. They should be golden brown and crispy when done.
- Let them cool for a minute or two, then serve immediately with your favorite dipping sauce.
Notes
If the filling feels too wet, squeeze it gently in a clean kitchen towel before wrapping to avoid soggy rolls. Don’t overcrowd the air fryer basket; cook in batches if needed. Brushing oil on the rolls gives a better golden color than spraying alone. Can bake at 400°F (200°C) for 15-18 minutes if no air fryer is available.
Nutrition
- Serving Size: 1 spring roll
- Calories: 135
- Sugar: 3
- Sodium: 350
- Fat: 4
- Saturated Fat: 0.5
- Carbohydrates: 18
- Fiber: 2
- Protein: 5
Keywords: spring rolls, air fryer, crispy snack, easy appetizer, homemade spring rolls, healthy snack, quick recipe