It was 11:47 PM on a random Wednesday in early October, and I had a ridiculous, specific craving for something light, airy, and weirdly cute. I didn’t have the energy for a full-blown cake or a batch of cookies that required chilling dough, but I had three egg whites sitting in the fridge from a quiche I’d made for lunch and a bag of sugar that was practically begging to be used. The idea just arrived, fully formed, like a little ghost floating into my brain: ghost meringue cookies. I mean, honestly, it was one of those late-night kitchen experiments where you’re not sure if you’re being a genius or just delirious, but you commit anyway.
The thing about working late at night is that the usual rules kind of dissolve. You’re not measuring things with the same precision you would at 2 PM. You’re going by feel, by the way the mixture looks in the dim light of the stove hood. I remember I piped my first few ghosts and they looked more like sad blobs than anything spooky, but then I figured out the trick—a quick flick of the wrist to pull up that little tail. It was a quiet, slightly messy triumph. I made a bit of a mess on the counter, of course, and I’m pretty sure I got a smear of meringue on my cheek, but when those little guys came out of the oven, perfectly crisp and faintly golden at the tips, I knew this was a keeper. Maybe you’ve been there, standing in your kitchen at a ridiculous hour, making something just because the whim struck you. That’s exactly how this recipe was born, and honestly, that’s why I keep making it.
Why You’ll Love This Recipe
Let me tell you, I’ve tested this recipe about six times now, tweaking the sugar ratio and the oven temperature until I got it just right. These ghost meringue cookies aren’t just another Halloween treat—they’re the kind of thing that makes people light up when they see them. Here’s why you’re going to love them:
- Quick & Easy: From start to finish, you’re looking at about 2 hours, but most of that is hands-off baking time. The actual prep is maybe 15 minutes.
- Simple Ingredients: You need exactly four ingredients: egg whites, sugar, cream of tartar, and vanilla extract. That’s it. No fancy grocery trips.
- Perfect for Halloween: These are the star of any Halloween party, classroom treat, or spooky movie night. They’re cute without being overly complicated.
- Crowd-Pleaser: Kids and adults both go crazy for them. They’re light, not too sweet, and they look like little ghosts—what’s not to love?
- Unbelievably Delicious: The texture is what gets me every time. They’re crisp on the outside with a light, airy center that melts on your tongue. It’s next-level comfort food in a tiny, ghost-shaped package.
What makes this recipe different from the rest is the technique. I found that adding the sugar slowly and letting the meringue whip until it’s stiff and glossy makes all the difference. It’s not just another version of meringue cookies—it’s my best version. This recipe is the kind that makes you close your eyes after the first bite. It’s Halloween fun reimagined—simpler, faster, but with the same soul-soothing satisfaction. Perfect for impressing guests without any stress, or turning a simple October evening into something memorable.
What Ingredients You Will Need
This recipe uses simple, wholesome ingredients to deliver that light-as-air texture and subtle sweetness. You probably have most of these in your kitchen already, which is part of the magic. Let’s break down what you need and why each ingredient matters.
For the Meringue
- 3 large egg whites, at room temperature (room temperature eggs whip up much fluffier, so don’t skip this step)
- 3/4 cup (150g) granulated sugar (I prefer Domino brand for its fine texture, but any granulated sugar works)
- 1/4 teaspoon cream of tartar (this stabilizes the meringue and helps it hold its shape—don’t skip it)
- 1/2 teaspoon vanilla extract (pure vanilla extract gives the best flavor, but imitation works in a pinch)
- A pinch of salt (just a tiny pinch to balance the sweetness)
For the Ghost Faces (Optional but Adorable)
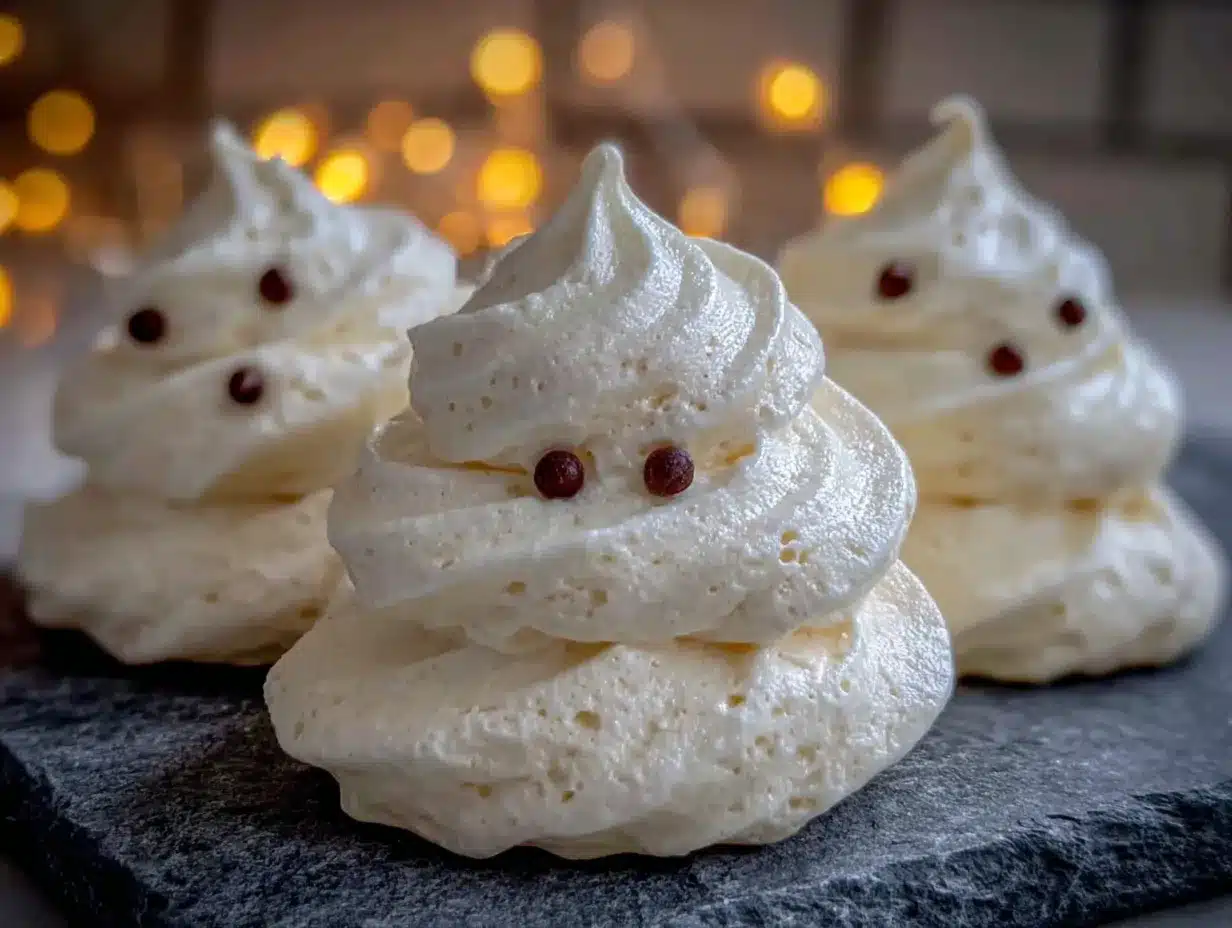
- 1/4 cup mini chocolate chips, or dark chocolate melting wafers (for piping the eyes and mouths)
- 1/2 teaspoon coconut oil (if using chocolate chips, this helps thin the chocolate for piping)
Ingredient Selection Tips: Look for eggs that are fresh but not too fresh—eggs that are about a week old actually whip up better because the whites are slightly thinner. For the cream of tartar, I’ve tested this recipe with both cream of tartar and a squeeze of lemon juice, and cream of tartar gives the most reliable results. If you’re out, you can use 1/2 teaspoon of lemon juice or white vinegar as a substitute. For the sugar, avoid superfine sugar if you can—it dissolves too quickly and can make the meringue weepy. Regular granulated sugar is your best friend here.
Substitution Guidance: If you need a dairy-free option, these cookies are naturally dairy-free since they’re made with only egg whites. For a vegan version, you can try aquafaba (the liquid from a can of chickpeas) instead of egg whites, but I’ll be honest—the texture isn’t quite the same. Stick with the egg whites for the best results. If you’re worried about salmonella, you can use pasteurized egg whites from a carton, but make sure they’re at room temperature before whipping.
Equipment Needed
You don’t need a lot of fancy equipment for these ghost meringue cookies, which is part of why I love them. Here’s what you’ll need:
- Electric stand mixer or hand mixer: You can whip meringue by hand, but honestly, your arm will thank you for using a mixer. I use my KitchenAid stand mixer with the whisk attachment, and it’s perfect.
- Large mixing bowl: Make sure it’s spotless—any grease can prevent the egg whites from whipping up properly. Glass or metal bowls work best.
- Piping bag with a round tip: I use a Wilton #12 round tip for the ghost shapes. If you don’t have a piping bag, you can use a zip-top bag with a corner snipped off.
- Baking sheets: Two large baking sheets lined with parchment paper. The parchment is non-negotiable—it prevents sticking and makes cleanup easy.
- Small piping bag or toothpick: For adding the chocolate faces. A toothpick works surprisingly well for dotting on the eyes.
- Cooling rack: For cooling the cookies completely before adding the chocolate faces.
Budget-Friendly Options: If you don’t have a stand mixer, a hand mixer works just fine—it’ll take a few extra minutes, but the results are the same. No piping bag? No problem. You can spoon the meringue into small mounds and shape them with the back of a spoon. They won’t look as ghost-like, but they’ll still taste amazing.
Preparation Method
Alright, let’s get into the nitty-gritty. This method has been tested and tweaked so you don’t have to learn the hard way like I did. Follow these steps, and you’ll have perfect ghost meringue cookies every time.
- Preheat your oven to 200°F (93°C). Yes, this is a low temperature. We’re not baking the meringue—we’re drying it out. Line two baking sheets with parchment paper and set them aside.
- Separate your eggs carefully. This is crucial—any yolk in the whites will prevent them from whipping up. I separate each egg into a small bowl first, then transfer the white to the mixing bowl. That way, if one yolk breaks, you don’t ruin the whole batch. Let the egg whites come to room temperature for about 30 minutes before whipping.
- Whip the egg whites and cream of tartar. In your clean, dry mixing bowl, combine the egg whites and cream of tartar. Start whipping on medium speed until the mixture becomes frothy and light, about 2 minutes. You should see small bubbles forming.
- Add the sugar slowly. With the mixer running on medium-high speed, start adding the sugar one tablespoon at a time. I know it’s tempting to dump it all in at once, but don’t. Adding it slowly helps the sugar dissolve completely, which gives you a smooth, glossy meringue. This process takes about 5-7 minutes total.
- Add the vanilla and salt. Once all the sugar is incorporated, add the vanilla extract and a tiny pinch of salt. Continue whipping on high speed until the meringue is stiff and glossy. You’ll know it’s ready when you lift the whisk and the meringue forms stiff peaks that hold their shape. The mixture should also feel smooth between your fingers—not gritty from undissolved sugar. This takes about 2-3 more minutes.
- Prepare your piping bag. Fit your piping bag with the round tip and fill it with the meringue. If you’re using a zip-top bag, snip off about 1/2 inch from one corner. Don’t overfill the bag—about halfway is perfect.
- Pipe the ghosts. Hold the piping bag perpendicular to the baking sheet, about 1/2 inch above the surface. Pipe a small mound of meringue, about 1.5 inches wide. Then, pull the bag straight up while gently squeezing to create a tall peak. Release pressure and flick your wrist up to create the ghost’s tail. Space the ghosts about 1 inch apart—they don’t spread much, but they need a little breathing room.
- Bake low and slow. Place the baking sheets in the preheated oven and bake for 60-75 minutes. The meringues should be dry to the touch and easily lift off the parchment paper. They shouldn’t be brown—just pale and slightly matte. If they start to brown, your oven is too hot.
- Cool completely. Turn off the oven and leave the meringues inside with the door slightly ajar for about 30 minutes. This helps them dry out completely and prevents cracking. Then transfer them to a cooling rack to cool completely.
- Add the ghost faces. Once the meringues are completely cool, melt your chocolate chips with the coconut oil in a small microwave-safe bowl. Microwave in 20-second intervals, stirring between each, until smooth. Transfer the melted chocolate to a small piping bag or zip-top bag with a tiny snipped corner. Pipe two small dots for eyes and a tiny open “o” for the mouth. Let the chocolate set for about 15 minutes before serving.
Troubleshooting Tip: If your meringue is weeping (liquid pooling at the bottom), your sugar didn’t dissolve completely. Next time, add the sugar more slowly and whip a little longer. If your ghosts collapse, they weren’t baked long enough or the oven temperature was too high. Patience is key with meringue!
Cooking Tips & Techniques
I’ve made my fair share of mistakes with meringue, and I’m here to save you from the same fate. Here are the tips I wish someone had told me when I started.
The Humidity Factor: Meringue is sensitive to humidity. If it’s a rainy day or your kitchen is steamy from boiling pasta, your meringue might not whip up as well. I learned this the hard way when I tried making these on a humid August afternoon and ended up with a sticky mess. For best results, make these on a dry day, or run your air conditioner to reduce humidity in the kitchen.
The Bowl Must Be Spotless: I cannot stress this enough. Any trace of grease or yolk will ruin your meringue. I wipe my bowl and whisk with a bit of lemon juice or white vinegar on a paper towel before I start. It’s an extra step, but it guarantees success.
Don’t Overbake: The first time I made these, I left them in the oven too long because I wanted them extra crispy. They turned out brown and brittle. The goal is to dry them out, not bake them. If they start to brown, your oven is too hot. I recommend using an oven thermometer to check the temperature—my oven runs about 25 degrees hot, so I set it lower than the recipe calls for.
Timing and Multitasking: While the meringues are baking, you can clean up your kitchen or prep the chocolate for the faces. Just don’t open the oven door too often—the rush of cold air can cause the meringues to crack. I usually peek through the oven window instead.
Consistency is Key: The meringue should be thick and glossy, like marshmallow fluff. If it’s runny, keep whipping. If it’s dry and clumpy, you’ve overwhipped it (yes, that’s a thing). Stop as soon as it forms stiff, glossy peaks that hold their shape when you lift the whisk.
Variations & Adaptations
One of the best things about this recipe is how easy it is to adapt. Here are some variations I’ve tried and loved.
Flavor Variations
- Peppermint Ghosts: Add 1/4 teaspoon peppermint extract along with the vanilla. These are perfect for a winter-themed party or a Christmas twist on Halloween.
- Chocolate Ghosts: Sift 2 tablespoons of unsweetened cocoa powder into the sugar before adding it to the egg whites. You’ll get a subtle chocolate flavor and a lovely pale brown color.
- Lemon Ghosts: Replace the vanilla with 1 teaspoon of lemon zest and 1/2 teaspoon of lemon extract. These are bright and refreshing—great for a spring celebration.
Dietary Adaptations
- Vegan Version: Replace the egg whites with aquafaba (the liquid from a can of chickpeas). Use 3 tablespoons of aquafaba per egg white. It whips up similarly but takes a bit longer. The texture won’t be exactly the same, but it’s a solid alternative.
- Sugar-Free Version: Use a granulated monk fruit sweetener instead of sugar. Keep in mind that sugar-free meringues won’t be as crisp and may have a slightly different texture, but they’re still delicious.
- Gluten-Free: These cookies are naturally gluten-free, so no changes needed. Just make sure your vanilla extract is certified gluten-free if you’re sensitive.
Customization Ideas
- Colorful Ghosts: Add a drop of gel food coloring to the meringue before piping. Purple, green, or orange ghosts are perfect for Halloween.
- Spooky Eyes: Instead of chocolate dots, use edible googly eyes or colored candy melts for the faces. You can find these at craft stores or online.
- Glittery Ghosts: Sprinkle a little edible glitter or luster dust over the ghosts before they go into the oven. They’ll come out sparkling and magical.
Serving & Storage Suggestions
These ghost meringue cookies are best served at room temperature, and they’re perfect for Halloween parties, spooky movie nights, or just because. Here’s how to make the most of them.
Serving: Arrange the ghosts on a platter or in a decorative jar. They look amazing next to other Halloween treats like pumpkin cupcakes or caramel apples. For a fun presentation, place them on a bed of black sesame seeds or crushed Oreos to look like they’re floating in the dark. They’re also great for dunking in hot chocolate—just be careful, they’re delicate!
Storage: Meringue cookies are sensitive to moisture, so storage is key. Keep them in an airtight container at room temperature for up to 2 weeks. Don’t refrigerate them—the humidity will make them sticky. If you live in a humid climate, add a silica gel packet to the container to absorb excess moisture. I keep mine in a glass jar with a tight-fitting lid, and they stay crisp for days.
Freezing: You can freeze meringue cookies for up to 3 months. Place them in a single layer in a freezer-safe container, with parchment paper between layers. Thaw them at room temperature for about 30 minutes before serving. Don’t open the container while they’re thawing, or condensation can form and make them sticky.
Flavor Development: These cookies taste best within the first week. Over time, they’ll lose a bit of their crispness, but they’re still delicious. If they start to soften, you can re-crisp them in a 200°F oven for about 10 minutes.
Nutritional Information & Benefits
Let’s be real—these are cookies, not health food. But they’re lighter than most Halloween treats, and they have some surprising benefits. Here’s the nutritional breakdown per ghost (based on about 24 cookies):
| Nutrient | Amount per Cookie |
|---|---|
| Calories | 25 |
| Total Fat | 0g |
| Saturated Fat | 0g |
| Cholesterol | 0mg |
| Sodium | 5mg |
| Total Carbohydrates | 6g |
| Dietary Fiber | 0g |
| Sugars | 6g |
| Protein | 0.5g |
Health Benefits: These cookies are fat-free and cholesterol-free, making them a lighter option for Halloween. Egg whites are a good source of protein and contain all the essential amino acids. They’re also low in calories compared to traditional cookies—perfect for when you want a little something sweet without overdoing it.
Dietary Considerations: These cookies are naturally gluten-free, dairy-free, and nut-free. They’re suitable for most dietary restrictions, but they do contain eggs. If you’re vegan, try the aquafaba version mentioned above. Always check your chocolate chips for dairy if you’re serving someone with a dairy allergy.
Conclusion
These ghost meringue cookies are more than just a Halloween treat—they’re a little piece of late-night kitchen magic that turned into something I genuinely look forward to making every October. They’re simple, they’re cute, and they taste like a cloud that decided to be a ghost for a day. I love how they bring a smile to people’s faces, from the kids at my neighbor’s Halloween party to my own family gathered around the table.
I hope you give these a try and make them your own. Maybe you’ll add a splash of peppermint or a dash of cocoa powder. Maybe you’ll pipe them into little pumpkins instead of ghosts. Whatever you do, I’d love to hear about it. Leave a comment below and tell me how your ghosts turned out—or better yet, share a photo on Pinterest and tag me! Let’s make this Halloween a little sweeter, one ghost at a time. Happy baking!
Frequently Asked Questions
Can I make these ghost meringue cookies ahead of time?
Absolutely! You can make them up to 2 weeks in advance. Just store them in an airtight container at room temperature. If you’re adding chocolate faces, wait until the day you’re serving them to pipe the faces on—the chocolate can soften and smudge over time.
Why did my meringue turn out flat?
This usually happens for one of three reasons: your bowl or whisk had traces of grease, there was a bit of egg yolk in the whites, or you didn’t whip the meringue long enough. Make sure your equipment is spotless and your egg whites are yolk-free. Whip until the meringue forms stiff, glossy peaks that hold their shape.
Can I use liquid egg whites from a carton?
Yes, but the results won’t be as good. Carton egg whites are pasteurized, which can affect their ability to whip up. If you use them, make sure they’re at room temperature and add an extra tablespoon of sugar to help stabilize the meringue.
How do I know when the meringues are done baking?
They’re done when they’re dry to the touch and easily lift off the parchment paper. They should be pale and matte, not brown. If they’re still sticky or soft, give them another 10-15 minutes in the oven. Remember, we’re drying them out, not baking them.
Can I skip the chocolate faces?
Of course! The ghosts are adorable on their own, just plain white. You can also use edible markers to draw faces on them, or leave them plain and let your guests decide what expression their ghost has. It’s a fun activity for kids!
Pin This Recipe!
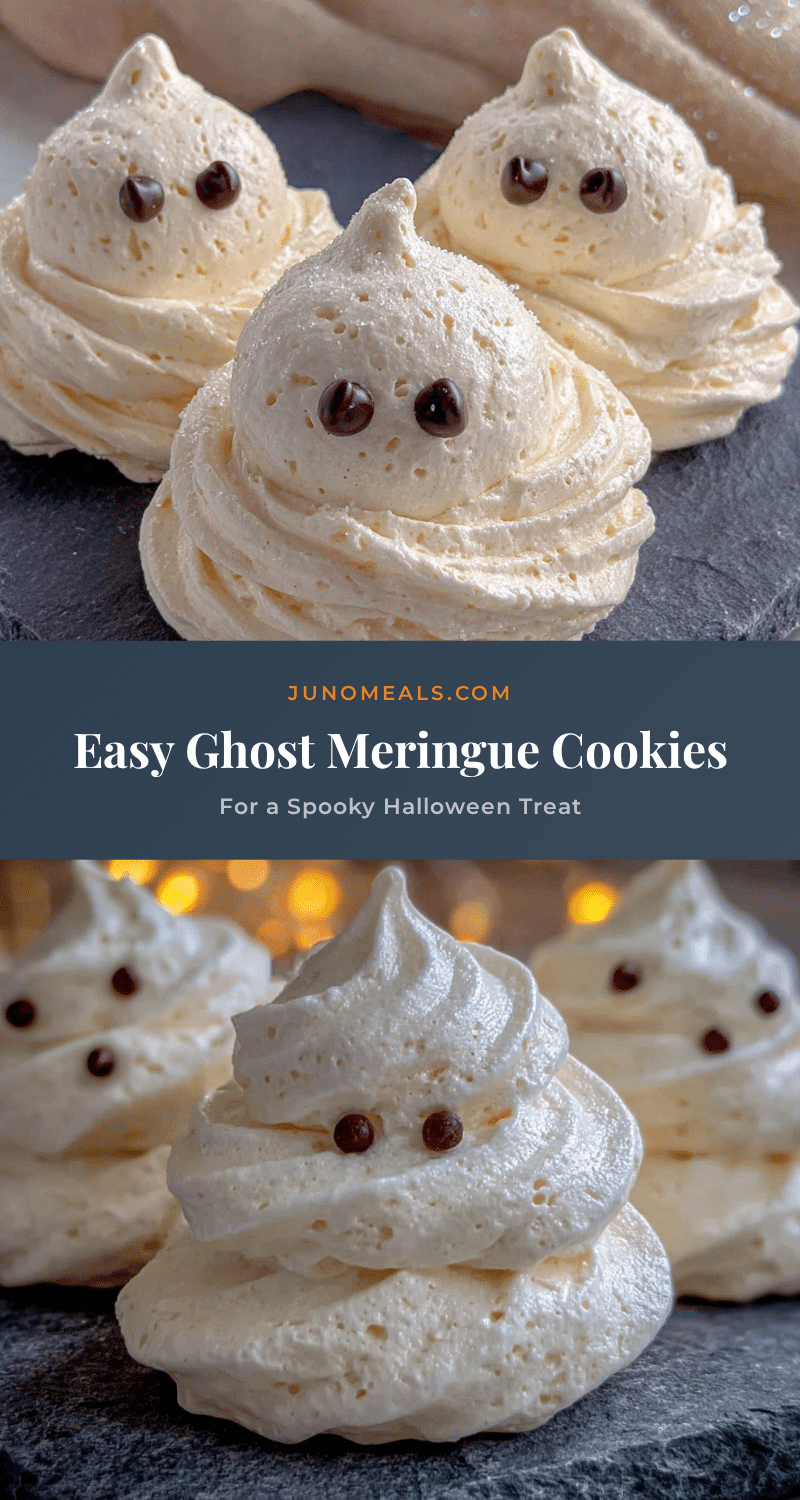
Easy Ghost Meringue Cookies: Best Spooky Halloween Treat
These ghost meringue cookies are light, airy, and perfectly spooky for Halloween. Made with just four simple ingredients, they’re quick to prepare and guaranteed to delight kids and adults alike.
- Prep Time: 15 minutes
- Cook Time: 60-75 minutes
- Total Time: 2 hours
- Yield: 24 cookies 1x
- Category: Dessert
- Cuisine: American
Ingredients
- 3 large egg whites, at room temperature
- 3/4 cup (150g) granulated sugar
- 1/4 teaspoon cream of tartar
- 1/2 teaspoon vanilla extract
- A pinch of salt
- 1/4 cup mini chocolate chips (or dark chocolate melting wafers)
- 1/2 teaspoon coconut oil (if using chocolate chips)
Instructions
- Preheat your oven to 200°F (93°C). Line two baking sheets with parchment paper.
- Separate your eggs carefully, ensuring no yolk gets into the whites. Let the egg whites come to room temperature for about 30 minutes before whipping.
- In a clean, dry mixing bowl, combine the egg whites and cream of tartar. Whip on medium speed until frothy and light, about 2 minutes.
- With the mixer running on medium-high speed, add the sugar one tablespoon at a time, taking about 5-7 minutes total.
- Add the vanilla extract and a tiny pinch of salt. Continue whipping on high speed until the meringue is stiff and glossy, about 2-3 more minutes.
- Fit a piping bag with a round tip and fill it with the meringue. Alternatively, use a zip-top bag with a corner snipped off.
- Pipe the ghosts: Hold the piping bag perpendicular to the baking sheet, about 1/2 inch above the surface. Pipe a small mound (about 1.5 inches wide), then pull the bag straight up while gently squeezing to create a tall peak. Release pressure and flick your wrist up to create the ghost’s tail. Space the ghosts about 1 inch apart.
- Bake for 60-75 minutes, until the meringues are dry to the touch and easily lift off the parchment paper. They should be pale and matte, not brown.
- Turn off the oven and leave the meringues inside with the door slightly ajar for about 30 minutes. Then transfer to a cooling rack to cool completely.
- Once completely cool, melt the chocolate chips with the coconut oil in a small microwave-safe bowl. Microwave in 20-second intervals, stirring between each, until smooth. Transfer to a small piping bag or zip-top bag with a tiny snipped corner. Pipe two small dots for eyes and a tiny open ‘o’ for the mouth. Let the chocolate set for about 15 minutes before serving.
Notes
Meringue is sensitive to humidity; make on a dry day. Ensure bowl and whisk are spotless and free of grease. Add sugar slowly to prevent weeping. Do not overbake; the goal is to dry out the meringue, not brown it. For best results, use an oven thermometer.
Nutrition
- Serving Size: 1 cookie
- Calories: 25
- Sugar: 6
- Sodium: 5
- Carbohydrates: 6
- Protein: 0.5
Keywords: ghost meringue cookies, Halloween cookies, meringue cookies, easy Halloween treat, spooky cookies


