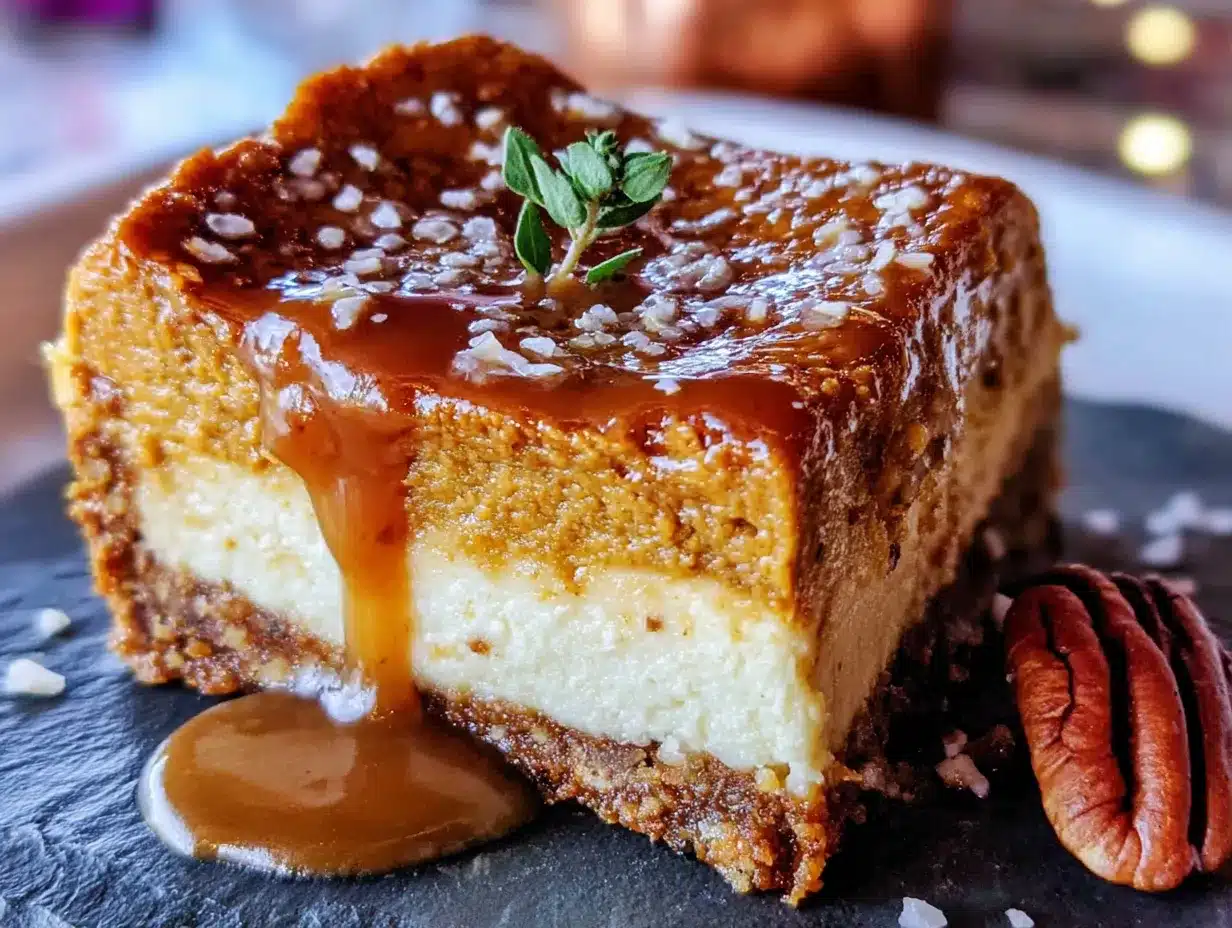
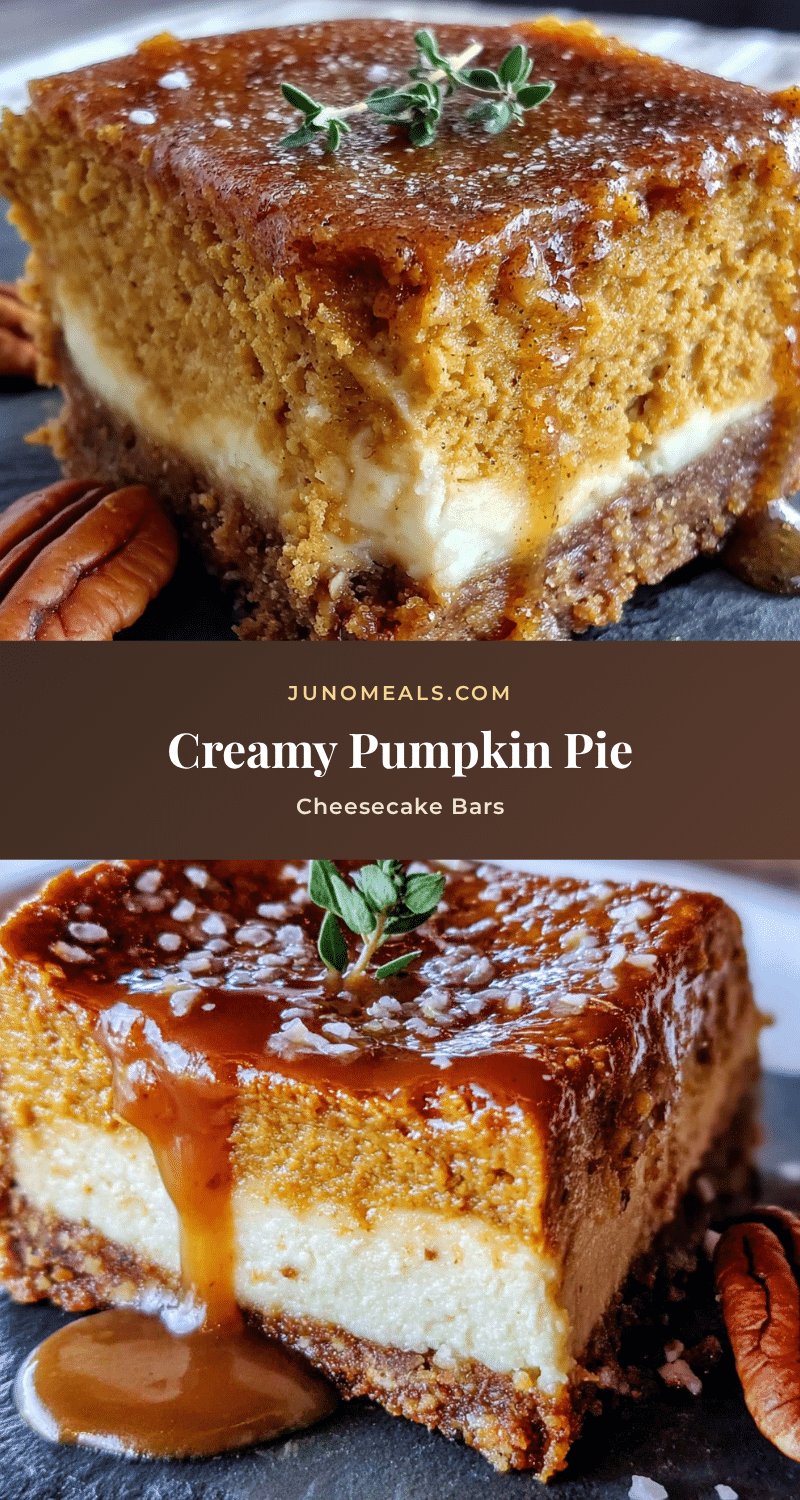
The first time I made these creamy pumpkin pie cheesecake bars, it was purely out of stubbornness. I had a half-used can of pumpkin puree staring at me from the fridge, a block of cream cheese that needed using, and absolutely no desire to roll out pie dough. So I didn’t. Instead, I threw together a buttery shortbread crust, beat the cream cheese until it was silky, and swirled in the spiced pumpkin mixture with a chopstick. What came out of the oven was this perfect, two-toned bar that had a clean, sharp edge when I cut into it — no cracking, no sinking, just a smooth top with those gorgeous marbled ribbons of orange and cream. That clean slice, honestly, is what sold me. It looked like something from a bakery display case, but it came from my messy kitchen counter on a random Tuesday night.
I kept making them because they solved a problem I didn’t know I had. I love pumpkin pie, but I’m not always patient enough to deal with a finicky crust. And I love cheesecake, but a full-sized one feels like a commitment. These bars split the difference. They give you that dense, velvety cream cheese layer everyone craves, topped with a pumpkin pie filling that actually tastes like fall — cinnamon, ginger, cloves, all of it. The textures stack on top of each other in a way that feels intentional, not accidental. And the whole thing comes together in about the same time it takes to preheat the oven and wash a few bowls. That’s the kind of dessert I can get behind.
What really stuck with me, though, was how forgiving the recipe turned out to be. I’ve overmixed the filling, underbaked the crust, and once forgot the eggs entirely (don’t ask). Every single batch still got devoured. There’s something reassuring about a dessert that doesn’t punish you for being distracted. These bars have become my go-to for fall gatherings, quiet weekends, and those moments when you just need something sweet that feels like a hug. They’re not fussy, they’re not pretentious, and they don’t require a pastry degree. They just work.
Why You’ll Love This Recipe
Let me tell you why these creamy pumpkin pie cheesecake bars have earned a permanent spot in my fall baking rotation. I’ve tested this recipe more times than I can count, tweaking the ratios, adjusting the bake time, and even swapping out ingredients just to see what happens. What I landed on is a dessert that delivers every single time.
- Quick & Easy: From start to finish, you’re looking at about an hour of active time. The oven does most of the heavy lifting. This is perfect for those busy weeknights when you still want a homemade dessert without spending hours in the kitchen.
- Simple Ingredients: You probably have most of these in your pantry right now. Butter, flour, sugar, eggs, cream cheese, pumpkin puree, and a few spices. No weird specialty items, no trips to three different stores.
- Perfect for Fall Gatherings: Whether it’s Thanksgiving, a potluck, or just a cozy Sunday dinner, these bars fit right in. They’re portable, they slice neatly, and they don’t need to be served warm like a traditional pie.
- Crowd-Pleaser: I’ve served these to kids, adults, picky eaters, and self-proclaimed pumpkin haters. The cheesecake layer wins over the skeptics, and the pumpkin layer satisfies the traditionalists. Everyone finds something to love.
- Unbelievably Delicious: The texture is what gets people. That creamy, almost mousse-like pumpkin layer sitting on top of a dense, tangy cheesecake, all held together by a buttery crust. It’s next-level comfort food.
What makes these bars different from every other pumpkin cheesecake recipe out there is the technique. I blend the cream cheese and sugar until it’s completely smooth — no lumps, no shortcuts. Then I add the pumpkin mixture in stages, creating that beautiful marbled effect without overmixing. The result is a bar that tastes like you spent hours on it, when really, you just followed a few simple steps. And honestly, that’s the kind of recipe I want to share. The one that makes you look good without making you work for it.
What Ingredients You Will Need
This recipe uses simple, wholesome ingredients to deliver bold flavor and satisfying texture without the fuss. Most of these are pantry staples, which means you can whip up a batch anytime the craving hits.
For the Crust
- 1 ½ cups (180g) graham cracker crumbs — You can use store-bought crumbs or crush your own. I prefer the texture of homemade crumbs, but the pre-made ones work just fine. (About 12 full graham cracker sheets if you’re crushing them yourself.)
- ¼ cup (50g) granulated sugar — Just enough to sweeten the crust without making it candy-like.
- 6 tablespoons (85g) unsalted butter, melted — Use real butter here, not margarine. It makes a huge difference in flavor and texture. I like using Land O’Lakes for consistent results.
- ¼ teaspoon salt — Balances the sweetness and enhances the buttery flavor.
For the Cheesecake Layer
- 16 ounces (450g) cream cheese, softened — Full-fat block cream cheese is non-negotiable here. Low-fat or spreadable versions will make the filling too soft. Let it sit on the counter for at least 30 minutes before you start.
- ½ cup (100g) granulated sugar — Sweetens the cheesecake layer just enough to complement the tangy cream cheese.
- 2 large eggs, room temperature — Cold eggs will seize up the cream cheese mixture. If you forgot to take them out early, place them in a bowl of warm water for 5 minutes.
- 1 teaspoon vanilla extract — Pure vanilla extract, not imitation. It adds a warmth that plays well with the pumpkin spices.
- ¼ cup (60ml) sour cream — This is my secret ingredient. It adds moisture and a slight tang that keeps the cheesecake layer from feeling too heavy. (Greek yogurt works in a pinch.)
For the Pumpkin Layer
- 1 cup (245g) pumpkin puree — Not pumpkin pie filling. Make sure you grab the 100% pure pumpkin puree. I recommend Libby’s for consistent texture and flavor.
- ¼ cup (50g) packed light brown sugar — Adds depth and a hint of molasses flavor that pairs beautifully with pumpkin.
- ¼ cup (50g) granulated sugar — Balances the earthiness of the pumpkin.
- 1 large egg, room temperature — Helps bind the pumpkin layer and gives it structure.
- 1 teaspoon vanilla extract — Rounds out the spices.
- 1 ½ teaspoons ground cinnamon — The backbone of pumpkin spice. I use Saigon cinnamon for a warmer, more intense flavor.
- ½ teaspoon ground ginger — Adds a little heat without being overwhelming.
- ¼ teaspoon ground nutmeg — Freshly grated if you have it. It makes a noticeable difference.
- ¼ teaspoon ground cloves — Just a pinch. Cloves are potent, so a little goes a long way.
- ¼ teaspoon salt — Brings all the flavors into focus.
Equipment Needed
You don’t need a professional kitchen to make these bars. Here’s what you’ll need:
- 9×9-inch baking pan — This is the sweet spot for bar thickness. An 8×8 pan will work, but your bars will be slightly thicker and may need a few extra minutes in the oven. A 9×13 pan will make them too thin.
- Parchment paper — Line your pan with two overlapping strips, leaving some overhang on the sides. This creates “handles” that let you lift the entire block of bars out cleanly. I cannot stress enough how much easier this makes slicing.
- Electric hand mixer or stand mixer — You can mix by hand, but an electric mixer ensures the cream cheese gets truly smooth. I’ve made these with a hand mixer for years and never had an issue.
- Large mixing bowls — One for the crust, one for the cheesecake layer, and one for the pumpkin layer. I use glass or stainless steel bowls.
- Rubber spatula — For scraping down the sides of the bowl and spreading the crust evenly. A silicone spatula is ideal.
- Measuring cups and spoons — Accurate measurements matter, especially for the spices.
- Sharp knife — For clean slices. A chef’s knife or a long serrated knife works well. Wipe the blade clean between cuts for those picture-perfect edges.
If you don’t have a 9×9 pan, you can use a disposable aluminum pan from the grocery store. Just make sure it’s sturdy enough to hold the weight. And if you’re short on time, a food processor can crush the graham crackers in seconds, but a rolling pin and a zip-top bag work just as well.
Preparation Method
Let’s get into the actual cooking. I’ve broken this down into clear steps, with all the little details I’ve learned from making these bars dozens of times.
- Preheat and Prep: Preheat your oven to 325°F (160°C). Line your 9×9-inch baking pan with parchment paper, leaving about 2 inches of overhang on two opposite sides. This will be your lifting handles later. Lightly spray the parchment with non-stick cooking spray for extra insurance.
- Make the Crust: In a medium bowl, combine the graham cracker crumbs, sugar, and salt. Pour in the melted butter and stir with a fork until the mixture looks like wet sand. Every crumb should be coated. Press this mixture firmly into the bottom of your prepared pan. I use the bottom of a measuring cup to really pack it down — an even, compact crust is key. Bake for 10 minutes, then set aside to cool slightly while you make the fillings. The crust should be lightly golden and fragrant.
- Make the Cheesecake Layer: In a large bowl, beat the softened cream cheese with an electric mixer on medium speed until completely smooth — about 2 minutes. Scrape down the sides and bottom of the bowl with a rubber spatula. Add the sugar and beat for another minute until light and fluffy. Add the eggs one at a time, beating on low after each addition until just combined. Overmixing at this stage can incorporate too much air, which leads to cracks. Stir in the vanilla extract and sour cream until smooth. The mixture should be thick, creamy, and completely lump-free.
- Make the Pumpkin Layer: In a separate bowl, whisk together the pumpkin puree, brown sugar, and granulated sugar until smooth. Add the egg and vanilla extract, whisking until fully incorporated. In a small bowl, combine the cinnamon, ginger, nutmeg, cloves, and salt. Sprinkle this spice mixture over the pumpkin mixture and whisk until everything is evenly distributed. The filling should smell like autumn at this point — warm, spicy, and inviting.
- Assemble the Layers: Pour the cheesecake mixture over the pre-baked crust and spread it into an even layer with a spatula. Then, carefully spoon the pumpkin mixture over the cheesecake layer in dollops. Don’t pour it all in one spot — spread it out so you have small mounds of pumpkin across the surface. Here’s where the magic happens: take a butter knife or a skewer and gently swirl the two layers together. I like to use a figure-eight motion, but don’t overdo it. You want distinct ribbons of pumpkin and cheesecake, not a uniform orange mixture. A few broad strokes are all you need.
- Bake: Place the pan in the preheated oven and bake for 40-45 minutes. The edges should look set and slightly puffed, but the center should still have a slight jiggle when you gently shake the pan. This is the sweet spot — overbaking will make the cheesecake dry and cause cracks. If the top starts browning too quickly around the 30-minute mark, tent the pan loosely with aluminum foil.
- Cool Gradually: Turn off the oven and crack the door open slightly. Let the bars cool in the oven for 1 hour. This slow cooling process prevents the dreaded cheesecake crack. After an hour, remove the pan from the oven and let it cool completely on a wire rack — about another 30 minutes.
- Chill: Once the bars are at room temperature, cover the pan with plastic wrap and refrigerate for at least 4 hours, but overnight is better. This step is crucial. The bars need time to set properly so you get clean, sharp slices. Patience here pays off.
- Slice and Serve: When you’re ready to serve, lift the entire block of bars out of the pan using the parchment paper handles. Place it on a cutting board and use a sharp knife to slice into even squares. Wipe the knife clean between cuts for the neatest edges. I usually cut 16 bars (4 rows by 4 rows), but you can make them bigger or smaller depending on your crowd.
Cooking Tips & Techniques
Over the years, I’ve made just about every mistake you can make with these bars. Here’s what I’ve learned so you don’t have to repeat my failures.
Room temperature ingredients matter. I know it’s tempting to use cold cream cheese straight from the fridge, but trust me on this one. Cold cream cheese creates lumps that no amount of beating will fix. The same goes for eggs. If your ingredients are at room temperature, they’ll blend together smoothly and create a uniform, creamy texture. Set everything out on the counter an hour before you start.
Don’t overmix the cheesecake batter. Once you add the eggs, mix on low speed and stop as soon as they’re incorporated. Overmixing adds too much air, which causes the cheesecake to puff up in the oven and then collapse, creating cracks on the surface. You want a dense, velvety texture, not a fluffy one.
The water bath is optional. Most cheesecake recipes call for a water bath to prevent cracking, but I’ve found these bars are forgiving enough that you don’t need one. The key is the slow cooling process in the oven. That gradual temperature change does the same job without the hassle of wrapping your pan in foil and worrying about leaks.
Watch the bake time carefully. Every oven runs a little differently. Start checking your bars at the 35-minute mark. The edges should be set and slightly golden, but the center should still wobble when you gently shake the pan. If you wait until the center is completely firm, you’ve already overbaked it. Remember, the bars will continue to set as they cool.
Patience with chilling is non-negotiable. I once tried to rush the process and cut into the bars after only 2 hours in the fridge. The result was a gooey, messy disaster. The bars need at least 4 hours to set properly, and overnight is even better. The texture firms up, the flavors meld together, and you get those clean, Instagram-worthy slices.
Variations & Adaptations
One of the best things about this recipe is how adaptable it is. Here are some variations I’ve tried and loved.
Gluten-Free Option: Swap the graham cracker crumbs for gluten-free graham crackers or use crushed gluten-free shortbread cookies. The rest of the ingredients are naturally gluten-free, so this is an easy switch. I’ve used Pamela’s gluten-free graham crackers with great results.
Dairy-Free Adaptation: Use dairy-free cream cheese (I recommend Kite Hill or Miyoko’s) and a dairy-free butter substitute for the crust. Replace the sour cream with a dairy-free yogurt or coconut cream. The texture will be slightly softer, but the flavor is still fantastic.
Spice It Up: If you like a bolder pumpkin spice flavor, add an extra ½ teaspoon of cinnamon and a pinch of cardamom. Cardamom adds a floral, almost citrusy note that pairs beautifully with pumpkin. I tried this on a whim one year and now it’s my preferred version.
Chocolate Swirl: Melt ¼ cup of semi-sweet chocolate chips and drizzle it over the pumpkin layer before swirling. The chocolate adds a rich, bittersweet contrast to the sweet pumpkin and tangy cheesecake. It’s a little indulgent, but sometimes that’s exactly what you need.
Nutty Crust: Replace ½ cup of the graham cracker crumbs with finely chopped pecans or walnuts. Toast the nuts first for extra flavor. This adds a wonderful crunch and a nutty depth that complements the pumpkin. I’ve done this for Thanksgiving and got rave reviews.
Mini Version: Line a muffin tin with paper liners and press the crust mixture into the bottom of each cup. Fill with the cheesecake and pumpkin mixtures, then bake for 18-20 minutes. These mini bars are perfect for parties or portion control. Just make sure to cool and chill them the same way.
Serving & Storage Suggestions
These creamy pumpkin pie cheesecake bars are versatile when it comes to serving. Here’s how I like to do it.
Serving Temperature: I prefer these bars cold, straight from the fridge. The texture is firm and clean, and the flavors are sharp and distinct. If you prefer a softer, more luscious texture, let them sit at room temperature for about 15 minutes before serving. Either way, they’re delicious.
Presentation: For a simple presentation, arrange the bars on a platter and dust them with a light sprinkle of cinnamon or nutmeg. For something a little fancier, top each bar with a dollop of whipped cream and a drizzle of caramel sauce. A few toasted pecans on top add crunch and visual appeal.
Complementary Dishes: These bars pair beautifully with a cup of hot coffee, spiced chai, or a glass of cold milk. If you’re serving them as part of a fall dessert spread, they go well with mini lemon blueberry cheesecakes for a colorful contrast. For a full holiday menu, check out more seasonal ideas on our recipes page.
Storage: Store the bars in an airtight container in the refrigerator for up to 5 days. Layer them between sheets of parchment paper to prevent sticking. The flavors actually improve after a day or two as they meld together.
Freezing: These bars freeze beautifully. Once they’re fully chilled and set, wrap the entire block (or individual bars) tightly in plastic wrap, then in aluminum foil. Freeze for up to 3 months. To thaw, transfer to the refrigerator overnight. Do not thaw at room temperature, as condensation can make the crust soggy.
Reheating: I don’t recommend reheating these bars. They’re meant to be served cold or at room temperature. If you really want a warm dessert, try a quick 10-second zap in the microwave, but be aware that the texture will become softer and less defined.
Nutritional Information & Benefits
Here’s an approximate nutritional breakdown for one bar (based on 16 servings):
- Calories: 280
- Total Fat: 17g
- Saturated Fat: 10g
- Cholesterol: 85mg
- Sodium: 220mg
- Total Carbohydrates: 28g
- Dietary Fiber: 1g
- Sugars: 20g
- Protein: 5g
While these are definitely a treat, there are a few nutritional bright spots. Pumpkin puree is packed with vitamin A, which supports eye health and immune function. It’s also a good source of fiber and antioxidants. The cream cheese provides calcium and protein, though it’s also high in saturated fat, so moderation is key. If you’re looking for a lower-sugar option, you can reduce the sugar in the cheesecake layer to ⅓ cup, but keep in mind it will affect the texture slightly.
These bars are not gluten-free in their standard form, but as I mentioned earlier, a simple swap makes them work. They contain dairy and eggs, so they’re not suitable for vegan diets without significant modifications. If you have specific dietary needs, the variations section above has some helpful alternatives.
Conclusion
These creamy pumpkin pie cheesecake bars are the kind of recipe that makes you look like a hero with minimal effort. They combine two classic desserts into one beautiful, sliceable bar that’s perfect for fall. The buttery crust, the tangy cheesecake layer, and the spiced pumpkin swirl come together in a way that feels both familiar and special. I’ve made these for Thanksgiving, for casual dinners, and for no reason at all, and they’ve never let me down.
What I love most about this recipe is how forgiving it is. You don’t need to be a pastry chef to get great results. The instructions are straightforward, the ingredients are simple, and the payoff is huge. Whether you’re a seasoned baker or someone who’s just starting out, these bars will make you proud.
I’d love to hear how yours turn out. Did you try any of the variations? Did you add your own twist? Drop a comment below and let me know. And if you share a photo on social media, tag me — I love seeing your creations. Happy baking, and here’s to a fall full of warm spices and good desserts!
Frequently Asked Questions
Can I use pumpkin pie filling instead of pumpkin puree?
No, I wouldn’t recommend it. Pumpkin pie filling is already sweetened and spiced, so it will throw off the balance of the recipe. Stick with 100% pure pumpkin puree for the best results.
Why did my cheesecake layer crack?
Cracks usually happen from overbaking or sudden temperature changes. Make sure you pull the bars out while the center still has a slight jiggle, and let them cool slowly in the oven with the door cracked open.
Can I make these bars ahead of time?
Absolutely. In fact, they taste better the next day. You can make them up to 2 days in advance and keep them refrigerated. They also freeze well for up to 3 months.
How do I get clean, sharp slices?
Use a sharp knife and wipe it clean with a damp paper towel between each cut. Make sure the bars are fully chilled — at least 4 hours in the fridge — before you slice them.
Can I double this recipe?
Yes, you can double the ingredients and bake the bars in a 9×13-inch pan. The bake time will be similar, but start checking at the 35-minute mark. You may need to add a few extra minutes.
Pin This Recipe!
Creamy Pumpkin Pie Cheesecake Bars: Best Easy Fall Dessert
These creamy pumpkin pie cheesecake bars combine a buttery shortbread crust, a velvety cream cheese layer, and a spiced pumpkin swirl for a perfect fall dessert. They’re easy to make, forgiving, and deliver clean, bakery-style slices every time.
- Prep Time: 20 minutes
- Cook Time: 45 minutes
- Total Time: 5 hours 35 minutes (includes cooling and chilling)
- Yield: 16 servings 1x
- Category: Dessert
- Cuisine: American
Ingredients
- 1 ½ cups (180g) graham cracker crumbs
- ¼ cup (50g) granulated sugar
- 6 tablespoons (85g) unsalted butter, melted
- ¼ teaspoon salt
- 16 ounces (450g) cream cheese, softened
- ½ cup (100g) granulated sugar
- 2 large eggs, room temperature
- 1 teaspoon vanilla extract
- ¼ cup (60ml) sour cream
- 1 cup (245g) pumpkin puree
- ¼ cup (50g) packed light brown sugar
- ¼ cup (50g) granulated sugar
- 1 large egg, room temperature
- 1 teaspoon vanilla extract
- 1 ½ teaspoons ground cinnamon
- ½ teaspoon ground ginger
- ¼ teaspoon ground nutmeg
- ¼ teaspoon ground cloves
- ¼ teaspoon salt
Instructions
- Preheat your oven to 325°F (160°C). Line a 9×9-inch baking pan with parchment paper, leaving about 2 inches of overhang on two opposite sides. Lightly spray the parchment with non-stick cooking spray.
- Make the crust: In a medium bowl, combine graham cracker crumbs, sugar, and salt. Pour in melted butter and stir with a fork until the mixture looks like wet sand. Press firmly into the bottom of the prepared pan using the bottom of a measuring cup. Bake for 10 minutes, then set aside to cool slightly.
- Make the cheesecake layer: In a large bowl, beat softened cream cheese with an electric mixer on medium speed until completely smooth, about 2 minutes. Scrape down the sides. Add sugar and beat for another minute until light and fluffy. Add eggs one at a time, beating on low after each addition until just combined. Stir in vanilla extract and sour cream until smooth.
- Make the pumpkin layer: In a separate bowl, whisk together pumpkin puree, brown sugar, and granulated sugar until smooth. Add egg and vanilla extract, whisking until fully incorporated. In a small bowl, combine cinnamon, ginger, nutmeg, cloves, and salt. Sprinkle over the pumpkin mixture and whisk until evenly distributed.
- Assemble the layers: Pour the cheesecake mixture over the pre-baked crust and spread into an even layer. Spoon the pumpkin mixture over the cheesecake layer in dollops. Use a butter knife or skewer to gently swirl the two layers together in a figure-eight motion, creating distinct ribbons.
- Bake for 40-45 minutes. The edges should look set and slightly puffed, but the center should still have a slight jiggle when gently shaken. If the top browns too quickly, tent loosely with aluminum foil.
- Turn off the oven and crack the door open slightly. Let the bars cool in the oven for 1 hour. Then remove from the oven and cool completely on a wire rack, about 30 minutes.
- Cover the pan with plastic wrap and refrigerate for at least 4 hours, preferably overnight.
- When ready to serve, lift the entire block of bars out of the pan using the parchment paper handles. Place on a cutting board and slice into even squares using a sharp knife, wiping the blade clean between cuts.
Notes
Room temperature ingredients are crucial for a smooth texture. Do not overmix the cheesecake batter after adding eggs. The water bath is optional; slow cooling in the oven prevents cracking. Chilling for at least 4 hours is essential for clean slices. For gluten-free, use gluten-free graham crackers. For dairy-free, use dairy-free cream cheese and butter substitute.
Nutrition
- Serving Size: 1 bar
- Calories: 280
- Sugar: 20
- Sodium: 220
- Fat: 17
- Saturated Fat: 10
- Carbohydrates: 28
- Fiber: 1
- Protein: 5
Keywords: pumpkin cheesecake bars, fall dessert, easy pumpkin dessert, cheesecake bars, pumpkin pie bars


