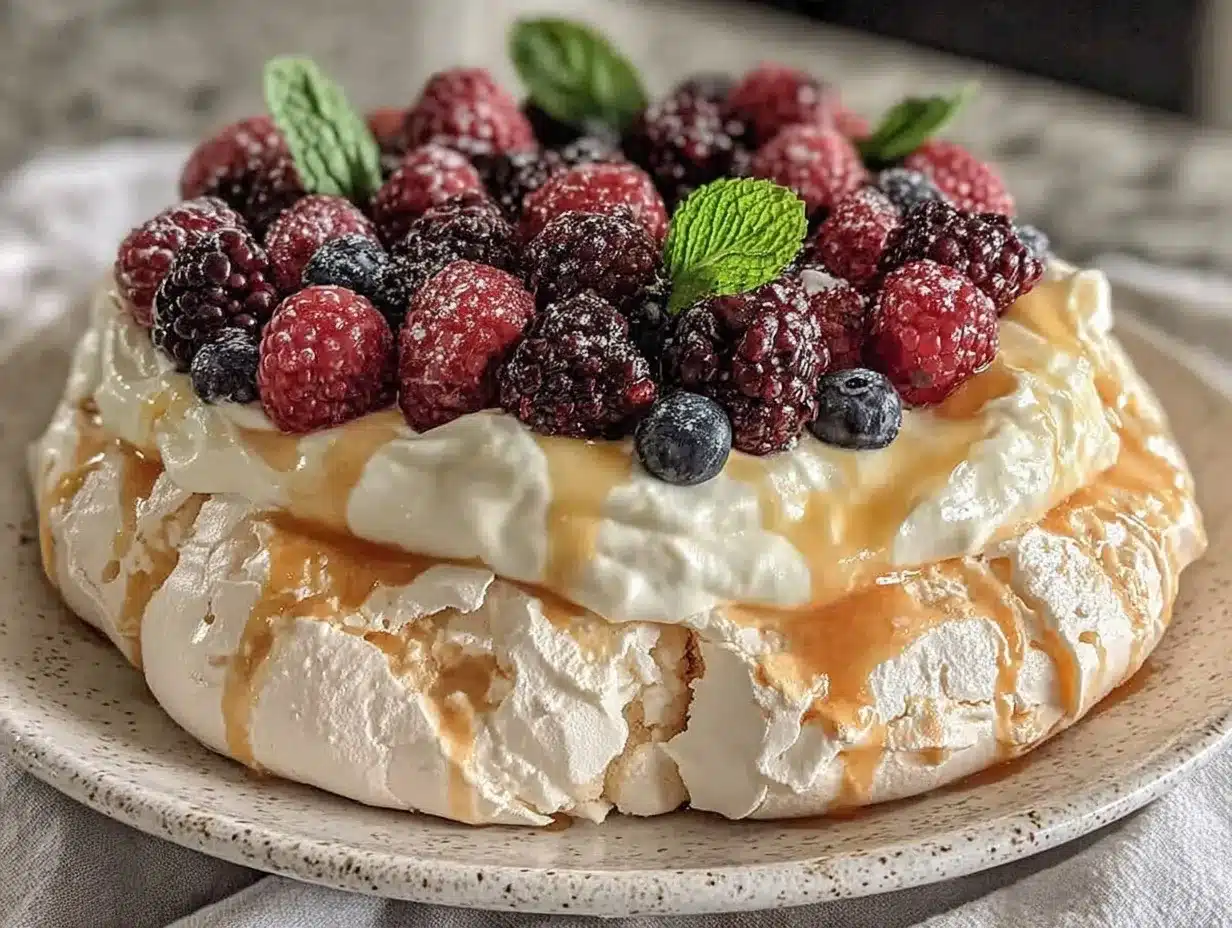
Let me tell you, the delicate crackle of a perfectly baked pavlova shell and the sweet tartness of fresh berries swirling together is enough to make anyone’s mouth water. The first time I baked this light and fluffy pavlova with fresh berries, I was instantly hooked—like, the kind of moment where you pause, take a deep breath, and just smile because you know you’re onto something truly special. It was a rainy weekend years ago, and I was knee-high to a grasshopper in my love for baking desserts that look as stunning as they taste. I stumbled upon this recipe trying to recreate a dessert I once had at a friend’s summer party, and honestly, I wish I had found it years ago.
My family couldn’t stop sneaking bites off the cooling rack (and I can’t really blame them). The crisp exterior that melts into a marshmallow-soft center, paired with the burst of fresh berries, is dangerously easy to fall in love with. You know what? This pavlova is perfect for potlucks, a sweet treat for your kids, or to brighten up your Pinterest cookie board with its elegant, cloud-like beauty. After testing this recipe multiple times in the name of research, of course, it’s become a staple for family gatherings and gifting. It feels like a warm hug wrapped in a dessert, and you’re going to want to bookmark this one.
Why You’ll Love This Recipe
This light and fluffy pavlova recipe isn’t just any dessert—it’s a reliable crowd-pleaser that’s as easy as it is impressive. After plenty of kitchen experimenting and family taste-tests, here’s why I think you’ll love it:
- Quick & Easy: Comes together in under an hour, perfect for last-minute dessert cravings or weekend treats.
- Simple Ingredients: No fancy grocery trips needed; you likely already have all the essentials in your pantry and fridge.
- Perfect for Summer Gatherings: Great for brunches, garden parties, or holiday mornings when you want something light but special.
- Crowd-Pleaser: Kids and adults alike rave about the crisp shell and the melt-in-your-mouth inside paired with juicy berries.
- Unbelievably Delicious: The texture combo of crispy outside and fluffy center is next-level comfort food that’s also elegant.
What sets this pavlova apart? The secret is in the slow, low baking that gives it that perfect marshmallow center and crisp shell without drying it out. Plus, the fresh berries aren’t just a garnish—they bring brightness and a natural sweetness that balances the airy meringue. This recipe isn’t just good; it’s the kind that makes you close your eyes after the first bite. It’s comfort food reimagined—lighter, fresh, yet soul-soothing. Perfect for impressing guests without stress or turning a simple dessert into a memorable moment.
What Ingredients You Will Need
This recipe uses simple, wholesome ingredients to deliver bold flavor and satisfying texture without the fuss. Most are pantry staples, with fresh berries adding that seasonal pop of color and taste.
- For the Pavlova Base:
- 4 large egg whites, at room temperature (helps with volume and stability)
- 1 cup (200g) superfine sugar (caster sugar works best for smooth meringue)
- 1 teaspoon white vinegar (helps stabilize the meringue)
- 1 teaspoon cornstarch (adds that soft marshmallow texture inside)
- 1/2 teaspoon vanilla extract (for subtle, warm flavor)
- Pinch of salt (balances sweetness)
- For the Topping:
- 1 cup (240ml) heavy whipping cream (chilled, for best whip)
- 2 tablespoons powdered sugar (adjust to sweetness preference)
- 1 teaspoon vanilla extract
- Fresh berries (about 2 cups mixed strawberries, blueberries, raspberries, and blackberries)
- Optional: fresh mint leaves for garnish
For the sugar, I recommend using Domino superfine or Wholesome organic caster sugar for the best texture. If you want to swap berries based on season, fresh peaches or kiwi also work beautifully. For a dairy-free option, coconut cream whipped to stiff peaks can replace heavy cream. When choosing berries, pick firm and ripe ones to avoid sogginess.
Equipment Needed
- Electric mixer or stand mixer with whisk attachment (essential for stiff peaks)
- Baking sheet lined with parchment paper or a silicone mat (prevents sticking and helps shape)
- Mixing bowls (glass or metal recommended to avoid residual fats)
- Rubber spatula (for gentle folding)
- Measuring cups and spoons (precision matters here!)
- Cooling rack (to cool pavlova evenly)
If you don’t have a stand mixer, a hand mixer works just fine but might take a bit longer to whip. For a budget-friendly option, silicone mats are reusable and fantastic for pavlova baking. When using egg whites, make sure the bowl and whisk are completely grease-free to get the best volume.
Preparation Method
- Preheat your oven to 250°F (120°C) and line a baking sheet with parchment paper. Draw a 7-inch (18cm) circle on the paper as a guide, then flip the paper so the pencil mark is underneath.
- Separate the egg whites carefully—no yolk allowed! Let them sit at room temperature for about 30 minutes before you start. This helps with whipping.
- In a clean, dry bowl, beat the egg whites on medium speed until soft peaks form. This should take about 2-3 minutes.
- Gradually add the superfine sugar, one tablespoon at a time, while continuing to beat on high speed. This slow addition helps dissolve the sugar completely, creating a glossy, stiff meringue. This step usually takes about 7-10 minutes. To test, rub a bit of mixture between your fingers; it shouldn’t feel gritty.
- Once stiff peaks form, gently fold in the vinegar, cornstarch, vanilla, and salt using a rubber spatula. These ingredients help stabilize the meringue and give it that signature marshmallowy center.
- Carefully spoon the meringue onto the parchment paper, using the circle as a guide. Shape it into a round with slightly higher edges to hold the topping later. Smooth the sides but don’t worry about perfect—rustic is charming here!
- Bake in the preheated oven for 1 hour and 15 minutes (75 minutes). Avoid opening the oven door during this time to prevent the pavlova from cracking.
- Turn off the oven and let the pavlova cool completely inside with the door slightly ajar (about 1 hour). This slow cooling prevents cracking and keeps the inside soft.
- While the pavlova cools, whip the cream. Beat the chilled heavy cream with powdered sugar and vanilla until soft peaks form. Don’t overbeat—it should be light and fluffy, not grainy.
- Once cooled, gently top the pavlova with the whipped cream and scatter fresh berries all over. Garnish with mint leaves if using.
- Serve immediately, or keep refrigerated for up to 4 hours before serving for best freshness.
Pro tip: If you notice any cracks forming during baking, don’t fret! They add to the pavlova’s rustic charm. Also, make sure to use fresh egg whites—older whites don’t whip as well.
Cooking Tips & Techniques
Getting that perfect pavlova texture can be tricky, but after some trial and error (and a few cracked meringues), I’ve learned a few handy tips. First, always separate your eggs when cold, then let whites come to room temperature before whipping. This really helps with volume.
Slowly adding sugar is key. If you dump it all in at once, the mixture won’t stiffen properly, and you might end up with gritty meringue. Using superfine sugar also makes a big difference in dissolving quickly. If you don’t have caster sugar, pulse regular sugar in a food processor for a few seconds.
For baking, resist the urge to open the oven door before the time’s up. Pavlovas are sensitive to temperature changes, and sudden cool drafts can cause cracks. Letting it cool in the oven with the door ajar is a game changer for that soft, marshmallow center.
When whipping cream, chill your bowl and beaters in the fridge for 15 minutes beforehand. This little trick helps cream whip faster and hold its shape longer. Also, don’t overbeat; otherwise, you get butter, which is delicious but not what you want here.
Finally, when folding in the vinegar and cornstarch, be gentle—it’s all about keeping as much air in the meringue as possible. I’ve learned the hard way that vigorous stirring flattens the mix and ruins the fluff!
Variations & Adaptations
Once you’ve nailed the classic pavlova, you can have a lot of fun with variations. Here are a few ideas:
- Chocolate Pavlova: Add 1-2 tablespoons of cocoa powder to the meringue for a rich chocolate twist. Top with chocolate shavings and cherries.
- Gluten-Free & Vegan Adaptation: Traditional pavlova relies on egg whites, but for a vegan version, aquafaba (the liquid from canned chickpeas) whips up similarly. I recommend testing this carefully, as baking times and texture differ.
- Seasonal Fruit Toppings: Swap fresh berries for tropical fruits like mango, passion fruit, or kiwi during summer months. A drizzle of passion fruit pulp adds a zingy contrast.
- Nutty Crunch: Sprinkle toasted almonds or pistachios over the cream topping for added texture and flavor.
- Lower Sugar Option: Use a natural sweetener like erythritol or monk fruit sugar, but be cautious as the meringue structure might differ slightly.
I personally tried a lemon curd drizzle with blueberries once—and wow, it was a bright, tangy upgrade that had everyone asking for seconds!
Serving & Storage Suggestions
Serve your light and fluffy pavlova chilled or at room temperature. The contrast between the crisp shell and the cool whipped cream with fresh berries is just divine. For a show-stopping presentation, pile the berries high and sprinkle a little powdered sugar on top right before serving.
Pair this dessert with a cup of tea, a glass of sparkling wine, or even a fruity rosé to complement the berry notes. It’s a perfect finale for summer dinners or festive occasions.
If you need to store it, keep the pavlova base separate from the cream and berries to avoid sogginess. Wrap the baked meringue tightly in plastic wrap and store at room temperature for up to 2 days. Whip the cream fresh and add berries just before serving.
Leftovers (if any!) can be refrigerated for up to 24 hours once assembled, but the texture slightly softens. To re-crisp the pavlova base, pop it in a low oven (about 250°F/120°C) for 5-7 minutes before assembling.
Flavors tend to meld beautifully if you prepare the components ahead, but assembly is best done last minute for that crisp-tender magic.
Nutritional Information & Benefits
This light and fluffy pavlova with fresh berries is a relatively low-calorie dessert compared to many rich cakes and pies. A typical serving contains approximately:
| Calories | 220 kcal |
|---|---|
| Protein | 3 g |
| Fat | 15 g (mostly from cream) |
| Carbohydrates | 20 g |
| Fiber | 2 g (from berries) |
| Sugar | 18 g (natural and added) |
Egg whites provide a high-quality source of protein without fat or cholesterol, while fresh berries add antioxidants, vitamins, and fiber. The cream contributes calcium and healthy fats but can be swapped out for lighter options if desired.
This recipe is naturally gluten-free and can be modified for dairy-free diets. Just be mindful of allergens like eggs and dairy when serving to guests.
From a wellness perspective, this dessert feels indulgent yet lighter than many traditional sweets, making it a satisfying choice when you want something special without going overboard.
Conclusion
If you’re after a dessert that’s both stunning and delicious, this light and fluffy pavlova with fresh berries should be your go-to. It’s easy to make, uses simple ingredients, and delivers that perfect balance of crisp and soft textures with bright, juicy fruit. Honestly, I love this recipe because it brings a bit of magic to everyday moments and special occasions alike.
Feel free to customize it with your favorite fruits or add a twist like chocolate or nuts. I’d love to hear how you make it your own—drop a comment, share your photos, or tell me about your favorite variations. You’re going to want to keep this recipe handy for years to come, trust me!
Happy baking and berry picking!
Frequently Asked Questions
How long can I store pavlova before serving?
You can store the baked pavlova base at room temperature, wrapped well, for up to 2 days. Avoid assembling with cream and berries until just before serving to keep it crisp.
Can I make pavlova ahead of time?
Yes! Bake the meringue base a day ahead and store it properly. Whip the cream fresh and add fruit when ready to serve for the best texture.
What if my pavlova cracks during baking?
Minor cracks are normal and don’t affect taste. To prevent large cracks, avoid sudden temperature changes and don’t open the oven door during baking.
Can I use frozen berries for the topping?
It’s best to use fresh berries as frozen ones can release water and make the pavlova soggy. If using frozen, thaw and drain them well beforehand.
Is pavlova naturally gluten-free?
Yes, pavlova is made from egg whites and sugar with no flour, so it’s naturally gluten-free. Just check toppings if you’re serving to someone with gluten sensitivity.
Pin This Recipe!
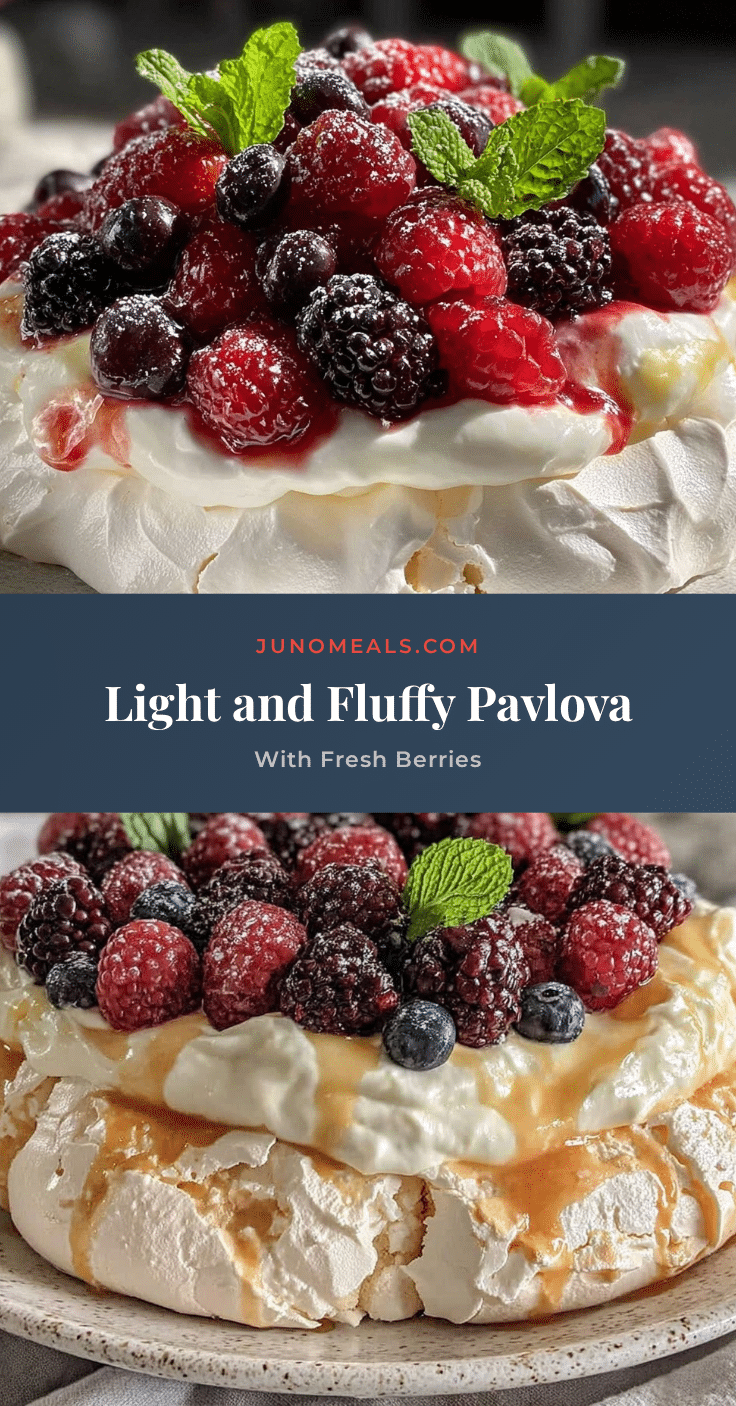
Light and Fluffy Pavlova Recipe Perfect for Fresh Berry Desserts

A delicate pavlova with a crisp shell and marshmallow-soft center topped with fresh berries and whipped cream, perfect for summer gatherings and special occasions.
- Prep Time: 40 minutes
- Cook Time: 1 hour 15 minutes
- Total Time: 1 hour 55 minutes
- Yield: 8 servings 1x
- Category: Dessert
- Cuisine: Australian/New Zealand
Ingredients
- 4 large egg whites, at room temperature
- 1 cup (200g) superfine sugar (caster sugar)
- 1 teaspoon white vinegar
- 1 teaspoon cornstarch
- 1/2 teaspoon vanilla extract
- Pinch of salt
- 1 cup (240ml) heavy whipping cream, chilled
- 2 tablespoons powdered sugar
- 1 teaspoon vanilla extract
- About 2 cups mixed fresh berries (strawberries, blueberries, raspberries, blackberries)
- Optional: fresh mint leaves for garnish
Instructions
- Preheat oven to 250°F (120°C) and line a baking sheet with parchment paper. Draw a 7-inch (18cm) circle on the paper as a guide, then flip the paper so the pencil mark is underneath.
- Separate the egg whites carefully, ensuring no yolk is included. Let them sit at room temperature for about 30 minutes.
- In a clean, dry bowl, beat the egg whites on medium speed until soft peaks form (about 2-3 minutes).
- Gradually add superfine sugar one tablespoon at a time while beating on high speed until stiff, glossy peaks form (7-10 minutes). Test by rubbing a bit between fingers; it should not feel gritty.
- Gently fold in vinegar, cornstarch, vanilla extract, and salt using a rubber spatula.
- Spoon the meringue onto the parchment paper within the circle, shaping it into a round with slightly higher edges to hold the topping. Smooth sides but keep a rustic look.
- Bake for 1 hour and 15 minutes without opening the oven door.
- Turn off the oven and let the pavlova cool completely inside with the door slightly ajar (about 1 hour).
- While cooling, whip the chilled heavy cream with powdered sugar and vanilla extract until soft peaks form. Avoid overbeating.
- Once cooled, top the pavlova with whipped cream and scatter fresh berries over it. Garnish with mint leaves if desired.
- Serve immediately or refrigerate assembled pavlova for up to 4 hours for best freshness.
Notes
Use room temperature egg whites for better volume. Add sugar slowly to avoid gritty meringue. Do not open oven door during baking to prevent cracking. Cool pavlova slowly in oven with door ajar to keep marshmallow center soft. Chill bowl and beaters before whipping cream. For dairy-free, substitute heavy cream with whipped coconut cream. Fresh berries are preferred over frozen to avoid sogginess. Pavlova base can be baked a day ahead and stored wrapped at room temperature for up to 2 days.
Nutrition
- Serving Size: 1 slice or portion
- Calories: 220
- Sugar: 18
- Fat: 15
- Carbohydrates: 20
- Fiber: 2
- Protein: 3
Keywords: pavlova, meringue dessert, fresh berries, whipped cream, light dessert, gluten-free dessert, summer dessert