Let me tell you, the smell of roasted peanuts mixed with a hint of honey and chocolate chips wafting through the kitchen is enough to make anyone’s mouth water. The first time I rolled up a batch of these Easy No-Bake Peanut Butter Energy Balls, I was instantly hooked. It was one of those rare moments where you pause, take a deep breath, and just smile because you know you’re onto something truly special. I stumbled upon this recipe years ago during a blustery weekend when I was knee-high to a grasshopper and needed a quick snack fix that didn’t involve the oven. Honestly, these energy balls feel like pure, nostalgic comfort wrapped in a bite-sized package.
My family couldn’t stop sneaking them off the cooling plate (and I can’t really blame them). You know what makes these little powerhouses so dangerously easy? No baking required! They’re perfect for potlucks, a sweet treat for your kids’ lunchboxes, or even a quick pick-me-up during a busy workday. After testing this recipe multiple times in the name of research, of course, it’s become a staple for family gatherings and gifting. Trust me, this recipe feels like a warm hug you’re going to want to bookmark and make again and again.
Why You’ll Love This Recipe
I’ve tinkered with peanut butter energy ball recipes over the years, and this version stands out because it’s just so simple and foolproof. Here’s why you’re going to love it:
- Quick & Easy: Comes together in under 15 minutes, perfect for busy mornings or last-minute snack cravings.
- Simple Ingredients: No fancy grocery trips needed; you likely already have everything in your pantry.
- Perfect for On-the-Go: Great for hiking trips, lunchboxes, or a quick workout fuel boost.
- Crowd-Pleaser: Kids and adults alike rave about the sweet, nutty flavor and chewy texture.
- Unbelievably Delicious: The combo of creamy peanut butter, honey, and a hint of chocolate hits that perfect comfort food note without feeling heavy.
What sets this recipe apart? It’s all about balance—no overpowering sweetness, just the perfect blend of natural peanut butter and just enough binder to hold everything together without being sticky or crumbly. Plus, there’s zero baking hassle, so you’re saving time and energy. Honestly, it’s the kind of snack that makes you close your eyes after the first bite and smile. Whether you’re impressing guests or just treating yourself, this recipe turns simple ingredients into something memorable.
What Ingredients You Will Need
This recipe uses simple, wholesome ingredients to deliver bold flavor and satisfying texture without the fuss. Most of these are pantry staples, and substitutions are easy if needed.
- 1 cup creamy peanut butter (I recommend natural, unsweetened peanut butter like Smucker’s Natural for the best texture and taste)
- 1/3 cup honey (raw or regular honey works; this adds natural sweetness and helps bind the balls)
- 1 cup old-fashioned rolled oats (use gluten-free oats if needed)
- 1/4 cup mini chocolate chips (semi-sweet or dark chocolate, depending on preference)
- 1/4 cup ground flaxseed (adds fiber and helps with binding; Bob’s Red Mill is my go-to)
- 1 teaspoon vanilla extract (pure vanilla gives a warm depth of flavor)
- Pinch of salt (balances sweetness and enhances peanut butter flavor)
Optional substitutions: Use almond or cashew butter instead of peanut butter for a different nutty taste. Swap honey with maple syrup or agave for a vegan-friendly version. If you want a crunchier texture, toss in 1/4 cup chopped nuts or seeds.
Equipment Needed
- Mixing bowl: A large bowl to combine all ingredients comfortably.
- Measuring cups and spoons: Accuracy helps keep the texture perfect.
- Spatula or wooden spoon: For mixing the sticky peanut butter and honey blend.
- Baking sheet or plate: To place the energy balls while they chill.
- Optional: Food processor if you want to pulse the oats for a finer texture or mix everything quickly.
Honestly, you don’t need any fancy gadgets for this recipe. I’ve made these with just a sturdy spoon and a bowl on a lazy Sunday afternoon. If you do use a food processor, be sure not to overmix to keep a nice chewy texture. For budget-friendly kitchens, a simple set of measuring spoons and a bowl will do wonders here.
Preparation Method
- Combine peanut butter and honey: In your mixing bowl, scoop 1 cup creamy peanut butter and 1/3 cup honey. Stir well until smooth and fully blended, about 2 minutes. You’ll notice the sticky, luscious texture starts coming together here.
- Add vanilla extract and salt: Mix in 1 teaspoon vanilla extract and a pinch of salt to enhance flavor depth. Stir gently to avoid splashing.
- Mix dry ingredients: Add 1 cup rolled oats and 1/4 cup ground flaxseed to the bowl. Stir everything until the oats and flaxseed are evenly coated and distributed.
- Fold in mini chocolate chips: Gently fold 1/4 cup mini chocolate chips into the mixture. Don’t overmix here or the chocolate might melt.
- Chill the mixture: Place the bowl in the fridge for 10 minutes to firm up the mixture slightly. This makes rolling easier and less sticky.
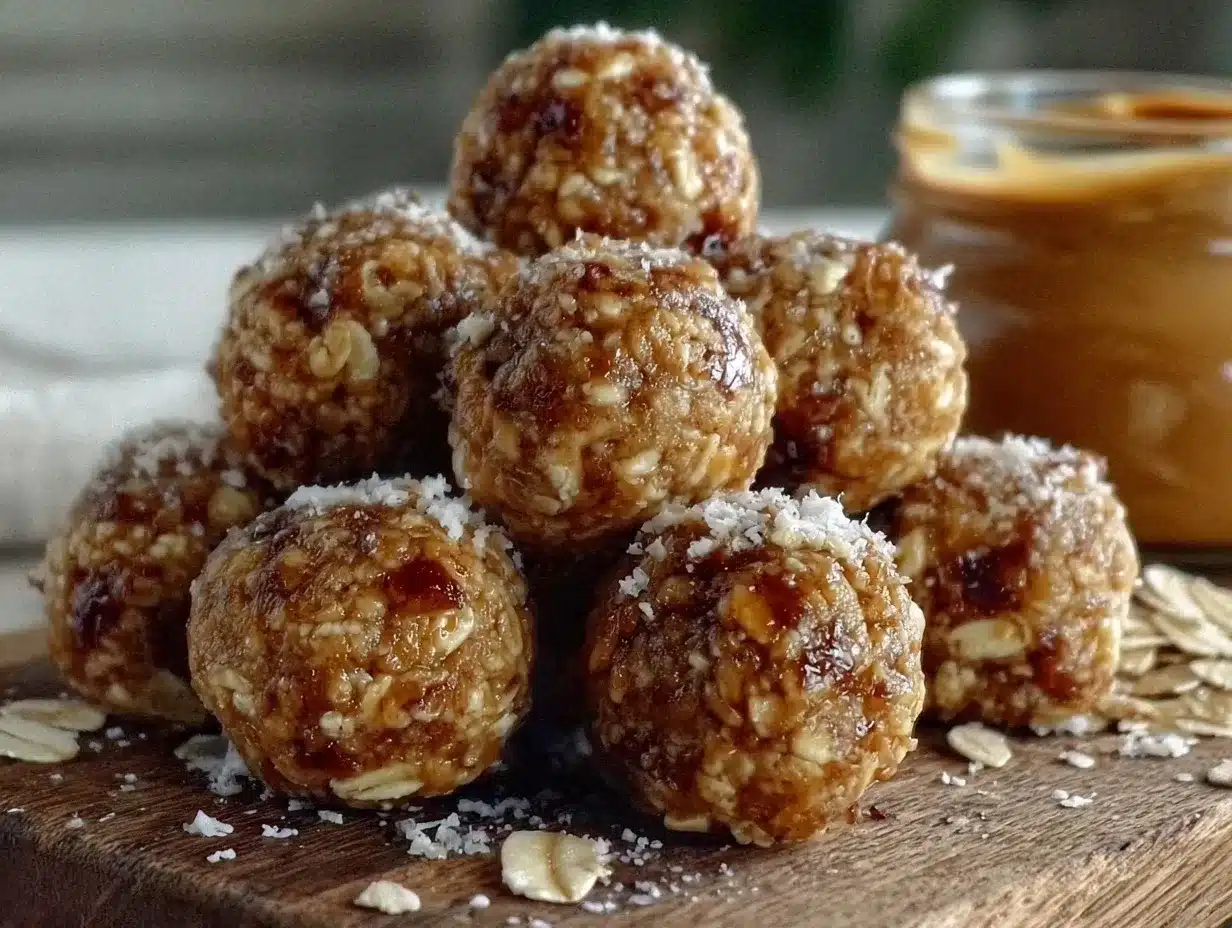
- Form the balls: Using your hands, scoop about 1 tablespoon (15g) of mixture and roll into a tight ball. Place each ball on a baking sheet or plate lined with parchment paper. Repeat with remaining mixture, yielding around 18-20 balls.
- Final chill: Refrigerate the energy balls for at least 30 minutes before serving to set their shape and texture fully.
Pro tip: If the mixture feels too sticky, add a tablespoon more oats or flaxseed. If too dry, stir in a little more peanut butter or honey. The texture should be firm but pliable.
Cooking Tips & Techniques
Here are some tips I’ve picked up while making these peanut butter energy balls that’ll make your life easier and your snacks tastier:
- Use room temperature peanut butter: It blends easier with honey and oats, giving a smooth, even texture.
- Don’t overmix: Overworking the mixture can make the balls too dense or crumbly.
- Chill before rolling: This helps the mixture firm up and reduces stickiness, making shaping much simpler.
- Adjust sweetness to taste: Feel free to tweak honey quantity based on your preference or swap in maple syrup for a different flavor twist.
- Multitask while chilling: Use the chilling time to clean up or prep your next meal.
- Storage tip: Store energy balls in an airtight container in the fridge to keep them fresh and chewy.
Personally, I learned the hard way that skipping the chilling step makes rolling a sticky, messy disaster—so don’t skip it! Also, I once added too many chocolate chips and had trouble forming balls, so balance is key.
Variations & Adaptations
Once you get the hang of the basic recipe, you can have fun switching it up. Here are some ideas I’ve tried and loved:
- Vegan & Allergy-Friendly: Swap honey for maple syrup and use sunflower seed butter instead of peanut butter. Gluten-free oats make this safe for gluten-sensitive folks.
- Seasonal Twist: Add 1/4 cup dried cranberries or chopped dried apricots for a fruity burst. In winter, sprinkle in some cinnamon or pumpkin spice for cozy vibes.
- Protein Boost: Stir in a scoop of your favorite protein powder or add chopped nuts like almonds or walnuts for extra crunch.
- Chocolate Lover’s: Drizzle melted dark chocolate over the chilled balls or coat them in cocoa powder for a richer experience.
One of my favorite twists is adding shredded coconut and a dash of sea salt on top for that beachy, tropical flair. Honestly, the recipe is a great canvas, so feel free to experiment based on what’s in your pantry!
Serving & Storage Suggestions
These peanut butter energy balls are best served chilled or at room temperature. I like to pop a couple in my kids’ lunchboxes or keep a jar handy on my desk for an afternoon pick-me-up. They pair wonderfully with a glass of cold milk or a cup of black coffee.
For storage, keep them in an airtight container in the refrigerator for up to two weeks. If you want to stash them longer, freeze the balls in a single layer on a baking sheet, then transfer to a freezer-safe bag for up to three months. When ready to eat, thaw in the fridge for a few hours or enjoy straight from the freezer for a refreshing treat.
Flavors develop a bit more after a day or two in the fridge, so making them ahead is a great option. Just remember, they’re dangerously easy to devour, so hide a few if you want them to last!
Nutritional Information & Benefits
Each energy ball (about 1 tablespoon or 15g) roughly contains:
| Calories | 90-100 kcal |
|---|---|
| Protein | 3 g |
| Fat | 6 g (mostly healthy fats from peanut butter) |
| Carbohydrates | 8 g (includes fiber and natural sugars) |
| Fiber | 2 g |
Thanks to peanut butter and flaxseed, these energy balls provide a good dose of healthy fats and protein, making them a sustaining snack. The oats contribute fiber and slow-release carbs, keeping energy levels steady. Plus, the natural sweeteners avoid refined sugars, which is a win for anyone watching their sugar intake.
If you have nut allergies, try sunflower seed butter and gluten-free oats for a safe and still delicious alternative. These bites fit nicely into many dietary lifestyles including vegetarian, gluten-free (with proper oats), and low added-sugar diets.
Conclusion
In a nutshell, these Easy No-Bake Peanut Butter Energy Balls are a game changer for anyone who loves a quick, tasty, and wholesome snack. They come together with simple ingredients you probably already have, require zero baking, and pack a punch of flavor and nutrition. The best part? You can customize them endlessly to suit your taste or dietary needs.
Honestly, I love this recipe because it’s reliable, satisfying, and feels like a little treat that fuels me through busy days. Give it a try, tweak it your way, and I bet it’ll become a favorite in your snack rotation too. If you make these energy balls, I’d love to hear how you personalize them—drop a comment below or share your photos. Happy snacking!
FAQs
Can I store these energy balls at room temperature?
They’re best kept in the fridge to maintain texture and freshness, but you can store them at room temperature for up to 24 hours if needed.
What if I don’t have flaxseed? Can I skip it?
Yes, you can omit flaxseed, but it helps with binding and nutrition. You might want to add a bit more oats or a tablespoon of chia seeds as a substitute.
Can I make these energy balls ahead of time?
Absolutely! They keep well in the fridge for up to two weeks and freeze beautifully for up to three months.
Are these energy balls suitable for kids?
Yes, kids love them! They’re sweet, chewy, and packed with good-for-you ingredients—just watch out, they can be addictive.
Can I use crunchy peanut butter instead of creamy?
You can, but creamy peanut butter gives a smoother texture and easier mixing. If you use crunchy, the balls will have more texture, which some people enjoy.
Pin This Recipe!
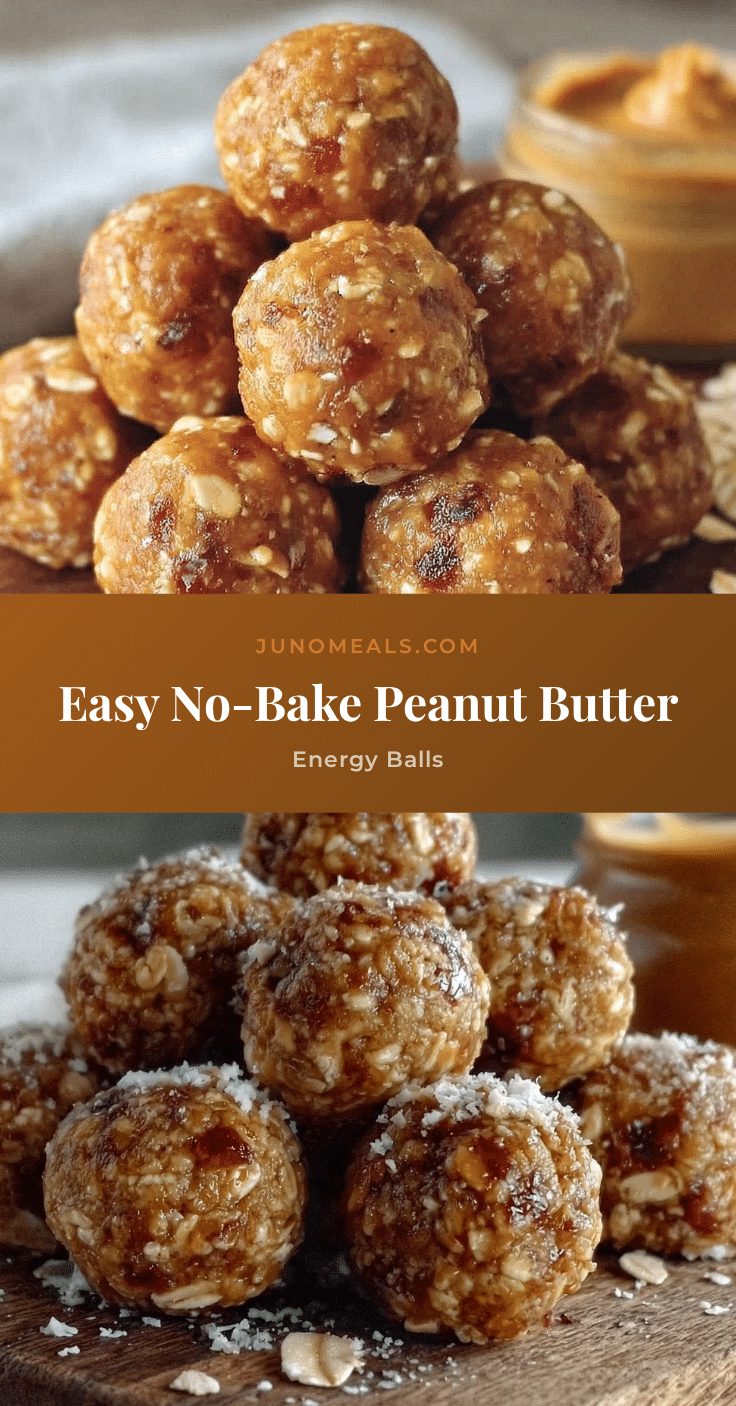
Easy No-Bake Peanut Butter Energy Balls

These no-bake peanut butter energy balls are quick, easy, and perfect for a healthy snack on the go. Made with simple pantry ingredients, they offer a delicious blend of creamy peanut butter, honey, oats, and chocolate chips.
- Prep Time: 10 minutes
- Cook Time: 0 minutes
- Total Time: 40 minutes
- Yield: 18-20 energy balls 1x
- Category: Snack
- Cuisine: American
Ingredients
- 1 cup creamy peanut butter (natural, unsweetened recommended)
- 1/3 cup honey (raw or regular)
- 1 cup old-fashioned rolled oats (gluten-free if needed)
- 1/4 cup mini chocolate chips (semi-sweet or dark)
- 1/4 cup ground flaxseed
- 1 teaspoon vanilla extract
- Pinch of salt
Instructions
- Combine peanut butter and honey in a mixing bowl and stir well until smooth and fully blended, about 2 minutes.
- Add vanilla extract and a pinch of salt; stir gently to combine.
- Mix in rolled oats and ground flaxseed until evenly coated and distributed.
- Fold in mini chocolate chips carefully to avoid melting.
- Chill the mixture in the refrigerator for 10 minutes to firm up slightly.
- Scoop about 1 tablespoon (15g) of mixture and roll into tight balls. Place on a baking sheet or plate lined with parchment paper. Repeat to make 18-20 balls.
- Refrigerate the energy balls for at least 30 minutes before serving to set shape and texture.
Notes
Use room temperature peanut butter for easier mixing. Chill mixture before rolling to reduce stickiness. Adjust oats or flaxseed if mixture is too sticky or dry. Store in an airtight container in the fridge for up to two weeks or freeze for up to three months.
Nutrition
- Serving Size: 1 energy ball (about
- Calories: 90100
- Fat: 6
- Carbohydrates: 8
- Fiber: 2
- Protein: 3
Keywords: peanut butter energy balls, no-bake snacks, healthy snacks, quick energy bites, peanut butter snacks, easy no-bake recipe