Introduction
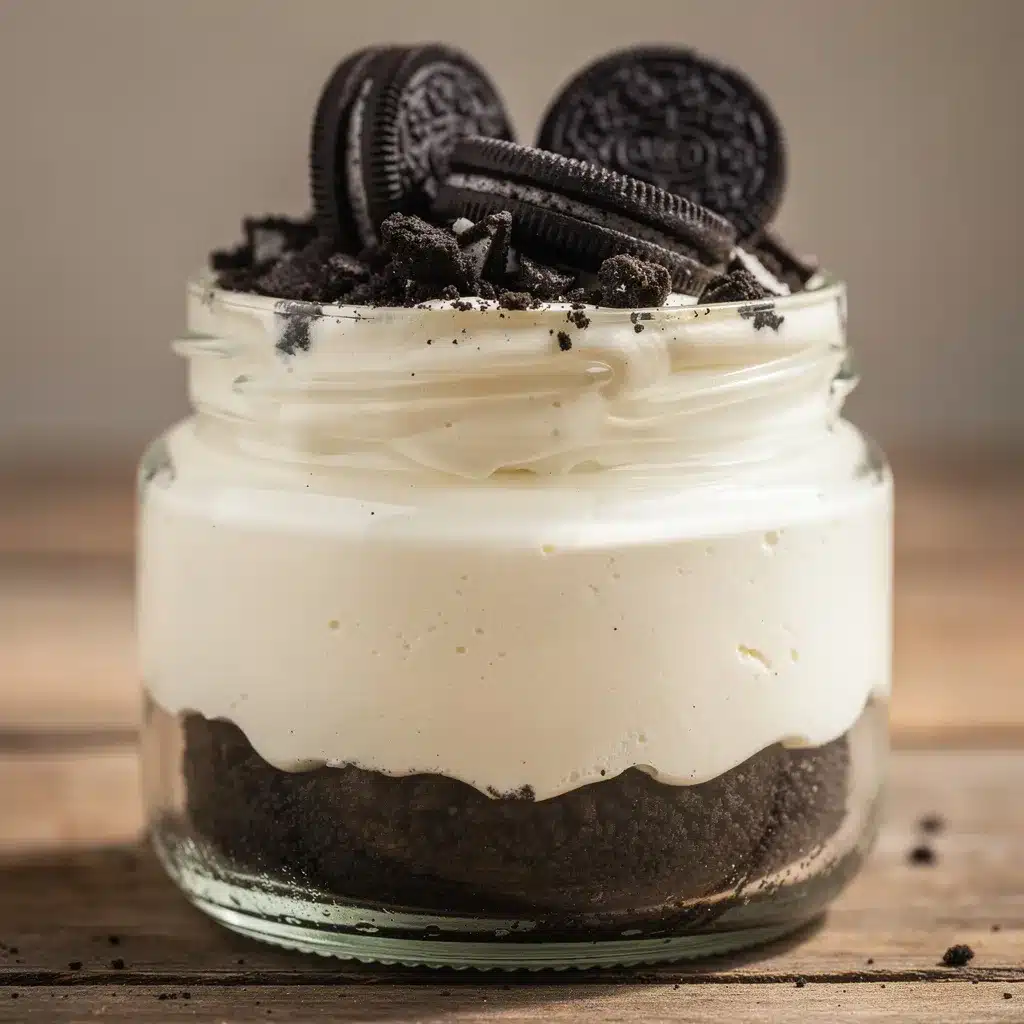
The first time I whipped up this creamy no-bake Oreo cheesecake in a jar, it was a bit of a last-minute rescue mission after a long day. Honestly, I wasn’t even sure if it would hold together or taste decent without baking. I just had a craving for something sweet and easy, and the idea of layering crushed Oreos and silky cream cheese in those little jars sitting in my pantry seemed like a fun shortcut. The texture surprised me — smooth, rich, with that perfect Oreo crunch throughout. My skeptical late-night self was quickly converted into a total fan.
What really stuck with me was how simple it felt to prepare and how elegant it looked when served. It’s like dessert got a little glow-up in a jar, no stress, no oven required. Plus, the portion control is spot-on — no guilt, just pure indulgence in a neat little package. I’ve since made it for friends and potlucks, and it’s always the one dessert people ask about again, which is quite the compliment from the crowd that usually goes wild for my mini lemon blueberry cheesecakes. This no-bake Oreo cheesecake isn’t just dessert; it’s a little moment of joy that’s easy enough to make any day of the week.
Why You’ll Love This Recipe
- Quick & Easy: This no-bake Oreo cheesecake in a jar comes together in under 20 minutes, perfect for busy weeknights or when you want a fuss-free treat.
- Simple Ingredients: You don’t need any fancy or hard-to-find items — just classic Oreos, cream cheese, a bit of sugar, and whipped cream. Chances are, you already have everything in your pantry.
- Perfect for Any Occasion: Whether it’s a casual dessert for family or an impressive treat for a potluck, these jars make serving effortless and stylish.
- Crowd-Pleaser: Kids and adults alike can’t get enough of the creamy texture combined with that little crunch of Oreo cookie bits.
- Unbelievably Delicious: The balance of rich cream cheese and sweet cookie crumbs creates that classic cheesecake flavor, but without the wait or oven time.
This recipe is not your typical no-bake cheesecake. The trick is blending the cream cheese until it’s ultra-smooth and folding in just the right amount of crushed Oreos for texture without overpowering the creaminess. Plus, layering it in jars makes it feel special without extra effort. Honestly, it’s the kind of dessert you can make after dinner, and by the time you’re ready to serve, it feels like you’ve planned something fancy.
What Ingredients You Will Need
This recipe uses simple, wholesome ingredients to deliver bold flavor and satisfying texture without the fuss. Most of these are pantry staples or easy to find in any grocery store.
- Oreo Cookies: About 20 cookies, crushed (reserve some whole for garnish). I like using the classic Oreo brand for that authentic chocolate and cream combo.
- Cream Cheese: 8 ounces (225 grams), softened to room temperature — this ensures a smooth, creamy filling without lumps.
- Powdered Sugar: ½ cup (60 grams) for sweetness and a silky texture. Powdered sugar dissolves better than granulated in this no-bake filling.
- Heavy Whipping Cream: 1 cup (240 ml), chilled — whipped to soft peaks to fold into the cream cheese mixture, giving the cheesecake that airy lift.
- Vanilla Extract: 1 teaspoon for warmth and depth of flavor.
- Butter: 4 tablespoons (60 grams), melted — mixed with crushed Oreos for the base layer, adding richness and binding it together.
If you want to switch things up, you can swap regular Oreos for gluten-free versions or try a reduced-fat cream cheese for a lighter twist. For a dairy-free version, coconut cream and dairy-free cream cheese alternatives work nicely, though the texture will vary slightly. I’ve also found that using a trusted brand of cream cheese like Philadelphia gives the best consistency and flavor.
Equipment Needed
- Mixing bowls (medium and large)
- Electric mixer or hand whisk for whipping cream and blending the filling
- Food processor or sturdy plastic bag and rolling pin to crush Oreos
- Measuring cups and spoons
- Spoons or spatulas for folding and layering
- Small glass jars or dessert cups (about 4 to 6 oz / 120 to 180 ml capacity) for serving
If you don’t have a food processor, crushing Oreos in a zip-top bag with a rolling pin works just fine — just be patient and go gently to avoid cookie dust everywhere. For whipping cream, I prefer a handheld electric mixer because it’s faster and easier to get that perfect soft peak stage without overdoing it. Glass jars add a cute touch and make the dessert portable, but any small dessert cup or bowl will do. If you want to get fancy, small mason jars are perfect and budget-friendly.
Preparation Method
- Prepare the Oreo Crust: Place about 15 Oreos in a food processor and pulse until finely crushed (about 1 cup of crumbs). If using a bag, crush carefully with a rolling pin. Transfer crumbs to a bowl and stir in melted butter until well combined. Divide this mixture evenly among your serving jars and press down firmly to form the crust layer. Chill in the fridge while you make the filling (10 minutes).
- Make the Cream Cheese Filling: In a large bowl, beat the softened cream cheese with powdered sugar and vanilla extract using an electric mixer on medium speed until smooth, about 2-3 minutes. It’s important here to scrape the sides frequently to ensure no lumps remain.
- Whip the Cream: In a separate chilled bowl, whip the heavy cream using clean beaters until soft peaks form — when you lift the whisk, the peaks should gently hold but fold over.
- Fold Cream Into Cream Cheese: Gently fold the whipped cream into the cream cheese mixture in three additions, using a spatula with gentle, sweeping motions to keep the mixture airy and light.
- Add Crushed Oreos: Reserve about 5 Oreos, roughly chopped. Fold these into the filling to add texture and that classic Oreo crunch.
- Assemble the Jars: Spoon or pipe the cream cheese filling over the chilled crusts in each jar, filling them nearly to the top. Smooth the surface with the back of a spoon.
- Chill: Refrigerate the jars for at least 3 hours or overnight to let the cheesecake set. This step is key for the filling to firm up nicely without baking.
- Garnish and Serve: Just before serving, top each jar with a whole Oreo or a few cookie crumbs for presentation.
If your filling feels too soft after chilling, a quick 10-minute pop in the freezer can help it firm up without freezing it solid. The key sensory indicator is a creamy, spoonable texture that holds shape without wobbling too much.
Cooking Tips & Techniques
One trick I learned the hard way is making sure the cream cheese is fully softened before mixing. If it’s too cold, you’ll end up with lumps or a grainy texture. Let it sit at room temperature for at least 30 minutes or microwave in short bursts (10 seconds) if you’re pressed for time.
When folding whipped cream into the cream cheese, patience is key. Rushing or stirring too aggressively deflates the cream, leading to a dense filling instead of light and fluffy. Use a gentle hand and fold in stages.
Another tip: don’t skip chilling the assembled jars. Even though it’s no-bake, the fridge time helps the butter in the crust firm up and the filling thicken, which makes serving and eating much neater.
For multitasking, start crushing Oreos and melting butter first, then soften your cream cheese as you prepare the whipped cream. This flow keeps things moving efficiently without waiting around.
Lastly, be mindful of the Oreo crumbs you add inside the filling. Too many can make the texture gritty, so I stick to about ⅓ cup of chopped cookies folded in. This way, you get a nice crunch without losing that creamy mouthfeel.
Variations & Adaptations
- Flavored Cheesecake: Add a teaspoon of instant espresso powder to the cream cheese mixture for a mocha twist that pairs wonderfully with chocolate cookies.
- Fruit Twist: Layer fresh strawberries or raspberries between the crust and filling for a burst of freshness, or swirl in a spoonful of fruit preserves before chilling.
- Gluten-Free Option: Use gluten-free chocolate sandwich cookies instead of Oreos for those with dietary restrictions. I’ve tested this with a popular brand, and the texture stays spot on.
- Vegan Version: Substitute dairy cream cheese with a plant-based alternative and use coconut cream whipped until fluffy. Use vegan Oreo-style cookies to keep it consistent.
- Crunchy Topping: Sprinkle crushed nuts or mini chocolate chips on top for extra texture and contrast. Personally, I love a little sea salt sprinkle to balance the sweetness.
For different cooking methods, while this cheesecake is designed to be no-bake, you can bake the crust base for 5 minutes at 350°F (175°C) if you want a firmer foundation, but it’s truly not necessary.
Serving & Storage Suggestions
This creamy no-bake Oreo cheesecake tastes best chilled straight from the fridge. Serving it cold keeps the filling firm yet creamy, and the crust crisp. The jars make it easy to transport and serve, so it’s perfect for picnics or parties.
Pair it with a cup of strong coffee or a glass of cold milk for a classic combo. For a more festive touch, a drizzle of chocolate sauce or a dollop of whipped cream on top works wonders.
Store leftovers tightly covered in the fridge for up to 3 days. The flavors actually meld together nicely over time, but the crust may soften slightly. For longer storage, these jars freeze well for up to 1 month; thaw overnight in the fridge before serving.
If reheating, a light warm-up isn’t recommended as it affects texture, but letting it sit at room temperature for 15 minutes before eating softens the cheesecake just right without melting.
Nutritional Information & Benefits
Each jar of this no-bake Oreo cheesecake (about 4 oz / 120 g serving) contains roughly:
| Calories | 320 |
|---|---|
| Fat | 22g |
| Carbohydrates | 28g |
| Protein | 5g |
| Sugar | 18g |
While this dessert is indulgent, the cream cheese provides a decent source of calcium and protein. Using real cream gives richness, but you can opt for lighter dairy if preferred. The Oreo cookies do contain gluten and dairy, so this recipe isn’t suitable for those with allergies unless substitutions are made.
From a personal wellness perspective, I like that this recipe allows for portion control and quick satisfaction without overindulgence. It’s a sweet treat that doesn’t require hours in the kitchen — which for me, is a win on busy days.
Conclusion
This creamy no-bake Oreo cheesecake in a jar hits that sweet spot between simplicity and indulgence. It’s a recipe I turn to when I want something delicious but don’t have hours to fuss over baking. The layers of crunchy Oreo crust and silky cream cheese filling feel fancy without the effort, and the jars add a little charm to every serving.
Feel free to tweak it with your favorite flavors or mix-ins — that’s the beauty of this recipe. It’s forgiving, fast, and always a crowd-pleaser. Honestly, it’s become one of my go-to desserts to bring along to get-togethers, knowing it will disappear fast.
If you try this out, I’d love to hear how you customize it or what occasion you made it for — sharing those little tweaks makes the recipe even better for everyone. Enjoy every creamy, crunchy bite!
FAQs
Can I use low-fat cream cheese for this recipe?
Yes, you can use low-fat cream cheese, but the texture might be less creamy and slightly tangier. It still works well for a lighter version.
How long does the no-bake cheesecake need to chill?
At least 3 hours in the fridge is best to let it set properly, but overnight chilling yields the creamiest texture.
Can I make this recipe ahead of time?
Absolutely! Prepare the jars a day in advance and keep them refrigerated. It’s perfect for prepping desserts ahead of parties.
What’s the best way to crush Oreos if I don’t have a food processor?
Place the Oreos in a sealed plastic bag and gently crush with a rolling pin or heavy pan until finely ground. Just be careful to avoid making a mess!
Is it possible to make this recipe dairy-free?
Yes, swap cream cheese with a plant-based alternative and use coconut cream for whipping. Use vegan chocolate sandwich cookies to keep it dairy-free.
Pin This Recipe!

Creamy No-Bake Oreo Cheesecake in a Jar
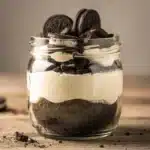
A quick and easy no-bake Oreo cheesecake layered in jars, perfect for portion control and elegant dessert presentation without the oven.
- Prep Time: 15 minutes
- Cook Time: 0 minutes
- Total Time: 3 hours 15 minutes
- Yield: 6 servings 1x
- Category: Dessert
- Cuisine: American
Ingredients
- 20 Oreo cookies, crushed (reserve some whole for garnish)
- 8 ounces (225 grams) cream cheese, softened to room temperature
- ½ cup (60 grams) powdered sugar
- 1 cup (240 ml) heavy whipping cream, chilled
- 1 teaspoon vanilla extract
- 4 tablespoons (60 grams) butter, melted
Instructions
- Prepare the Oreo crust: Place about 15 Oreos in a food processor and pulse until finely crushed (about 1 cup of crumbs). If using a bag, crush carefully with a rolling pin. Transfer crumbs to a bowl and stir in melted butter until well combined. Divide this mixture evenly among your serving jars and press down firmly to form the crust layer. Chill in the fridge while you make the filling (10 minutes).
- Make the cream cheese filling: In a large bowl, beat the softened cream cheese with powdered sugar and vanilla extract using an electric mixer on medium speed until smooth, about 2-3 minutes. Scrape the sides frequently to ensure no lumps remain.
- Whip the cream: In a separate chilled bowl, whip the heavy cream using clean beaters until soft peaks form.
- Fold cream into cream cheese: Gently fold the whipped cream into the cream cheese mixture in three additions, using a spatula with gentle, sweeping motions to keep the mixture airy and light.
- Add crushed Oreos: Reserve about 5 Oreos, roughly chopped. Fold these into the filling to add texture and Oreo crunch.
- Assemble the jars: Spoon or pipe the cream cheese filling over the chilled crusts in each jar, filling them nearly to the top. Smooth the surface with the back of a spoon.
- Chill: Refrigerate the jars for at least 3 hours or overnight to let the cheesecake set.
- Garnish and serve: Just before serving, top each jar with a whole Oreo or a few cookie crumbs.
Notes
Ensure cream cheese is fully softened before mixing to avoid lumps. Fold whipped cream gently to keep filling light and airy. Chill jars for at least 3 hours or overnight for best texture. If filling is too soft after chilling, freeze for 10 minutes to firm up without freezing solid. Use gluten-free or dairy-free substitutes as needed for dietary restrictions.
Nutrition
- Serving Size: 1 jar (about 4 oz /
- Calories: 320
- Sugar: 18
- Fat: 22
- Carbohydrates: 28
- Protein: 5
Keywords: no-bake cheesecake, Oreo cheesecake, dessert in a jar, easy dessert, quick cheesecake, Oreo dessert, no oven dessert