Introduction
“You sure that bread’s going to turn out?” my friend asked, eyeing the shaggy mess I’d just stirred together. Honestly, I wasn’t sure either. The whole thing started as a spur-of-the-moment experiment after a long day when I didn’t feel like wrestling with dough or watching the clock. I tossed a few staple ingredients into a bowl, stirred briefly, and left it alone for what felt like forever. When I finally popped that heavy Dutch oven into the oven and the kitchen filled with an irresistible, toasty aroma, I realized something special was happening.
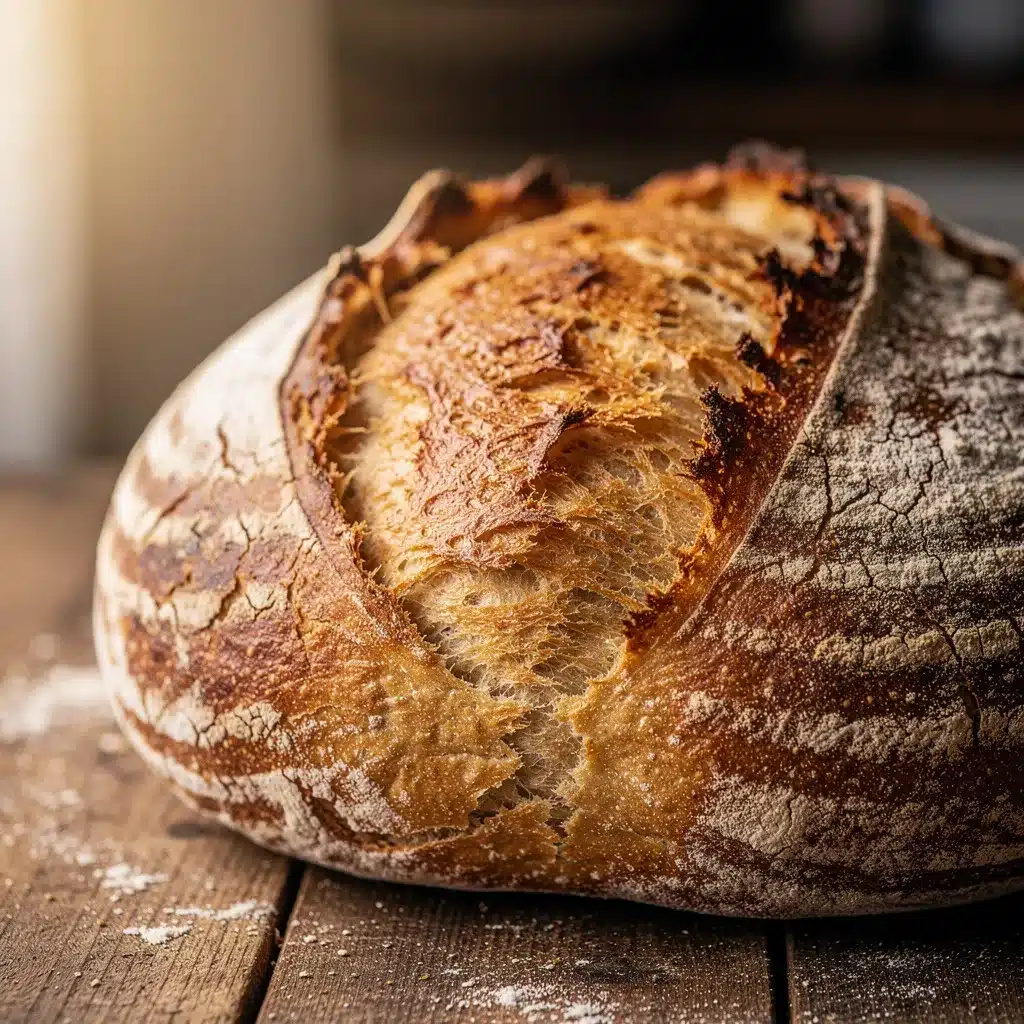
The crust crackled when I sliced it, the crumb was airy but not holey in a fancy way — just perfectly rustic. That first bite was a quiet little victory, like finding a shortcut through a familiar path. It quickly became my go-to when I craved fresh bread without the fuss. This crispy no-knead Dutch oven bread made easy isn’t about precision or perfect technique; it’s about a simple, forgiving process that anyone can trust. It’s proof that sometimes, the best kitchen wins come from just letting things be.
Over time, I tweaked the timing and temperature just a bit, but the core recipe stayed the same. The magic lies in the slow fermentation and the Dutch oven’s sealed heat creating that golden crust. If you’ve ever doubted your bread-making skills or felt overwhelmed by complicated recipes, this one’s for you. It’s the kind of bread that feels like home, even if it’s your first time baking it.
Why You’ll Love This Recipe
After making this crispy no-knead Dutch oven bread more times than I can count, I’ve nailed down exactly why it’s a keeper:
- Quick & Easy: The hands-on part takes just 10 minutes, and then you let the dough do its thing while you relax or prep other meals.
- Simple Ingredients: Flour, water, salt, and yeast — that’s it. You won’t need to hunt for anything exotic.
- Perfect for Any Occasion: Whether you’re setting up a cozy dinner or need fresh bread for sandwiches, this recipe fits right in.
- Crowd-Pleaser: Friends and family always ask for seconds — it’s that kind of universally loved bread.
- Unbelievably Delicious: The crisp crust and tender crumb hit that satisfying balance you didn’t know you were missing.
What sets this recipe apart? It’s the magic of baking in a Dutch oven, which traps steam and creates that bakery-style crust without fancy equipment or complicated steps. Plus, the no-knead technique means you’re not stuck elbow-deep in dough — perfect for those busy or lazy days alike. This recipe isn’t just another no-knead bread; it’s a trust-worthy, foolproof way to get bakery-worthy results at home.
Seriously, after just one loaf, you might find yourself thinking about it all week — that’s how addictive it is. It’s the kind of bread that makes you close your eyes after the first bite and just savor the moment.
What Ingredients You Will Need
This recipe uses simple, wholesome ingredients to deliver bold flavor and satisfying texture without the fuss. Most are pantry staples, and substitutions are easy if needed.
- All-purpose flour: 3 cups (360g) – I prefer King Arthur for consistent texture.
- Warm water: 1 ⅓ cups (320ml) – about 100°F (38°C), helps activate the yeast gently.
- Instant yeast: 1/4 teaspoon – less than usual, which gives the bread a slow rise and fuller flavor.
- Salt: 1 ½ teaspoons – balances the flavor and strengthens the dough.
That’s it! No sugar, no oil, no fuss. If you want to experiment, swapping all-purpose flour with bread flour can give a chewier bite. For a gluten-free version, almond or oat flour blends don’t work well here—stick to a gluten-free all-purpose mix designed for bread.
Equipment Needed
Here’s what you’ll want on hand to make this bread without a hitch:
- Dutch oven with lid: 5 to 6-quart size works best — cast iron is ideal for heat retention, but enameled cast iron is a great alternative.
- Mixing bowl: Large enough to hold the dough comfortably as it rises.
- Wooden spoon or dough whisk: For mixing the shaggy dough (no kneading needed, yay!).
- Kitchen towel or plastic wrap: To cover the dough during fermentation.
- Oven mitts: The Dutch oven gets hot, so protect your hands.
If you don’t have a Dutch oven, a heavy oven-safe pot with a tight-fitting lid can work in a pinch. I’ve tried using a deep roasting pan covered tightly with foil, but the crust won’t be quite as crisp. Investing in a good Dutch oven pays off across recipes — I actually use mine for everything from stews to mini lemon blueberry cheesecakes, so it’s worth the splurge.
Preparation Method
- Mix the dough: Combine 3 cups (360g) all-purpose flour, 1 ⅓ cups (320ml) warm water, ¼ teaspoon instant yeast, and 1 ½ teaspoons salt in a large bowl. Stir with a wooden spoon until just combined and no dry flour remains. The dough will be sticky and shaggy — that’s exactly right. (Time: 5 minutes)
- First rise: Cover the bowl with a kitchen towel or plastic wrap. Let it rest at room temperature for 12 to 18 hours — overnight works perfectly. You’ll see bubbles forming and the dough will double in size, smelling slightly tangy. (Tip: If your kitchen is cold, place it near a warm spot but not too hot.)
- Pre-shape and rest: Lightly flour a work surface and scrape the dough out. Fold it over itself a couple of times to form a rough ball. Cover with a towel and let rest for 15 minutes. This relaxes the gluten for better shaping.
- Final shaping: Shape the dough into a tight ball by cupping your hands and gently turning it on the surface. Place it seam-side down on a piece of parchment paper. Cover and rest for 30 to 60 minutes until it puffs slightly but doesn’t double again.
- Preheat the oven and Dutch oven: Place your Dutch oven with the lid inside your oven and preheat to 450°F (232°C) for at least 30 minutes. This step is crucial for that crispy crust.
- Bake: Carefully remove the hot Dutch oven from the oven. Lift the dough on the parchment paper and lower it into the pot. Cover with the lid and bake for 30 minutes.
- Uncover and finish baking: Remove the lid and bake for another 15 to 20 minutes until the crust is deep golden brown and crackly. (If you tap the bottom of the loaf, it should sound hollow.)
- Cool: Remove the bread from the Dutch oven and let it cool on a wire rack for at least an hour before slicing. Patience here makes a big difference in texture.
Pro tip: If the crust browns too quickly, tent loosely with foil during the last 10 minutes. Also, I’ve found that using parchment paper makes transferring the dough a breeze — no burns or sticking to worry about.
Cooking Tips & Techniques
Getting that perfect crispy no-knead Dutch oven bread takes a few insider tricks I’ve gathered:
- Don’t rush the rise: The long fermentation develops flavor and texture. I’ve tried cutting it short and the bread ends up dense and bland.
- Keep the dough sticky: It might feel sloppy at first, but resist adding extra flour. Sticky dough means a lighter crumb.
- Preheat the Dutch oven thoroughly: This creates steam inside, which is what makes the crust crackle. Skipping this step is a rookie mistake I learned the hard way.
- Use parchment paper: It helps lift the dough easily into the pot without burns or mess.
- Cool before slicing: I know it’s tempting to cut right away, but cooling lets the crumb set properly. Otherwise, you’ll get gummy bread.
One time, I forgot to cover the dough during the rise and it formed a dry skin on top — not fun. Covering snugly prevents that. Also, I multitask during the long rise by prepping sides or cleaning up, which makes the process feel effortless.
Variations & Adaptations
This crispy no-knead Dutch oven bread recipe is a fantastic base for creativity:
- Herb-infused bread: Add 2 tablespoons of chopped fresh rosemary or thyme to the dough for a fragrant twist.
- Whole wheat blend: Substitute half the all-purpose flour with whole wheat flour for a nuttier flavor and heartier texture.
- Cheese bread: Fold in ½ cup shredded sharp cheddar or Parmesan just before the final shaping for a melty surprise.
For a gluten-free adaptation, consider looking at recipes specifically designed for gluten-free flours because the hydration and structure differ too much for this no-knead method. I’ve also tried baking this bread in a Dutch oven on a grill with the lid closed — it works surprisingly well for outdoor cooking.
Serving & Storage Suggestions
This bread is best served warm or at room temperature. The crust is at its crispiest fresh out of the oven, and the crumb is soft and chewy inside.
- Slice and serve with olive oil and balsamic vinegar for dipping, or slather with butter and a sprinkle of sea salt.
- Pairs wonderfully with soups, stews, or a spread of cheeses and charcuterie for a casual gathering.
- Store leftover bread in a paper bag or wrapped loosely in a kitchen towel at room temperature for up to 3 days. Avoid plastic bags which make the crust soggy.
- To freeze, slice first, then wrap tightly in foil and place in a freezer bag. Toast slices directly from the freezer to revive crispness.
- Reheating in a 350°F (175°C) oven for 10 minutes refreshes the crust beautifully.
Over time, the flavor deepens — letting the bread rest a day before eating can be surprisingly rewarding. If you love experimenting, this bread pairs nicely with the sweet-tart notes of mini lemon blueberry cheesecakes for dessert after a cozy meal.
Nutritional Information & Benefits
This bread is a wholesome source of energy, made with minimal ingredients and no added sugars or fats. A single serving (about 2 ounces or 56g) provides approximately:
| Calories | Carbohydrates | Protein | Fat | Fiber |
|---|---|---|---|---|
| 150 kcal | 30g | 5g | 1g | 1g |
Using all-purpose flour means this bread contains gluten — not suitable for gluten-sensitive diets. The slow fermentation reduces phytic acid, which can help with mineral absorption and digestion. It’s a simple, clean recipe that fits into many eating styles and a great way to enjoy fresh bread without additives. Personally, I appreciate how this recipe balances flavor and simplicity, making homemade bread approachable and satisfying.
Conclusion
This crispy no-knead Dutch oven bread made easy has become a quiet staple in my kitchen — a reliable way to enjoy fresh, delicious bread without hours of work or fancy gear. It’s forgiving, straightforward, and downright tasty. Whether you’re a seasoned home baker or just starting out, this recipe welcomes you with open arms.
Feel free to tweak it with herbs, cheese, or whole wheat flour to suit your taste buds. I love how this bread always feels like a little celebration in the everyday — a reminder that sometimes, the simplest things are the most rewarding.
If you try it, I’d love to hear how your loaf turns out or any fun variations you come up with! Sharing food stories and recipes is what makes cooking so special.
Frequently Asked Questions
Can I use active dry yeast instead of instant yeast?
Yes, but you’ll need to proof it first in warm water with a pinch of sugar for about 5-10 minutes before mixing. Instant yeast can be added directly.
What if I don’t have a Dutch oven?
You can use any heavy oven-safe pot with a tight-fitting lid or even a deep roasting pan covered tightly with foil, but the crust won’t be quite as crisp.
Why is the dough so sticky?
The stickiness is normal and important for a light, airy crumb. Avoid adding extra flour when mixing or shaping.
Can I bake this bread gluten-free?
This recipe relies on gluten for structure. For gluten-free bread, it’s best to use recipes designed specifically for gluten-free flours.
How do I store leftover bread to keep it fresh?
Store at room temperature in a paper bag or kitchen towel for up to 3 days. Freeze slices for longer storage and reheat in a toaster or oven.
Pin This Recipe!
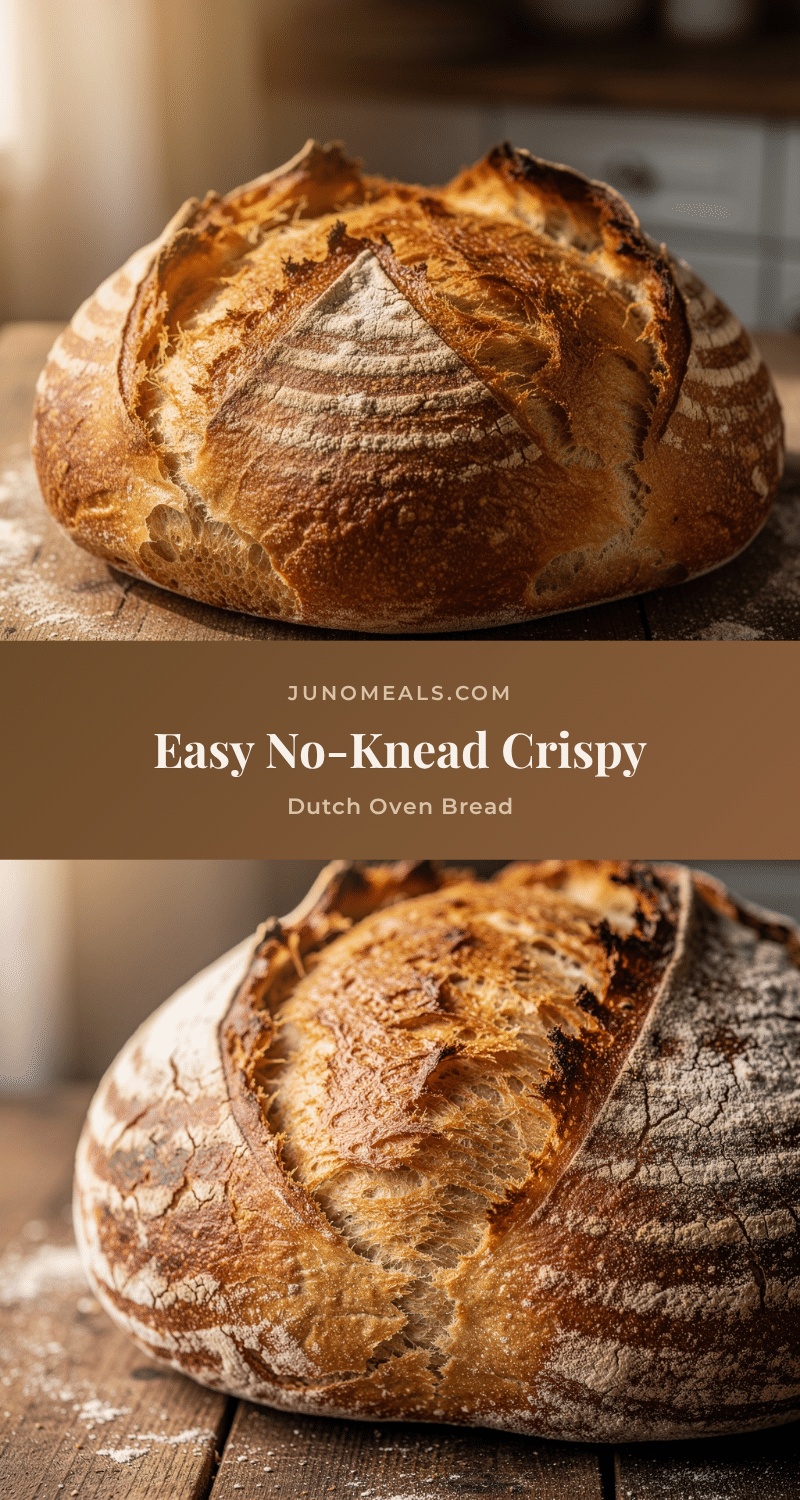
Crispy No-Knead Dutch Oven Bread

A simple, forgiving no-knead bread recipe baked in a Dutch oven for a crispy crust and tender crumb. Perfect for beginners and busy days, this bread requires minimal hands-on time and basic ingredients.
- Prep Time: 10 minutes
- Cook Time: 45 minutes
- Total Time: 13 hours 55 minutes
- Yield: 1 loaf (about 8 servings) 1x
- Category: Bread
- Cuisine: American
Ingredients
- 3 cups (360g) all-purpose flour
- 1 1/3 cups (320ml) warm water (about 100°F / 38°C)
- 1/4 teaspoon instant yeast
- 1 1/2 teaspoons salt
Instructions
- Combine 3 cups (360g) all-purpose flour, 1 1/3 cups (320ml) warm water, 1/4 teaspoon instant yeast, and 1 1/2 teaspoons salt in a large bowl. Stir with a wooden spoon until just combined and no dry flour remains. The dough will be sticky and shaggy.
- Cover the bowl with a kitchen towel or plastic wrap. Let it rest at room temperature for 12 to 18 hours until the dough doubles in size and bubbles form.
- Lightly flour a work surface and scrape the dough out. Fold it over itself a couple of times to form a rough ball. Cover with a towel and let rest for 15 minutes.
- Shape the dough into a tight ball by cupping your hands and gently turning it on the surface. Place it seam-side down on parchment paper. Cover and rest for 30 to 60 minutes until it puffs slightly but doesn’t double again.
- Preheat the oven to 450°F (232°C) with the Dutch oven and lid inside for at least 30 minutes.
- Carefully remove the hot Dutch oven from the oven. Lift the dough on the parchment paper and lower it into the pot. Cover with the lid and bake for 30 minutes.
- Remove the lid and bake for another 15 to 20 minutes until the crust is deep golden brown and crackly.
- Remove the bread from the Dutch oven and let it cool on a wire rack for at least one hour before slicing.
Notes
Do not rush the rise; the long fermentation develops flavor and texture. Keep the dough sticky and resist adding extra flour. Preheat the Dutch oven thoroughly to create steam for a crispy crust. Use parchment paper to transfer dough easily. Cool bread completely before slicing to avoid gummy texture. Tent with foil if crust browns too quickly during baking.
Nutrition
- Serving Size: 2 ounces (56g)
- Calories: 150
- Sodium: 360
- Fat: 1
- Carbohydrates: 30
- Fiber: 1
- Protein: 5
Keywords: no-knead bread, Dutch oven bread, easy bread recipe, crispy crust bread, homemade bread, simple bread recipe