“You really think black and gold cake pops can steal the show at a New Year’s Eve party?” my friend joked over the phone as I described my latest baking obsession. Honestly, I was half-skeptical myself when I first tried making these perfect black and gold cake pops. I was aiming for something festive but fuss-free, something that could handle the chaos of late-night revelry without falling apart or looking tired by midnight. Turns out, these little treats not only held their own but became the unexpected highlight of the night.
It all started the evening before NYE when I was scrambling through the pantry, trying to pull together something that looked dazzling but wouldn’t take hours. I had leftover cake and a handful of ingredients lying around, and a spark of inspiration hit—why not mix up cake pops with that glam black and gold vibe that screams celebration? The first batch was a total experiment, a bit of a mess, but surprisingly tasty. After tweaking the coating and perfecting the shimmer, I ended up with these stunning, bite-sized wonders that everyone kept asking about (and yes, I shared the recipe eventually!).
What stuck with me, though, was how effortlessly these cake pops brought everyone to the table, adding a touch of sparkle and sweetness to what could have been just another party snack. It’s quiet proof that sometimes the simplest ideas, whipped up in a pinch, become the most cherished traditions. These cake pops aren’t just about looking fancy—they’re about savoring those moments when the night feels full of promise and glittering fun.
Why You’ll Love This Recipe
Having tested this recipe multiple times during the last few New Year’s celebrations, I can say this is the one you’ll want on your dessert table. Here’s why it’s a winner:
- Quick & Easy: You can have these ready in under 45 minutes, which is a godsend when you’re juggling party prep and last-minute errands.
- Simple Ingredients: No need for fancy or hard-to-find items. Most of what you need is probably already in your pantry or fridge.
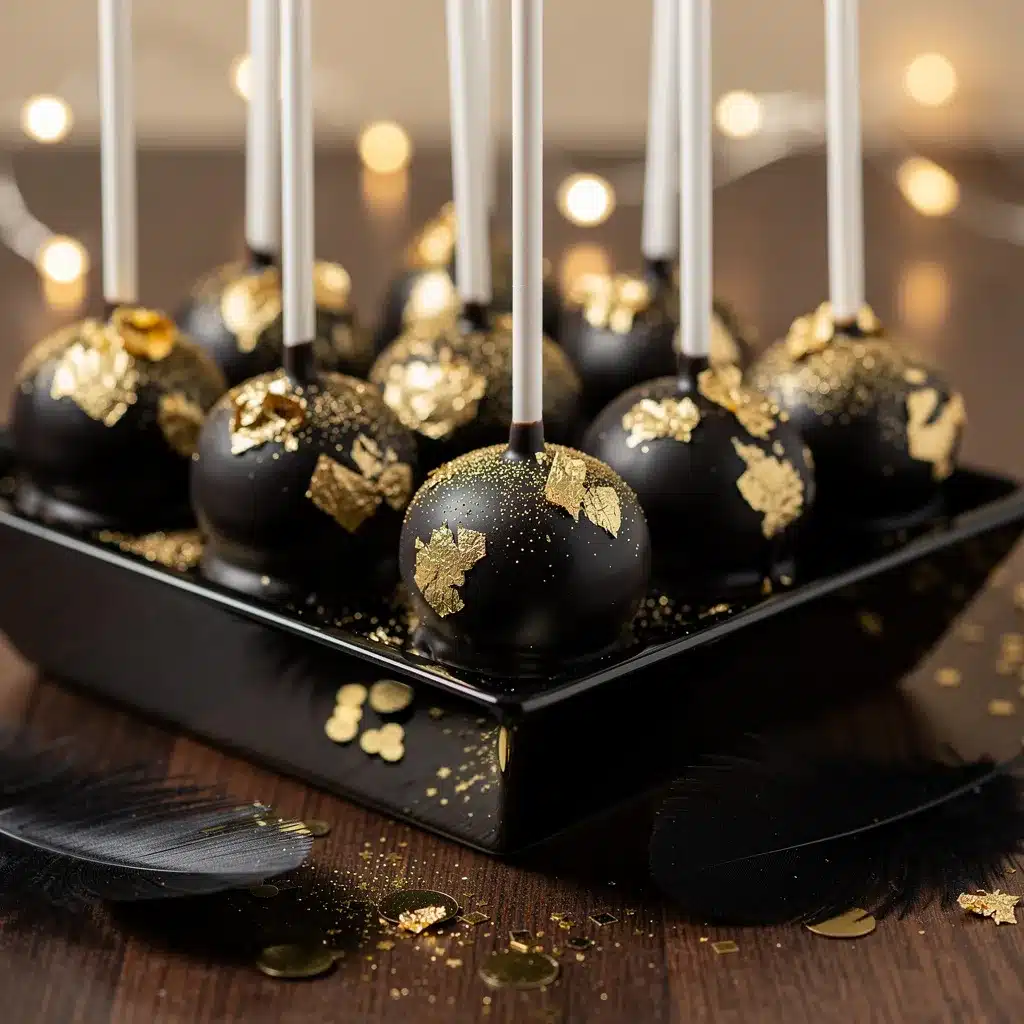
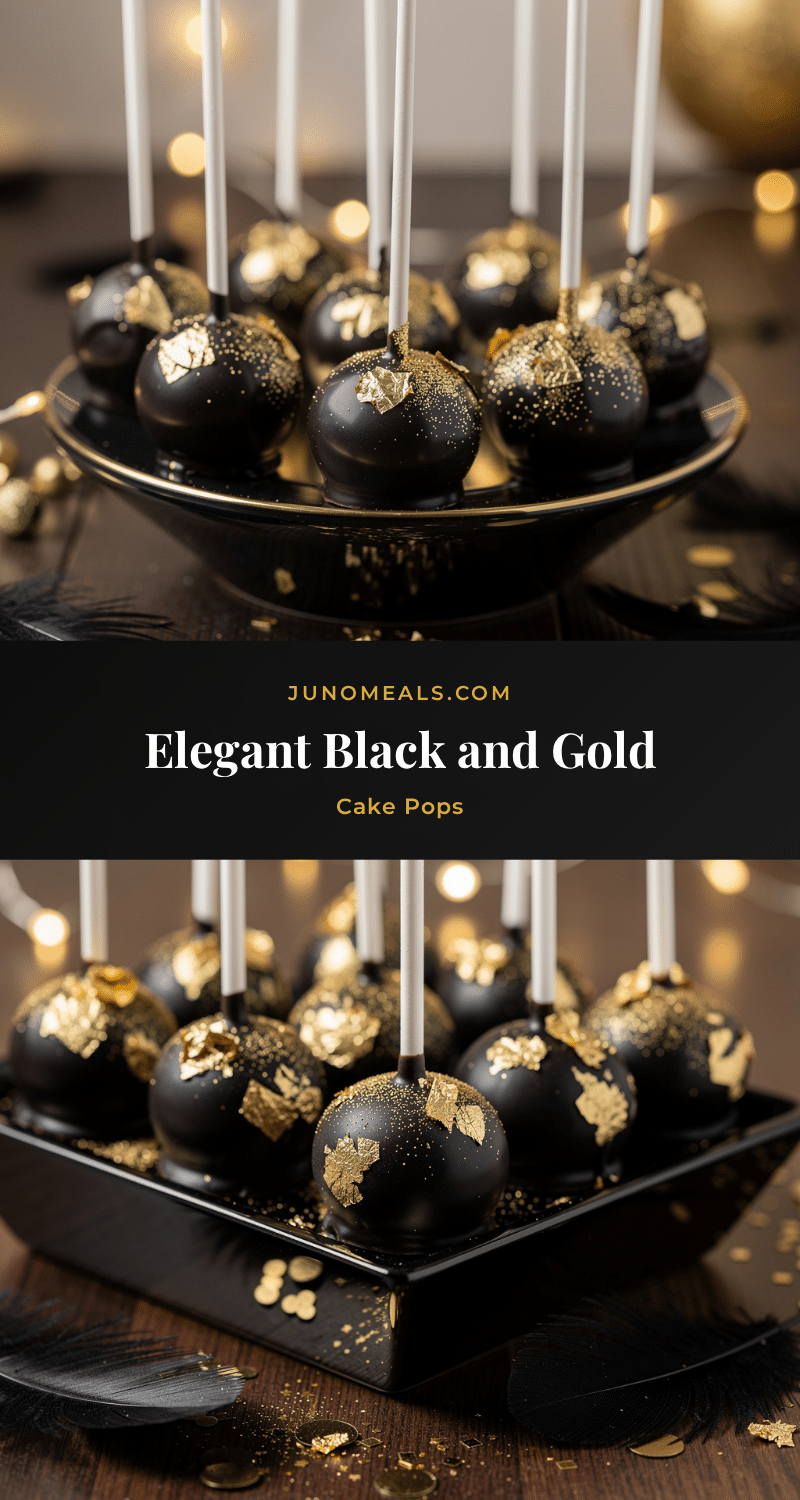
- Perfect for NYE Parties: The black and gold colors match the festive mood perfectly—classy yet playful.
- Crowd-Pleaser: Kids and adults alike love these. They’re small, fun, and pack a punch of sweetness that satisfies every craving.
- Unbelievably Delicious: The moist cake center paired with smooth chocolate coating and shimmering gold dust creates a texture and flavor combo that’s pure comfort food with a party twist.
What really sets this recipe apart is the way the cake pops balance elegance and ease. The trick is in the coating technique and the subtle shimmer of edible gold that makes them pop visually without feeling overdone. I’ve played around with different cake flavors, but chocolate cake with a hint of vanilla frosting gives just the right depth of flavor. You’ll find yourself making these not just for New Year’s but for any celebration that calls for a little sparkle and sweetness.
What Ingredients You Will Need
This recipe calls for straightforward ingredients that come together to create a bold look and rich flavor. I like to keep it simple but reliable, so here’s what you need:
- Chocolate Cake: About 1 box of your favorite chocolate cake mix (or 1 batch of homemade chocolate cake, cooled and crumbled)
- Frosting: 1/2 cup of vanilla or cream cheese frosting (room temperature) to bind the cake crumbs
- Dark Chocolate or Candy Melts: 12 ounces (340g) for dipping (I prefer Ghirardelli for the rich flavor and smooth melt)
- Black Candy Melts: 6 ounces (170g) for the signature black coating (Wilton brand works well and melts smoothly)
- Edible Gold Dust or Luster Dust: For the shimmering gold effect (available at specialty baking stores or online)
- Cake Pop Sticks: 25-30 sturdy sticks, about 4.5 inches long
- Optional Decorations: Gold sprinkles, edible glitter, or sugar pearls to add texture and glam
- Non-stick Spray or Parchment Paper: To keep your workspace and drying area clean
Feel free to substitute the boxed cake with a homemade recipe if you’re feeling ambitious, or swap the vanilla frosting for a dairy-free option if needed. When it comes to the gold dust, a little goes a long way—just a light brush or dusting will deliver that wow factor without overpowering the taste.
Equipment Needed
Making these cake pops requires just a handful of basic tools you probably already own:
- Mixing Bowls: One large for crumbling the cake and mixing with frosting, and one for melting chocolate
- Baking Sheet or Tray: To place the cake pops on while they set
- Microwave-Safe Bowl or Double Boiler: For melting the chocolate and candy melts gently
- Styrofoam Block or Cake Pop Stand: To hold the cake pops upright while the coating hardens
- Small Paintbrush or Food-Safe Brush: For applying edible gold dust
- Spatula or Spoon: For mixing and scooping cake mixture
Don’t worry if you don’t have a cake pop stand—styrofoam blocks work just fine and are often cheaper. When melting chocolate, patience is key; I recommend doing it in short bursts in the microwave or using a double boiler to avoid burning. A little tip: warming your bowls slightly before melting helps keep the chocolate smooth and glossy.
Preparation Method
- Prepare the Cake Base: Crumble your cooled chocolate cake into a large mixing bowl. Break it down until there are no large chunks—think fine crumbs. This usually takes about 5 minutes.
- Mix in the Frosting: Add 1/2 cup (about 120g) of frosting to the cake crumbs. Use your hands or a spoon to combine until the mixture holds together when pressed. It should be moist but not overly sticky. This step takes about 3-4 minutes. If it feels too dry, add a teaspoon more frosting.
- Shape the Cake Balls: Scoop out about 1.5 tablespoons (20g) of the mixture and roll it into a smooth ball. Place each ball on a parchment-lined baking sheet. This should yield around 25-30 balls. Chill them in the refrigerator for 30 minutes to firm up.
- Melt the Chocolate and Black Candy Melts: Using a microwave-safe bowl, melt the dark chocolate in 30-second intervals, stirring between each until smooth. Repeat with the black candy melts separately. Avoid overheating to keep the coating glossy.
- Insert the Sticks: Dip the tip of each cake pop stick about 1/2 inch into the melted dark chocolate, then push it halfway into a cake ball. This acts like glue to hold the stick in place. Return the pops to the fridge for 10 minutes.
- Dip the Cake Pops: First, dip each cake pop into the black candy melts, covering it completely. Gently tap off excess chocolate and stand them upright in your foam block or stand. Let set for about 15 minutes until firm.
- Add the Gold Touch: Using a small brush, lightly apply edible gold dust to each cake pop. For an extra glam touch, sprinkle a few gold sprinkles or edible glitter before the coating fully hardens.
- Final Chill and Serve: Chill the pops for another 15 minutes to fully set the coating and decorations. Serve at room temperature for the best flavor and texture.
Pro tip: If any cake pops crack or don’t stick well, remelt a little chocolate and use it as “glue” to fix them. The visual cue of a smooth, glossy finish means you’re on the right track.
Cooking Tips & Techniques
Making cake pops can feel a bit tricky at first, but a few pointers from my experience will save you some headaches:
- Consistency Is Key: The cake and frosting mixture shouldn’t be too wet or dry. If it’s crumbly, add a tiny bit more frosting. Too sticky? Pop it in the fridge for a bit.
- Chill, Chill, Chill: Don’t rush the chilling steps. Cake balls and dipped pops hold up better and look polished when properly chilled.
- Melting Chocolate: Take your time melting chocolate or candy melts. Overheating makes it clumpy or grainy. Stir often and use low heat.
- Dipping Technique: Dip straight down and lift slowly to avoid uneven coating or drips. Tapping the stick gently on the bowl edge helps remove extra coating.
- Gold Dust Application: Use a dry, soft brush to apply edible gold dust. A little dust goes a long way; you want a subtle shimmer, not a heavy layer.
On my first batch, I didn’t chill the cake balls enough and the coating cracked instantly—lesson learned! Also, I found multitasking by melting the chocolate while shaping the cake balls saves time and keeps everything moving smoothly.
Variations & Adaptations
If you like to switch things up, these cake pops are surprisingly versatile:
- Flavor Swaps: Try red velvet cake with cream cheese frosting for a festive twist, or lemon cake with a tangy glaze for a fresher bite.
- Coating Colors: Instead of black candy melts, use white chocolate dyed with black food coloring or metallic gold candy melts for a bolder look.
- Dietary Adjustments: Use gluten-free cake mix and dairy-free frosting to accommodate allergies. Almond flour cake balls also work well for a low-carb option.
- Alternative Decorations: Swap edible gold dust for crushed nuts, shredded coconut dyed gold, or even tiny edible stars for a celestial feel.
- Cooking Methods: If you want to skip the cake-making, use store-bought pound cake crumbled with frosting for a quicker fix.
One time, I made a batch with espresso powder in the cake mix and dusted with a pinch of cocoa powder instead of gold dust—perfect for a grown-up crowd craving a little coffee buzz.
Serving & Storage Suggestions
These cake pops look best served at room temperature, so take them out of the fridge 15 minutes before serving. Arrange them upright in a decorative vase or on a platter sprinkled with gold confetti to match the party vibe.
They pair wonderfully with bubbly drinks or a rich hot chocolate, especially if you want to lean into the indulgent celebration mood. For a savory contrast, offer alongside a cheese board with salty and creamy bites.
To store, keep the cake pops in an airtight container in the refrigerator for up to 4 days. You can freeze them too—just wrap individually in plastic wrap and pop in a freezer-safe bag for up to a month. Thaw in the fridge overnight before serving.
Reheating isn’t necessary, but if you like a softer center, leave them out at room temperature a bit longer. Over time, the cake flavor deepens, and the chocolate coating stays glossy as long as they’re stored properly.
Nutritional Information & Benefits
Each cake pop contains approximately 150-180 calories depending on size and ingredients used. The primary ingredients—cake and chocolate—are indulgent but made from simple basics.
The cocoa in the dark chocolate coating offers antioxidants, and using a quality cake mix can cut down on unnecessary additives. If you opt for cream cheese frosting, you’ll add a touch of protein and calcium too.
For those mindful of allergens, this recipe can be adapted to gluten-free or dairy-free versions without sacrificing much flavor or texture. It’s a fun treat that fits well within a balanced party menu—enjoy in moderation, you know?
Conclusion
These perfect black and gold cake pops have become my go-to for ringing in the new year with style and ease. They bring a little bit of sparkle and a whole lot of joy, without demanding hours in the kitchen. Whether you stick to the classic chocolate or try one of the variations, they’ll add that special something to your celebration table.
I love how customizable they are—just a few tweaks and they can suit any taste or dietary need. Plus, watching people’s faces light up when they bite into these glossy, shimmering bites is a reminder that sometimes the simplest desserts make the biggest impact.
Give this recipe a try and make those NYE moments a little sweeter. Don’t forget to share your own spin or stories—there’s nothing better than a recipe that sparks new traditions.
FAQs
Can I make the cake pops ahead of time?
Absolutely! You can prepare the cake balls and freeze them before dipping. Just thaw completely before coating with chocolate.
What if I don’t have black candy melts?
You can use white chocolate with black gel food coloring or simply use dark chocolate and add black edible glitter for a similar effect.
How do I prevent the cake pops from falling off the sticks?
Dipping the stick tip in melted chocolate before inserting into the cake ball helps secure it. Also, chilling the pops well before dipping is key.
Can I use other cake flavors for these pops?
Definitely! Red velvet, vanilla, or even spice cake work wonderfully. Just adjust the frosting flavor to complement the cake.
How should I store leftover cake pops?
Store them in an airtight container in the fridge for up to 4 days or freeze them wrapped individually for up to a month.
Pin This Recipe!
Perfect Black and Gold Cake Pops
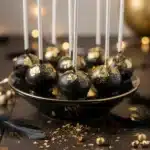
These festive black and gold cake pops are quick, easy, and perfect for New Year’s Eve parties. They feature a moist chocolate cake center coated in smooth black candy melts with a shimmering edible gold dust finish.
- Prep Time: 15 minutes
- Cook Time: 30 minutes
- Total Time: 45 minutes
- Yield: 25-30 cake pops 1x
- Category: Dessert
- Cuisine: American
Ingredients
- 1 box chocolate cake mix (or 1 batch homemade chocolate cake, cooled and crumbled)
- 1/2 cup vanilla or cream cheese frosting (room temperature)
- 12 ounces dark chocolate or candy melts for dipping
- 6 ounces black candy melts
- Edible gold dust or luster dust
- 25–30 cake pop sticks (about 4.5 inches long)
- Optional: gold sprinkles, edible glitter, or sugar pearls
- Non-stick spray or parchment paper
Instructions
- Crumble cooled chocolate cake into a large mixing bowl until fine crumbs form (about 5 minutes).
- Add 1/2 cup frosting to cake crumbs and mix until the mixture holds together when pressed (3-4 minutes). Add more frosting if too dry.
- Scoop about 1.5 tablespoons of mixture and roll into smooth balls. Place on parchment-lined baking sheet and chill for 30 minutes.
- Melt dark chocolate and black candy melts separately in microwave-safe bowls in 30-second intervals, stirring until smooth.
- Dip tip of each cake pop stick into melted dark chocolate about 1/2 inch, then insert halfway into a cake ball. Chill for 10 minutes.
- Dip each cake pop into black candy melts, covering completely. Tap off excess and stand upright in foam block or stand. Let set for 15 minutes.
- Lightly brush edible gold dust on each cake pop. Optionally, add gold sprinkles or edible glitter before coating hardens.
- Chill cake pops for another 15 minutes to fully set. Serve at room temperature.
Notes
Ensure cake and frosting mixture is moist but not too sticky. Chill cake balls and dipped pops thoroughly for best results. Melt chocolate gently to avoid clumping. Use a dry soft brush for gold dust application. If cake pops crack or sticks don’t hold, use melted chocolate as glue.
Nutrition
- Serving Size: 1 cake pop
- Calories: 150180
- Sugar: 18
- Sodium: 120
- Fat: 8
- Saturated Fat: 5
- Carbohydrates: 22
- Fiber: 1
- Protein: 2
Keywords: cake pops, black and gold cake pops, NYE party treats, chocolate cake pops, festive desserts, easy cake pops, party snacks