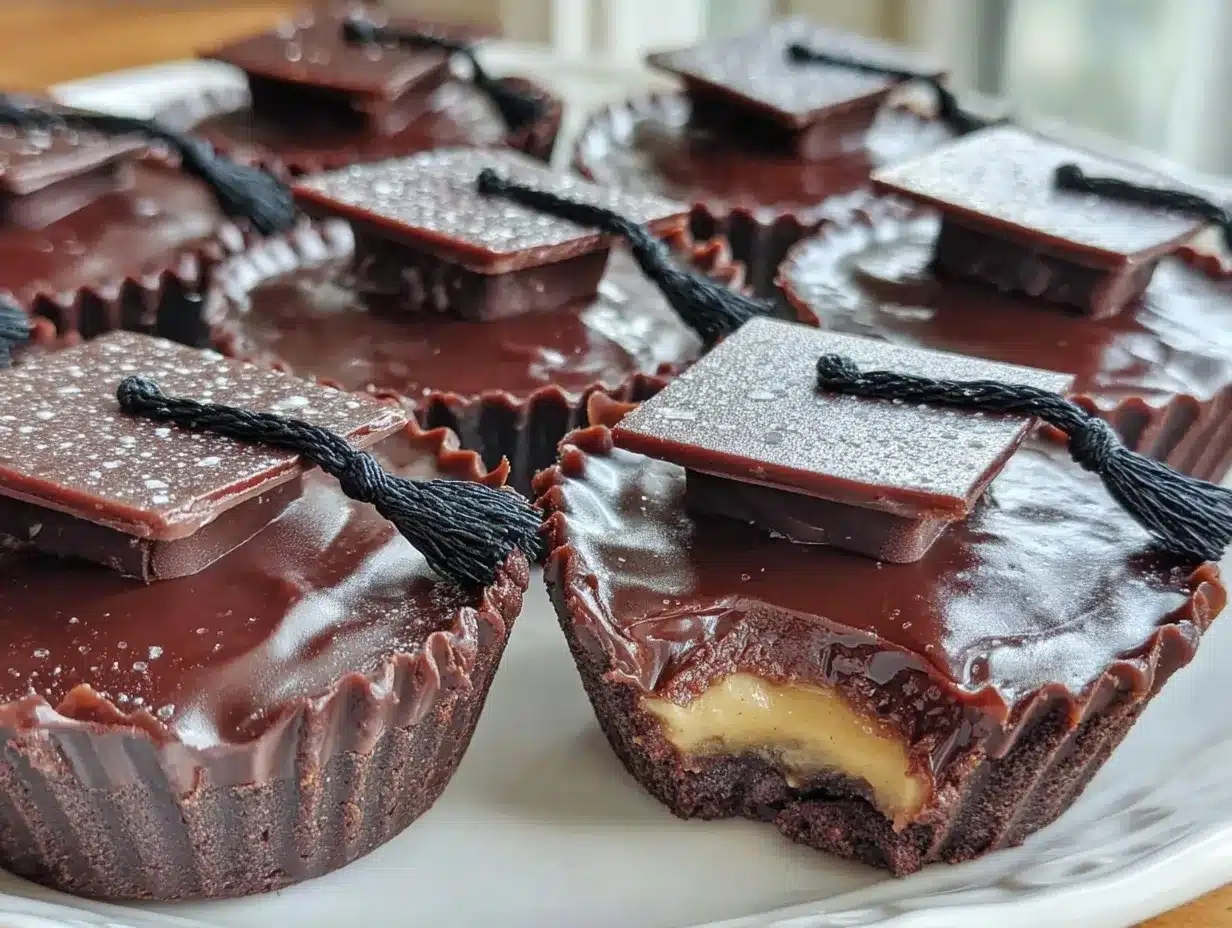
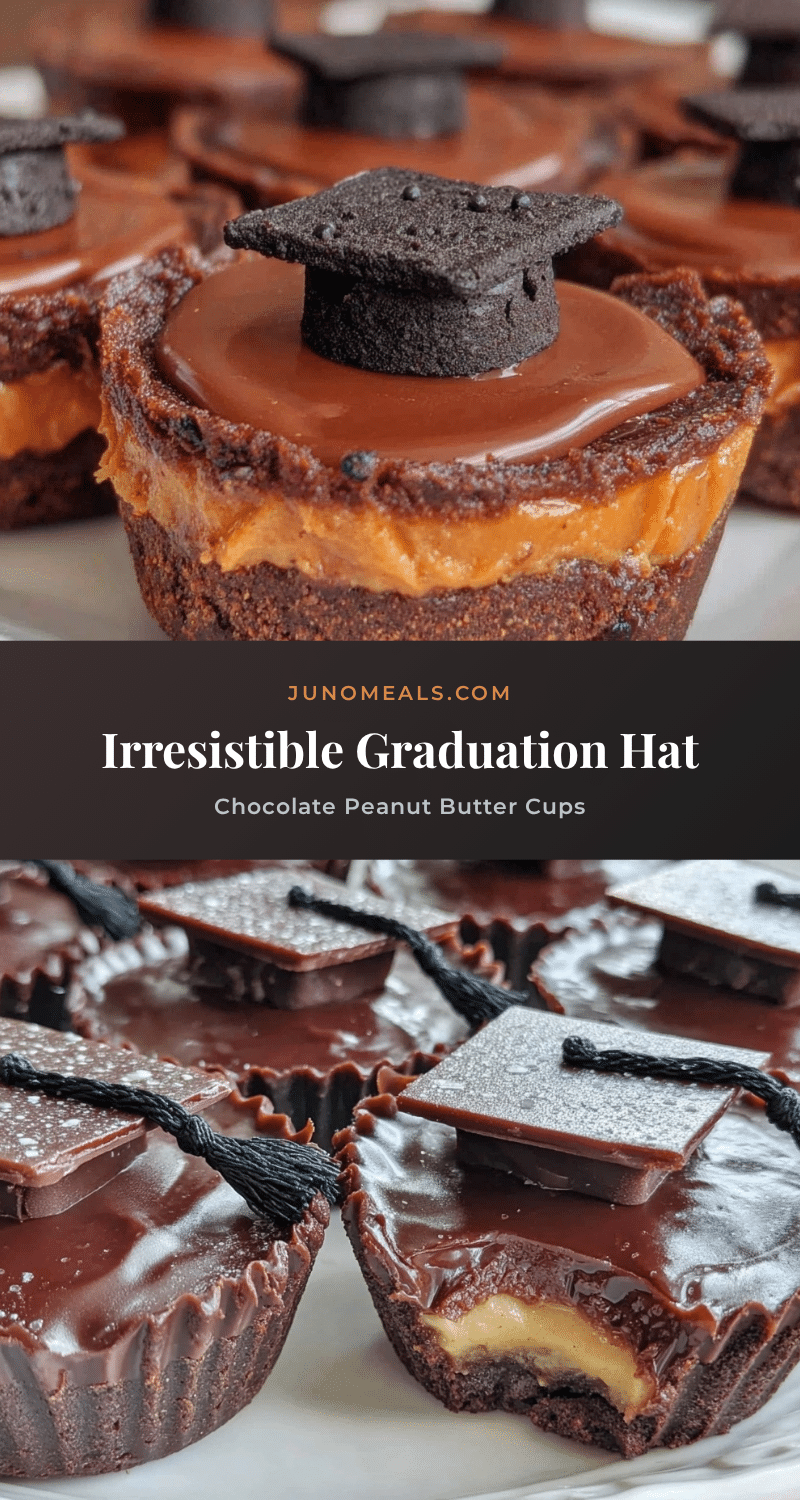
“Hey, are you bringing those graduation treats? Everyone’s been asking!” That text popped up just as I was juggling a last-minute gift wrap and a slightly burnt dinner. Honestly, I wasn’t planning anything fancy for the graduation party, but the idea of whipping up something quick and festive stuck with me. I rummaged through my pantry, and that’s when the magic happened—chocolate and peanut butter, that classic duo, but shaped into little graduation hats. It was a spur-of-the-moment idea that turned into a crowd favorite, and honestly, I couldn’t believe how simple these Perfect Graduation Hat Chocolate Peanut Butter Cups were to make.
There’s something about celebrating milestones with food that just feels right, you know? The rich, creamy peanut butter hidden under a smooth chocolate shell somehow made the whole graduation vibe even sweeter. I made a batch, and then another, because everyone kept grabbing them. It wasn’t just the flavor; it was the fun of those little hats sitting proudly on the dessert table, making the moment feel special without needing a fancy bakery run. This recipe has since become my go-to for celebrations—simple, playful, and absolutely delicious.
What I love most is how these chocolate peanut butter cups capture the spirit of the day in every bite—a little indulgence, a little joy, and a dash of nostalgia. It’s a quiet reminder that sometimes, the best celebrations come with the simplest recipes, made from the heart, and shared with the people who matter most.
Why You’ll Love This Recipe
After testing this recipe a few times (okay, maybe more than a few), I can say it’s a keeper for all your celebration needs. Here’s why these Perfect Graduation Hat Chocolate Peanut Butter Cups stand out:
- Quick & Easy: You’re looking at about 30 minutes from start to finish—perfect for those last-minute party preps or spontaneous celebrations.
- Simple Ingredients: No need for fancy trips to specialty stores. If you have peanut butter, chocolate, and a few basics, you’re halfway there.
- Perfect for Graduations & Parties: These fun little hats bring a festive vibe that’s just right for graduations, but honestly, they work for birthdays, potlucks, or even casual get-togethers.
- Crowd-Pleaser: Kids, adults, peanut butter lovers, and chocolate fans alike give these rave reviews every time.
- Unbelievably Delicious: The silky chocolate coating contrasts beautifully with the creamy peanut butter filling—comfort food at its finest.
- Unique Presentation: The graduation hat shape adds a playful twist that makes your dessert table instantly memorable without extra fuss.
This isn’t just another peanut butter cup recipe. The trick? Using a slightly darker chocolate for the shell to give a richer taste and a firm base, plus a homemade peanut butter filling that’s not too sweet but perfectly creamy. I also use mini cupcake liners to hold everything in place, which makes serving and eating a breeze. Honestly, it’s the kind of recipe that makes you close your eyes after the first bite and smile—comfort food with a celebration twist.
What Ingredients You Will Need
This recipe uses simple, wholesome ingredients to deliver bold flavor and that satisfying texture without any complicated steps. Most of these are pantry staples, and if you’re like me, you probably already have them on hand.
- Semisweet or dark chocolate chips (about 10 ounces / 280 grams) – I prefer Ghirardelli for that smooth melt and balanced flavor.
- Natural peanut butter
- Powdered sugar (1 cup / 120 grams) – this sweetens and thickens the peanut butter layer without graininess.
- Unsalted butter
- Vanilla extract
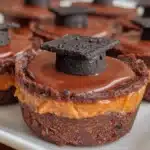
- Mini cupcake liners
- Optional decorations: edible gold glitter, tiny fondant tassels, or colored icing pens to personalize the hats.
Sometimes, I swap natural peanut butter for almond butter when I want a twist or need a peanut-free option, which works surprisingly well. If you want a dairy-free version, coconut oil can replace butter, and there are excellent dairy-free chocolate chips available these days. In summer, adding a pinch of sea salt to the peanut butter mix brings out the flavors even more—it’s a little secret I love.
Equipment Needed
- Double boiler or microwave-safe bowl: for melting chocolate gently. I’ve tried both, but a double boiler gives me more control to avoid scorching.
- Mixing bowls: at least two—one for the peanut butter filling and one for melting chocolate.
- Mini muffin tin or tray: to hold your cupcake liners steady while you assemble the cups.
- Spoon or small cookie scoop: for portioning peanut butter filling evenly.
- Spatula: for folding and smoothing the peanut butter mixture.
- Refrigerator space: to chill the cups until set.
If you don’t have a double boiler, no worries—a microwave in 30-second bursts works fine, just stir between intervals. For mini muffin trays, you can also use a small baking dish lined with cupcake liners, but the tray helps keep things neat. When I first started, I used a simple spoon and it worked, but a small cookie scoop really speeds up assembly and keeps the portions consistent.
Preparation Method
- Prep your workspace and liners: Line your mini muffin tin with cupcake liners and set it on a flat surface. This keeps everything tidy and helps shape your graduation hats.
- Melt the chocolate: Using a double boiler or microwave, gently melt 8 ounces (225 grams) of chocolate chips until smooth. Stir frequently to avoid burning. This will be your chocolate base.
- Coat the liners: Spoon about 1 teaspoon (5 ml) of melted chocolate into each liner, tilting the tin to spread the chocolate evenly across the bottom and slightly up the sides. Place the tin in the fridge for 10 minutes to set this first layer.
- Make the peanut butter filling: In a mixing bowl, combine the peanut butter, powdered sugar, softened butter, and vanilla extract. Stir until smooth and creamy. If the mixture feels too stiff, add a tiny splash of milk (about 1 teaspoon / 5 ml) to loosen it.
- Fill the cups: Once the bottom chocolate layer is firm, scoop about 1 tablespoon (15 grams) of the peanut butter mixture into each liner, gently pressing down to flatten the top slightly.
- Top with chocolate: Melt the remaining 2 ounces (55 grams) of chocolate chips and spoon over the peanut butter layer, fully covering it. Tap the tray gently on the counter to smooth the chocolate and remove air bubbles.
- Chill to set: Refrigerate for at least 30 minutes until the chocolate is firm and the cups hold their shape.
- Decorate: Carefully remove the liners and add your graduation hat details. Use edible gold glitter for that cap shimmer, or draw a tiny tassel with icing pens to personalize each cup.
Watch for the chocolate to cool but not harden too quickly—if it feels thick, warm it briefly again. The peanut butter filling should be firm enough to hold shape but not crumbly. If your kitchen is warm, chilling longer helps keep the cups neat. Once chilled, they pop out of the liners easily, and you’ll notice the chocolate snaps with a satisfying crunch.
Cooking Tips & Techniques
Making these graduation hat cups was a bit of trial and error at first. Here’s what I’ve learned so you don’t have to guess:
- Melting chocolate: Always melt chocolate gently and stir often. Overheating can cause it to seize, turning grainy and unusable.
- Chocolate thickness: If your melted chocolate is too runny, it will pool at the bottom and not coat liners well. If too thick, it won’t spread easily. Adjust by adding a teaspoon of coconut oil or vegetable oil if needed.
- Peanut butter filling consistency: Powdered sugar is your friend here—it sweetens and firms up the filling. Add it gradually until you get a spreadable but firm texture.
- Layering: Chill between layers to prevent mixing. This keeps your peanut butter center distinct and the chocolate shell solid.
- Personal touches: Use a small offset spatula or the back of a spoon to smooth chocolate tops for a polished look.
- Timing: Multitask by melting the chocolate while mixing the peanut butter filling. This saves precious minutes.
I once skipped chilling the bottom chocolate layer and ended up with peanut butter sinking into the chocolate—lesson learned! Also, if you don’t have mini liners, regular cupcake liners work; just adjust the quantity. Keeping your workspace cool helps prevent the chocolate from melting before it sets.
Variations & Adaptations
Here are some fun ways to switch up these chocolate peanut butter cups:
- Nut-Free Version: Swap peanut butter with sunflower seed butter or tahini to avoid allergens while keeping a creamy filling.
- Seasonal Flavors: Mix a pinch of cinnamon or pumpkin spice into the peanut butter for a fall twist, or add a drop of peppermint extract for winter celebrations.
- White Chocolate Shell: Use white chocolate instead of dark or semisweet for a sweeter, creamier hat appearance.
- Vegan Adaptation: Use dairy-free chocolate chips and substitute butter with coconut oil; ensure your peanut butter is natural and unsweetened.
- Personalized Decorations: Add edible letters or numbers to the hats using icing pens, perfect for marking graduation years or names.
One time, I tried mixing chopped roasted peanuts into the filling for extra crunch—it was a hit at the party, though messier to eat! For a different shape, you can experiment with silicone molds, but I find the cupcake liners easiest for clean, consistent hats.
Serving & Storage Suggestions
Serve these chocolate peanut butter cups chilled for the best texture—smooth chocolate shell with a creamy center. They look gorgeous arranged on a platter, especially with a few sprigs of fresh mint or edible flowers for color contrast.
They pair wonderfully with a cup of coffee or a cold glass of milk, balancing out the rich flavors. For graduation parties, they’re a fun alternative to traditional cake and fit perfectly alongside other treats like mini lemon blueberry cheesecakes.
Store leftovers in an airtight container in the refrigerator for up to one week. They freeze well too—just pop them in a zip-top bag with parchment paper between layers and thaw in the fridge overnight before serving. When reheating, avoid microwaving as it can melt the chocolate unevenly; instead, let them come to room temperature naturally.
Over time, the flavors meld beautifully, making them even more satisfying a day or two later. Just keep them cool to prevent the chocolate from blooming or softening too much.
Nutritional Information & Benefits
Each graduation hat chocolate peanut butter cup contains approximately 150 calories, with about 10 grams of fat, 10 grams of carbohydrates, and 4 grams of protein. The natural peanut butter provides healthy fats and protein, while the dark chocolate offers antioxidants and a rich flavor without excessive sugar.
This treat strikes a nice balance between indulgence and nutrition, especially when you use natural peanut butter and quality chocolate. It’s gluten-free and can be adapted to be dairy-free or vegan, making it accessible for many dietary needs.
From a wellness perspective, the protein and fats help keep you satisfied, so a couple of these cups can curb sweet cravings without overdoing it. Just remember, moderation is key, but honestly, for celebrations, these hits of joy are worth it.
Conclusion
These Perfect Graduation Hat Chocolate Peanut Butter Cups are more than just a sweet treat—they’re a little symbol of celebration, care, and fun all wrapped up in chocolate and peanut butter. Whether you’re scrambling to put together last-minute party snacks or planning ahead for a memorable gathering, this recipe fits the bill beautifully.
Don’t hesitate to tweak the flavors or decorations to match your style or dietary needs. I love how this recipe lets creativity shine through simple ingredients, making every bite feel special. It’s the kind of recipe I keep coming back to—not just for graduations but any time I want to bring a smile to the table.
If you try these out, I’d love to hear how you personalized your graduation hats or what twists you added. Sharing those moments makes the recipe even sweeter.
Here’s to making celebrations a little tastier, one chocolate peanut butter cup at a time!
FAQs
- Can I use crunchy peanut butter instead of creamy?
Yes! Crunchy peanut butter adds a nice texture contrast, but the filling might be slightly less smooth. - How long do these peanut butter cups keep?
Stored properly in the fridge, they last up to one week. They also freeze well for longer storage. - Can I make these ahead of time?
Absolutely! They can be made a few days before your event and stored in the refrigerator until serving. - What’s the best chocolate to use?
Semisweet or dark chocolate chips melt nicely and provide a balanced sweetness. Use quality brands like Ghirardelli for best results. - Are these cups suitable for people with nut allergies?
Not as is, but you can substitute peanut butter with sunflower seed butter or tahini for a nut-free option.
Pin This Recipe!
Perfect Graduation Hat Chocolate Peanut Butter Cups
These easy homemade chocolate peanut butter cups shaped like graduation hats are quick to make and perfect for celebrations, combining a rich chocolate shell with a creamy peanut butter filling.
- Prep Time: 15 minutes
- Cook Time: 15 minutes
- Total Time: 30 minutes
- Yield: 24 servings 1x
- Category: Dessert
- Cuisine: American
Ingredients
- 10 ounces (280 grams) semisweet or dark chocolate chips
- 1 cup (250 grams) natural peanut butter, creamy or chunky
- 1 cup (120 grams) powdered sugar
- 2 tablespoons (28 grams) unsalted butter, softened
- 1 teaspoon (5 ml) vanilla extract
- Mini cupcake liners
- Optional decorations: edible gold glitter, tiny fondant tassels, colored icing pens
Instructions
- Line your mini muffin tin with cupcake liners and set it on a flat surface.
- Melt 8 ounces (225 grams) of chocolate chips gently using a double boiler or microwave, stirring frequently.
- Spoon about 1 teaspoon (5 ml) of melted chocolate into each liner, tilting the tin to spread the chocolate evenly across the bottom and slightly up the sides. Refrigerate for 10 minutes to set.
- In a mixing bowl, combine peanut butter, powdered sugar, softened butter, and vanilla extract. Stir until smooth and creamy. Add 1 teaspoon (5 ml) milk if mixture is too stiff.
- Scoop about 1 tablespoon (15 grams) of peanut butter mixture into each liner, pressing down slightly to flatten the top.
- Melt the remaining 2 ounces (55 grams) of chocolate chips and spoon over the peanut butter layer, fully covering it. Tap the tray gently to smooth the chocolate and remove air bubbles.
- Refrigerate for at least 30 minutes until the chocolate is firm and cups hold their shape.
- Carefully remove liners and decorate with edible gold glitter, fondant tassels, or icing pens as desired.
Notes
Melt chocolate gently and stir often to avoid seizing. Chill between layers to keep peanut butter center distinct. Use coconut oil to thin chocolate if too thick. For dairy-free, substitute butter with coconut oil and use dairy-free chocolate chips. Store in airtight container in fridge up to one week or freeze with parchment paper between layers.
Nutrition
- Serving Size: 1 chocolate peanut b
- Calories: 150
- Fat: 10
- Carbohydrates: 10
- Protein: 4
Keywords: graduation treats, chocolate peanut butter cups, easy dessert, party snacks, homemade candy, celebration recipe