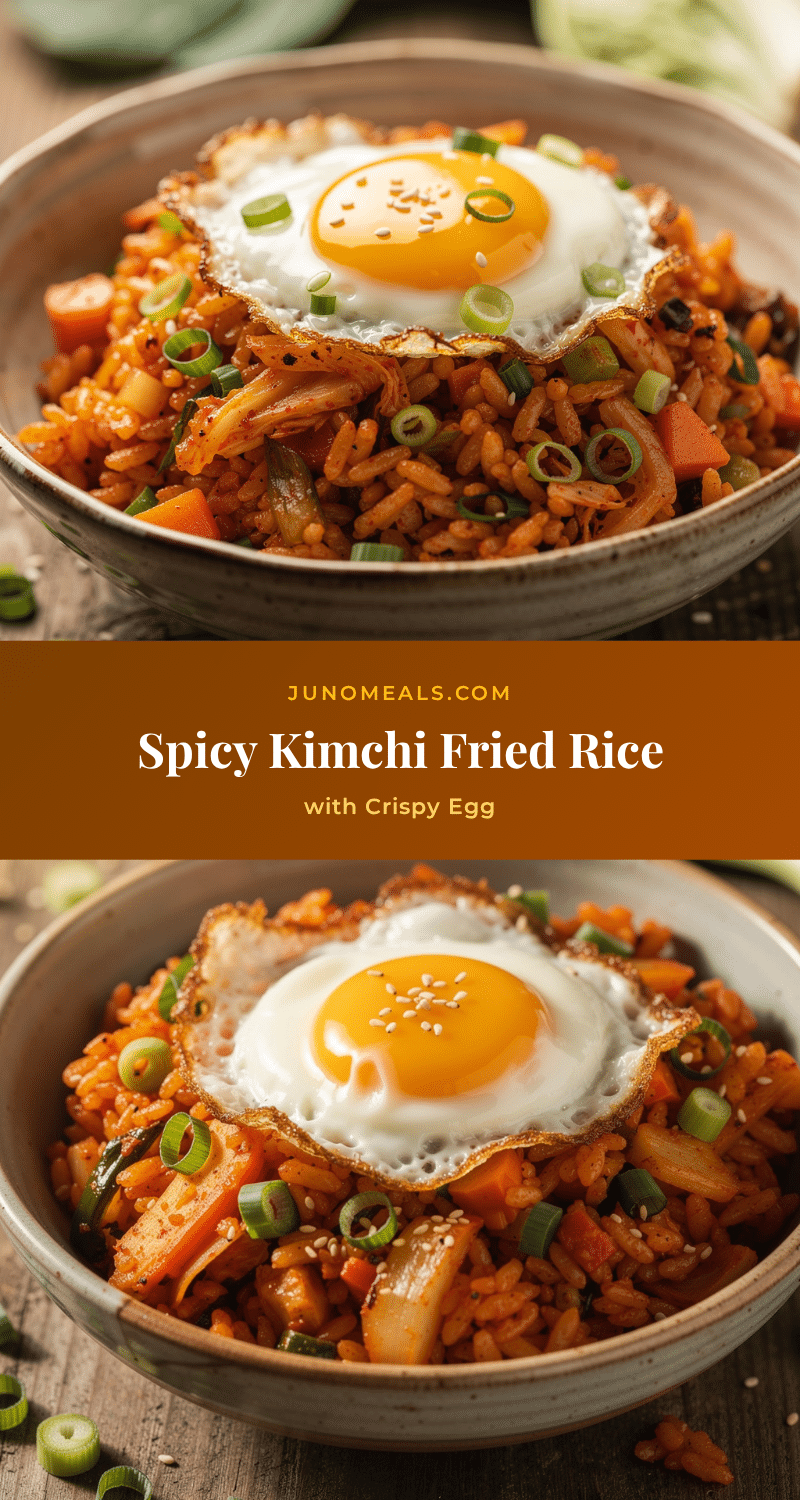
“You gotta try the kimchi fried rice,” my coworker insisted, sliding a lunch container across the table with a grin that suggested I’d be missing out if I said no. Skeptical but curious, I took a tentative bite. The crunch of caramelized rice, the tangy spice of kimchi, and that glorious golden fried egg perched on top—it wasn’t just food; it was a revelation. Honestly, I hadn’t expected much from what I thought was just a quick lunch hack, but that simple dish turned into a full-on obsession for me. I found myself craving it well beyond the office, making it multiple times a week, tweaking it just a bit each time.
There’s something about the crispy edges of the rice that really grabs you, the way the kimchi’s punch wakes up your taste buds, and then, oh, the perfect fried egg with its runny yolk that cocoons everything in creamy goodness. It’s the kind of meal that feels like a warm hug after a hectic day, yet it’s fast enough for those evenings when you just want to throw something together without a fuss. I never thought I’d be the one to champion fried rice, but here we are—this crispy kimchi fried rice with a perfect fried egg has quietly become my go-to comfort food.
What stuck with me, beyond the flavors, was how effortless it felt to make something so satisfying. No complicated ingredients, no hours wasted, just quick, honest cooking that fills you up and makes you smile. If you’ve ever wondered how to get that crisp texture on fried rice or nail the fried egg that everyone raves about, you’re in the right place.
Why You’ll Love This Recipe
This crispy kimchi fried rice recipe is one of those dishes that’s easy to fall for, whether you’re a seasoned cook or just starting out. I’ve tested it over and over (sometimes more than once in a day — no shame), and here’s why it truly stands out:
- Quick & Easy: Ready in about 20 minutes, this recipe fits perfectly into busy weeknights or impromptu meals.
- Simple Ingredients: You probably have kimchi, rice, and eggs on hand already—no specialty stores needed.
- Perfect for Any Occasion: Whether it’s a solo lunch or a casual dinner with friends, it hits the spot every time.
- Crowd-Pleaser: I’ve brought this to potlucks and it’s always a hit—kids and adults alike ask for seconds.
- Unbelievably Delicious: The crispy rice texture combined with the tangy kimchi and rich egg is downright addictive.
What makes this recipe different? I focus on getting that crispy fried rice texture without burning, balancing the kimchi’s acidity with a touch of sweetness, and nailing the fried egg so the yolk bursts in all the right ways. Plus, I like to add a dash of toasted sesame oil and a sprinkle of scallions for that extra punch. It’s not just another kimchi fried rice—it’s the one you’ll want to make again and again, trust me.
Honestly, it’s the kind of comfort food that doesn’t feel heavy or complicated. It’s quick, satisfying, and brings that little moment of joy when the flavors all come together just right. You’ll find yourself closing your eyes after the first bite, savoring that perfect combo of crispy, spicy, and creamy.
What Ingredients You Will Need
This recipe keeps it straightforward, using everyday ingredients that work together to create a bold, satisfying dish. Most of these are pantry staples, and substitutions are easy if you want to tweak for your preferences.
- Cooked white rice (preferably day-old, about 3 cups or 600g) – Day-old rice is key for that crisp texture.
- Kimchi (1 cup or 150g, chopped) – I prefer medium-spicy Napa cabbage kimchi; it’s tangy and soft enough to mix well.
- Vegetable oil (2 tablespoons) – For frying; can swap with canola or grapeseed oil.
- Garlic (2 cloves, minced) – Adds pungency and depth.
- Green onions (3 stalks, chopped) – For freshness and garnish.
- Soy sauce (1 tablespoon) – Use low sodium if preferred.
- Gochujang (1 teaspoon) – Optional but recommended for a little heat and complexity.
- Sesame oil (1 teaspoon) – Toasted, for that signature nutty aroma.
- Eggs (2 large) – Room temperature, for frying to perfection.
- Salt and pepper – To taste.
If kimchi is too spicy for you, try a milder version or reduce the amount. For a gluten-free option, replace soy sauce with tamari. I’ve used O Organics kimchi for consistent flavor and Kikkoman soy sauce in this recipe, but feel free to pick what suits your pantry best. If you want a vegan version, you can skip the egg or try a tofu scramble on top.
Equipment Needed
Not much is needed beyond the basics, which makes this recipe perfect for nearly any kitchen setup.
- Non-stick skillet or cast iron pan: Essential for getting the rice crispy and frying eggs without sticking.
- Spatula: A sturdy, flat spatula helps with flipping and mixing the rice without breaking it apart.
- Knife and cutting board: For chopping kimchi and green onions.
- Measuring spoons: For precise soy sauce and gochujang amounts.
If you don’t have a cast iron pan, a non-stick skillet works just fine. I personally prefer cast iron because it holds heat well and gives the best crisp on the rice, but it takes some care—make sure to season it regularly and avoid harsh detergents. For budget-friendly options, a good-quality non-stick skillet around 10 inches does the trick without fuss.
Preparation Method

- Prep the ingredients (5 minutes): Chop the kimchi into bite-size pieces, mince the garlic, and slice the green onions, separating the whites and greens for cooking and garnish.
- Heat the oil (1–2 minutes): Warm 2 tablespoons of vegetable oil over medium-high heat in your skillet until shimmering but not smoking.
- Sauté aromatics (1–2 minutes): Add minced garlic and the white parts of the green onions. Stir constantly until fragrant and lightly golden—watch closely to avoid burning.
- Add kimchi (3 minutes): Toss in the chopped kimchi, stirring occasionally. Cook until slightly caramelized and softened, releasing that tangy aroma.
- Stir-fry the rice (5–7 minutes): Crumble the cold rice into the pan, mixing well with the kimchi and aromatics. Press the rice down gently with the spatula and let it sit for 1–2 minutes to develop a crisp layer. Repeat this pressing and stirring a few times to get those coveted crunchy bits.
- Season the rice (1 minute): Add soy sauce, gochujang, and sesame oil. Mix thoroughly so the rice is evenly coated. Taste and adjust salt or pepper as needed.
- Cook the eggs (3–4 minutes): In a separate non-stick pan, heat a teaspoon of oil over medium heat. Crack in the eggs gently, cooking until the whites are set but the yolks remain runny (or cook longer if you prefer). Season lightly with salt and pepper.
- Plate and garnish (2 minutes): Serve the kimchi fried rice hot, topped with the perfect fried egg and a sprinkle of green onion greens. Optionally, add a drizzle of extra sesame oil for aroma.
Pro tip: Using day-old rice is crucial for avoiding mushiness and achieving crispiness. If you only have fresh rice, spread it out on a tray and cool it in the fridge for at least an hour first. Also, don’t overcrowd the pan; working in batches keeps the rice crisp.
Cooking Tips & Techniques
Getting that crispy kimchi fried rice just right is part technique, part patience. Here are some tips I’ve picked up over multiple attempts:
- Rice texture: Cold, dry rice works best. Freshly cooked rice tends to be too moist and clumps together, making crisping difficult.
- Heat control: Medium-high heat is your friend here. Too low and you won’t get crisp edges; too high and you risk burning the kimchi or rice.
- Press and pause: When you add rice to the pan, gently press it down and let it sit untouched for a couple of minutes. This helps form the crispy crust that makes this recipe special.
- Fried egg finesse: Use medium heat to cook the eggs slowly for whites that are set but yolks that stay runny. If you want to speed things up, cover the pan briefly to steam the tops.
- Multitasking: While the rice crisps, start frying your eggs in a second pan to have everything ready simultaneously.
- Flavor balance: Kimchi can vary in spice and sourness, so taste before seasoning. Sometimes a pinch of sugar helps mellow out overly sharp kimchi.
My first attempt had soggy rice and broken eggs—lesson learned: patience and cold rice are key! Once I nailed the technique, this became a quick, reliable meal.
Variations & Adaptations
Although this recipe is great as is, I like switching things up depending on mood or what’s in the fridge:
- Protein boost: Add diced cooked chicken, shrimp, or tofu for extra heft. Just toss it in with the kimchi before adding rice.
- Veggie upgrade: Stir in chopped spinach, peas, or shredded carrots for added color and nutrition.
- Spice level: Increase gochujang or add a dash of chili flakes to turn up the heat.
- Cooking method: Try baking the fried rice in a cast iron skillet after crisping for a few minutes under the broiler to get a crunchy top layer.
- Vegan option: Skip the fried egg and add sautéed mushrooms or tempeh for umami.
One of my favorite tweaks is adding a splash of rice vinegar at the end for a bright finish. It’s also fun to fold in some shredded cheese if you want a creamy twist. If you’re looking for ideas on other recipes to pair with this, you might enjoy browsing the wide variety here on my recipe collection.
Serving & Storage Suggestions
This crispy kimchi fried rice is best enjoyed hot and fresh, right off the stove. The fried egg yolk acts like a sauce, so serving immediately makes all the difference. A sprinkle of toasted sesame seeds on top adds a nice crunch and nuttiness.
It pairs beautifully with simple sides like steamed greens or a crisp cucumber salad. For drinks, a cold barley tea or light beer balances the spice perfectly.
If you have leftovers, store them in an airtight container in the refrigerator for up to 2 days. To reheat, sprinkle a little water over the rice and warm it in a skillet over medium heat to revive some of the crispness—microwaving tends to make it soggy.
Interestingly, the flavors deepen after a day as the kimchi melds with the rice, making leftovers surprisingly delicious with a bit of reheating care.
Nutritional Information & Benefits
One serving of this crispy kimchi fried rice with a fried egg roughly provides:
| Nutrient | Amount |
|---|---|
| Calories | 380-420 kcal |
| Protein | 12-15g |
| Carbohydrates | 50-55g |
| Fat | 10-12g |
| Fiber | 3-4g |
Kimchi is rich in probiotics, which support gut health, and the eggs provide a good source of protein and essential nutrients like vitamin D. Using vegetable oil and sesame oil adds healthy fats, and the dish can be made gluten-free with tamari instead of soy sauce.
For those watching carbs, swapping white rice for cauliflower rice can lower the carb count, though you’ll lose some of the characteristic crispiness. The recipe is naturally free of nuts and dairy, making it suitable for many dietary needs.
Conclusion
This crispy kimchi fried rice with a perfect fried egg is more than just a quick meal; it’s a flavorful, comforting dish that fits effortlessly into your kitchen routine. Whether you’re craving something spicy and crispy or looking for a fuss-free dinner that still impresses, this recipe has you covered.
Feel free to personalize it—add your favorite proteins, swap veggies, or adjust the spice level to your liking. For me, it’s become a reliable friend on busy nights and a dish I’m happy to share with guests. I hope you find it as delicious and satisfying as I do.
Enjoy your cooking, and if you ever want something sweet to round out the meal, those mini lemon blueberry cheesecakes are a fantastic treat!
Happy cooking and savor every crispy bite!
FAQs
What type of rice is best for kimchi fried rice?
Day-old cooked white rice works best because it’s drier and less sticky, which helps achieve the crispy texture. If you only have freshly cooked rice, cool it in the fridge for at least an hour before cooking.
Can I make this recipe vegan?
Absolutely! Simply skip the fried egg and add sautéed tofu or mushrooms for extra protein and umami flavor.
How do I get the fried egg yolk perfectly runny?
Cook the egg over medium heat until the whites are set but the yolk is still soft. Covering the pan for a minute helps cook the whites evenly without overcooking the yolk.
Is kimchi always spicy?
Kimchi varies in spice depending on the brand and recipe. If you prefer less heat, choose a mild kimchi or reduce the amount used.
Can I store leftover kimchi fried rice?
Yes, store leftovers in an airtight container in the fridge for up to 2 days. Reheat in a skillet over medium heat with a splash of water to help maintain some crispness.
Pin This Recipe!
Crispy Kimchi Fried Rice Recipe with Perfect Fried Egg

A quick and easy kimchi fried rice with crispy edges, tangy kimchi, and a perfect fried egg with runny yolk. This comforting dish is flavorful, satisfying, and perfect for busy weeknights.
- Prep Time: 5 minutes
- Cook Time: 15 minutes
- Total Time: 20 minutes
- Yield: 2 servings 1x
- Category: Main Course
- Cuisine: Korean
Ingredients
- 3 cups cooked white rice (preferably day-old, about 600g)
- 1 cup chopped kimchi (about 150g), medium-spicy Napa cabbage kimchi recommended
- 2 tablespoons vegetable oil (canola or grapeseed oil can be used)
- 2 cloves garlic, minced
- 3 stalks green onions, chopped (separate whites and greens)
- 1 tablespoon soy sauce (low sodium preferred)
- 1 teaspoon gochujang (optional)
- 1 teaspoon toasted sesame oil
- 2 large eggs, room temperature
- Salt and pepper to taste
Instructions
- Chop the kimchi into bite-size pieces, mince the garlic, and slice the green onions, separating the whites and greens for cooking and garnish.
- Heat 2 tablespoons of vegetable oil over medium-high heat in a skillet until shimmering but not smoking.
- Add minced garlic and the white parts of the green onions. Stir constantly until fragrant and lightly golden, avoiding burning.
- Add the chopped kimchi and cook for about 3 minutes until slightly caramelized and softened.
- Crumble the cold rice into the pan, mixing well with the kimchi and aromatics. Press the rice down gently with a spatula and let it sit for 1–2 minutes to develop a crisp layer. Repeat pressing and stirring a few times to get crispy bits.
- Add soy sauce, gochujang, and sesame oil. Mix thoroughly to coat the rice evenly. Taste and adjust salt and pepper as needed.
- In a separate non-stick pan, heat a teaspoon of oil over medium heat. Crack in the eggs and cook until the whites are set but yolks remain runny (or cook longer if preferred). Season lightly with salt and pepper.
- Serve the kimchi fried rice hot, topped with the fried egg and a sprinkle of green onion greens. Optionally, drizzle extra sesame oil for aroma.
Notes
Use day-old rice for best crispiness. If using fresh rice, cool it in the fridge for at least an hour. Avoid overcrowding the pan to keep rice crispy. For vegan version, skip the egg and add tofu or mushrooms. Adjust kimchi spice level to taste. Reheat leftovers in a skillet with a splash of water to maintain crispness.
Nutrition
- Serving Size: 1 serving (half of t
- Calories: 400
- Sugar: 4
- Sodium: 700
- Fat: 11
- Saturated Fat: 2
- Carbohydrates: 53
- Fiber: 3.5
- Protein: 14
Keywords: kimchi fried rice, crispy fried rice, fried egg, Korean recipe, quick dinner, easy fried rice, comfort food