“You’ll want to try these right now,” my neighbor texted me one chilly evening, almost out of the blue. I was knee-deep in dinner prep, feeling the usual end-of-day scramble. Honestly, I was skeptical—how could dinner rolls be both easy and melt-in-your-mouth soft? But curiosity got the best of me. I took a quick glance at the recipe she shared and decided to give it a shot the next day, planning ahead for a family dinner. That was the start of what quickly became my go-to recipe for tender make-ahead dinner rolls that never disappoint.
The beauty of these rolls isn’t just in their pillowy softness—it’s the way they practically dissolve with each bite, leaving that warm, comforting feeling you crave after a long day. The fact that I can prepare them hours in advance (or even the day before) has been a total game changer. No more frantic last-minute baking or settling for hard rolls from the store. Plus, the aroma wafting through the kitchen while they bake? Let’s just say it’s the kind of smell that has everyone asking, “Is that homemade?”
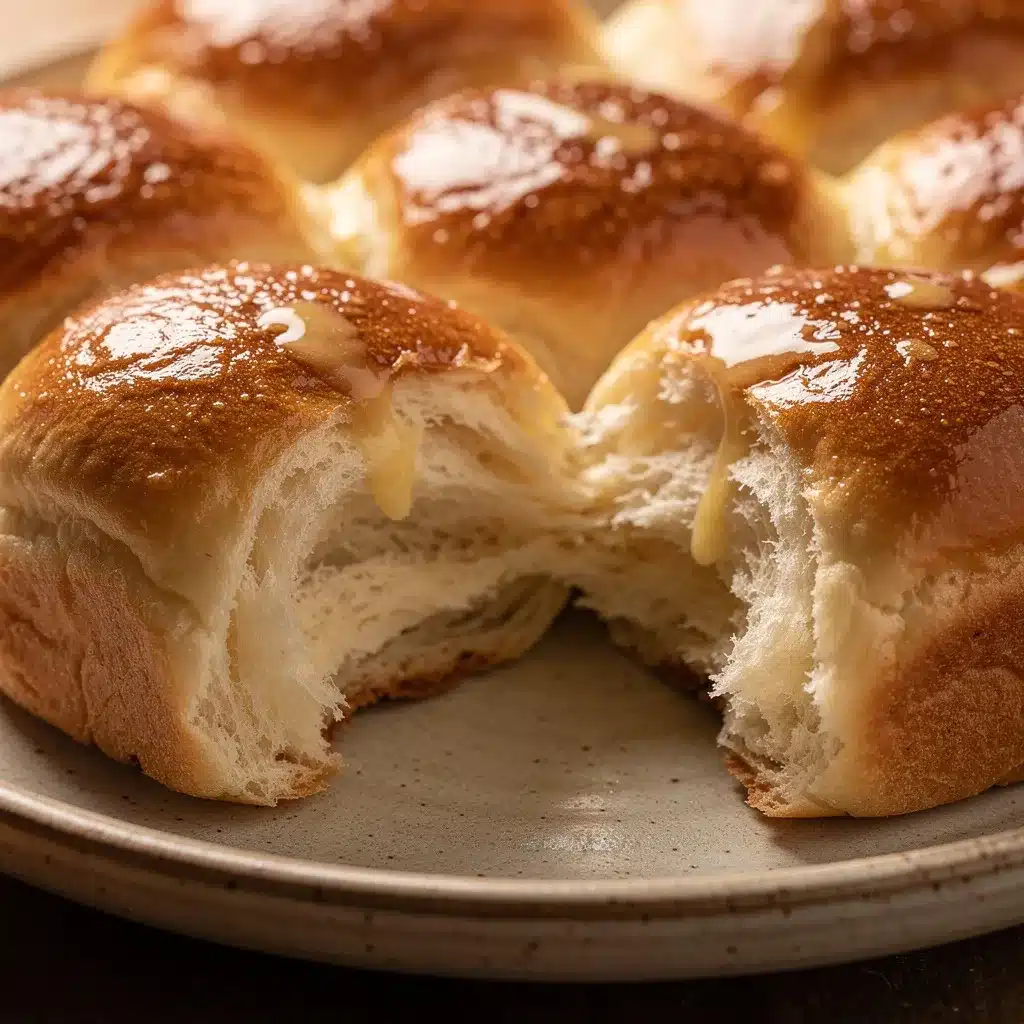
One quiet evening, after the kids were tucked in and the house had finally calmed down, I found myself savoring a roll straight from the oven. The soft crumb, the buttery hint, the slightly sweet crust—it all felt like a tiny celebration of simple things. I realized this recipe stuck with me not because it’s fancy or complicated, but because it’s reliably comforting and easy enough to fit into my busy life. So here’s to sharing those tender make-ahead dinner rolls that melt in your mouth—because sometimes the best things come from a little planning and a whole lot of love.
Why You’ll Love This Recipe
When I first started baking these tender make-ahead dinner rolls, I was amazed at how such a simple recipe could produce something so soft and flavorful. After testing and tweaking the technique a few times, I’m confident this is one of the best soft roll recipes you’ll find anywhere. Here’s why this recipe stands out:
- Quick & Easy: The dough comes together in about 15 minutes of active work, and thanks to the make-ahead proofing method, you can prep it the night before and bake fresh rolls whenever you want.
- Simple Ingredients: No fancy items here—just pantry staples like flour, yeast, butter, and milk. I usually use King Arthur flour for the best texture, but any all-purpose will do.
- Perfect for Any Occasion: Whether you’re hosting a holiday dinner, a casual family meal, or just craving soft bread on a Tuesday, these rolls fit right in.
- Crowd-Pleaser: Kids and adults alike always ask for seconds. They’re great with butter, jam, or alongside a hearty stew.
- Unbelievably Delicious: The secret is in the double rise and a touch of milk and butter in the dough, which creates a tender crumb and a golden crust that’s just the right balance of soft and slightly chewy.
What really makes this recipe different? Instead of rushing the rise, I let the dough rest overnight in the fridge, which deepens the flavor and gives the rolls that melt-in-your-mouth texture. No need for complicated shaping either—just gentle shaping into balls, and you’re set. Honestly, once you try these, you’ll find yourself skipping the store-bought rolls every time.
What Ingredients You Will Need
This recipe uses simple, wholesome ingredients to deliver soft, tender rolls without fuss or fancy equipment. Most of these you probably have on hand right now.
- All-purpose flour (about 4 cups / 480 g) – I prefer King Arthur for consistency, but any good quality flour works.
- Active dry yeast (2 1/4 teaspoons or one packet) – the magic behind the rise.
- Warm milk (1 1/4 cups / 300 ml) – helps activate the yeast and keeps rolls tender. Whole milk gives the best richness, but 2% works too.
- Unsalted butter (4 tablespoons / 60 g), melted – adds moisture and flavor.
- Sugar (2 tablespoons) – just enough for a subtle sweetness that balances the savory.
- Salt (1 1/2 teaspoons) – essential for flavor depth.
- Large egg (1, room temperature) – helps bind and enrich the dough.
- Optional: Honey or maple syrup (1 tablespoon) – for a natural sweetness variation.
If you want a dairy-free version, swap the milk for almond or oat milk, and use a dairy-free butter alternative. For gluten-free, I’d recommend trying a blend like Bob’s Red Mill Gluten-Free All-Purpose Flour, but note the texture might shift slightly.
Equipment Needed
- Mixing bowl: A large bowl to combine and rise the dough comfortably.
- Stand mixer with dough hook (optional): Makes kneading easier and faster, but you can knead by hand if you prefer.
- Measuring cups and spoons: For accuracy with your ingredients.
- Baking sheet or round cake pan: A rimmed baking sheet works well, or a 9-inch round pan if you want pull-apart rolls.
- Plastic wrap or clean kitchen towel: To cover the dough during rising.
- Pastry brush: For brushing melted butter on top (optional but worth it).
For those who bake regularly, a good dough scraper is a lifesaver when handling sticky dough. If you want to keep things budget-friendly, a simple wooden spoon and your hands will do just fine. Cleaning up is a breeze, which is always a bonus after a long day.
Preparation Method
- Activate yeast: In a small bowl, combine warm milk (110°F / 43°C) with sugar and yeast. Let it sit for 5 to 10 minutes until foamy. If it doesn’t foam, your yeast might be dead—start over with fresh yeast.
- Mix dough: In a large bowl or stand mixer, whisk together flour and salt. Add the melted butter, egg, and activated yeast mixture. Stir until a rough dough forms. This should take about 2-3 minutes.
- Knead the dough: Knead by hand on a lightly floured surface or with a dough hook for 8-10 minutes until the dough is smooth and elastic. It should feel soft but not sticky. If it’s too sticky, add flour 1 tablespoon at a time.
- First rise: Lightly oil a clean bowl, place the dough inside, and cover with plastic wrap or a damp towel. Let it rise in a warm spot for 1 to 1.5 hours until doubled in size.
- Shape rolls: Punch down the dough gently to release air. Divide into 12 equal pieces (about 2 ounces / 60 g each). Shape each into a smooth ball by pulling the edges underneath, creating surface tension on top.
- Arrange and second rise: Place rolls on a greased or parchment-lined baking sheet or round pan, spaced evenly but close enough to touch once risen. Cover and refrigerate overnight or at least 4 hours. This slow rise develops flavor and tenderness.
- Bring to room temperature: Remove rolls from fridge and let them sit uncovered for 30-45 minutes to take off the chill. Preheat oven to 375°F (190°C) during this time.
- Bake: Brush rolls lightly with melted butter or milk for a golden crust. Bake for 18-22 minutes until golden brown on top and hollow-sounding when tapped.
- Cool and serve: Let rolls cool slightly on a wire rack. Brush again with butter if desired for extra softness and shine.
When shaping, I like to keep my hands lightly floured but not too dry—it helps make those soft, smooth tops. If you’re short on time, you can skip the overnight rise and bake after the second rise at room temperature, but the flavor and texture won’t be quite as tender or rich.
Cooking Tips & Techniques
One key to these rolls melting in your mouth is the slow, cold fermentation. Refrigeration lets the dough develop subtle flavor notes you just can’t fake. I learned the hard way that rushing this step makes rolls tough, so give it the time it needs.
Don’t over-flour your dough during kneading—that’s a classic mistake that leads to dense rolls. The dough should remain soft and slightly tacky. If it sticks to your fingers, resist the urge to add too much flour; instead, use a bench scraper to fold it gently.
When shaping, creating surface tension by pulling the dough’s edges underneath helps the rolls rise evenly and keeps a smooth top. It’s a little trick I picked up from a baker friend, and honestly, it’s a game changer for presentation.
Brushing the tops with melted butter right after baking adds richness and keeps them soft longer. If you’re not serving immediately, wrap cooled rolls tightly in foil to lock in moisture.
Multitasking tip: While the rolls are baking, it’s perfect to prep a quick salad or get your main dish ready. The warm kitchen smell will keep you motivated!
Variations & Adaptations
- Herb-Infused Rolls: Add 1 tablespoon finely chopped fresh rosemary or thyme to the dough for an aromatic twist—great with roasted chicken dinners.
- Whole Wheat Blend: Swap half the all-purpose flour for whole wheat flour for a nuttier flavor and more fiber. You might need a touch more liquid.
- Sweet Rolls: Increase sugar to ¼ cup and add cinnamon or vanilla extract for a soft, sweet bread perfect for breakfast or brunch.
- Dairy-Free Option: Use coconut or almond milk and a dairy-free butter substitute. The texture remains tender, but the flavor shifts slightly.
- Gluten-Free Alternative: Use a gluten-free all-purpose flour blend with xanthan gum. Expect a denser crumb but still delicious.
Personally, I’ve tried adding a handful of finely chopped sun-dried tomatoes and basil for a savory, Mediterranean-inspired roll. It was a hit at our dinner party! If you want to experiment, these rolls are a forgiving base for many flavors.
Serving & Storage Suggestions
These tender dinner rolls are best served warm, ideally slathered with butter that melts right over the top. They pair beautifully with hearty soups, stews, and roasted meats. I often serve them alongside a fresh green salad or something simple like roasted vegetables to balance the meal.
To store, wrap cooled rolls tightly in plastic wrap or place in an airtight container. They keep well at room temperature for up to two days. For longer storage, freeze them in a sealed bag for up to three months. Thaw overnight in the fridge, then warm gently in the oven wrapped in foil.
Reheating tips: Warm rolls in a 300°F (150°C) oven for about 10 minutes, wrapped in foil to prevent drying. You can brush with a little extra butter before serving for that fresh-baked feel.
Flavors actually deepen after resting a day, making these rolls a fantastic make-ahead option for holiday dinners or casual weeknight meals. You can even prepare the dough the night before and bake fresh rolls just before serving.
Nutritional Information & Benefits
Each tender make-ahead dinner roll contains approximately 150-170 calories, 5 grams of fat, 25 grams of carbohydrates, and 4 grams of protein. The moderate sugar content balances flavor without being excessive.
The use of milk and butter adds beneficial fats and calcium, while the yeast contributes B vitamins. Opting for whole wheat flour adds fiber and nutrients, making these rolls a more wholesome choice than typical store-bought varieties.
This recipe is naturally free from nuts and can be made dairy-free or gluten-free with simple substitutions, making it adaptable for many dietary needs. For those watching carbs, pairing these rolls with protein- and veggie-heavy meals keeps the plate balanced.
Conclusion
If you’re looking for a tender make-ahead dinner roll recipe that’s both easy and irresistibly soft, this one’s a keeper. It fits right into a busy lifestyle without sacrificing flavor or texture. The gentle overnight rise, simple ingredients, and subtle buttery sweetness come together for rolls that literally melt in your mouth.
Feel free to tweak the flavor or shape to suit your taste—these rolls are wonderfully forgiving and always satisfying. I love these because they bring a quiet moment of comfort to any meal, whether it’s a weekday dinner or a special occasion.
Give them a try, and if you find yourself reaching for seconds (or thirds), you’ll know exactly why this recipe has earned a permanent spot in my kitchen. And if you like recipes that make entertaining easier, you might enjoy browsing through my collection of easy recipes or the mini lemon blueberry cheesecakes perfect for parties—both are crowd favorites!
Frequently Asked Questions
Can I make these dinner rolls completely ahead of time?
Yes! You can shape the rolls and refrigerate them overnight, then bake fresh in the morning or just before serving. This slow rise improves flavor and texture.
What if my dough is too sticky to handle?
Try using a dough scraper or lightly flour your hands instead of adding too much flour. Over-flouring can make the rolls dense.
Can I freeze these rolls after baking?
Absolutely. Once cooled, wrap rolls tightly and freeze for up to three months. Reheat in the oven wrapped in foil to revive softness.
How do I know if my yeast is still active?
If your yeast mixture doesn’t foam after 5-10 minutes in warm milk and sugar, it’s likely inactive. Use fresh yeast for best results.
Can I add herbs or spices to change the flavor?
Definitely! Try fresh rosemary, thyme, garlic powder, or cinnamon for sweet rolls. Just add them during the mixing step for even distribution.
Pin This Recipe!

Tender Make-Ahead Dinner Rolls

Soft, melt-in-your-mouth dinner rolls that can be prepared ahead and baked fresh, perfect for any occasion with simple pantry ingredients.
- Prep Time: 15 minutes
- Cook Time: 20 minutes
- Total Time: Overnight plus 1 hour 35 minutes active
- Yield: 12 rolls 1x
- Category: Bread
- Cuisine: American
Ingredients
- 4 cups all-purpose flour (about 480 g)
- 2 1/4 teaspoons active dry yeast (one packet)
- 1 1/4 cups warm milk (300 ml, whole or 2%)
- 4 tablespoons unsalted butter, melted (60 g)
- 2 tablespoons sugar
- 1 1/2 teaspoons salt
- 1 large egg, room temperature
- Optional: 1 tablespoon honey or maple syrup
Instructions
- Activate yeast: In a small bowl, combine warm milk (110°F / 43°C) with sugar and yeast. Let it sit for 5 to 10 minutes until foamy.
- Mix dough: In a large bowl or stand mixer, whisk together flour and salt. Add melted butter, egg, and activated yeast mixture. Stir until a rough dough forms (2-3 minutes).
- Knead the dough: Knead by hand on a lightly floured surface or with a dough hook for 8-10 minutes until smooth and elastic. Add flour 1 tablespoon at a time if too sticky.
- First rise: Lightly oil a clean bowl, place dough inside, cover with plastic wrap or damp towel. Let rise in a warm spot for 1 to 1.5 hours until doubled in size.
- Shape rolls: Punch down dough gently. Divide into 12 equal pieces (~2 ounces / 60 g each). Shape each into a smooth ball by pulling edges underneath.
- Arrange and second rise: Place rolls on greased or parchment-lined baking sheet or round pan, close enough to touch once risen. Cover and refrigerate overnight or at least 4 hours.
- Bring to room temperature: Remove rolls from fridge and let sit uncovered for 30-45 minutes. Preheat oven to 375°F (190°C).
- Bake: Brush rolls lightly with melted butter or milk. Bake for 18-22 minutes until golden brown and hollow-sounding when tapped.
- Cool and serve: Let rolls cool slightly on wire rack. Brush again with butter if desired.
Notes
For best flavor and texture, refrigerate dough overnight for slow fermentation. Use a dough scraper to handle sticky dough instead of adding too much flour. Brushing rolls with melted butter after baking keeps them soft and shiny. Rolls can be frozen after baking for up to three months.
Nutrition
- Serving Size: 1 roll
- Calories: 160
- Sugar: 3
- Sodium: 300
- Fat: 5
- Saturated Fat: 3
- Carbohydrates: 25
- Fiber: 1
- Protein: 4
Keywords: dinner rolls, make-ahead rolls, soft rolls, easy bread recipe, yeast rolls, homemade rolls, tender rolls