“You want a snack that’s sweet, but not loaded with a ton of junk?” That’s what my niece asked me one afternoon while rummaging through my pantry. Honestly, I was scrambling to come up with something quick, wholesome, and — well — fun to eat. The usual fruit and nuts just weren’t cutting it that day. So, in a moment of kitchen improvisation (and maybe a bit of desperation), I whipped up these easy homemade fruit roll-ups. They turned out to be a surprise hit — sticky, fruity, and just the right amount of chewy.
What surprised me the most? How simple it was to make a snack that felt both nostalgic and fresh. No artificial colors or flavors, just pure fruit flavor that you can feel good about handing over to the kids (or sneaking yourself). It quickly became a little project I found myself repeating through the week — sometimes tweaking the fruits, sometimes with a whisper of honey, but always with that satisfying, wholesome finish.
There’s something about peeling off each fruit leather strip that feels almost meditative, grounding in a way that a bag of chips just isn’t. So, for anyone looking for a straightforward, natural snack that’s easy to make and impossible to resist, this easy homemade fruit roll-ups recipe is for you. It’s the kind of recipe that quietly wins you over, bite by bite.
Why You’ll Love This Recipe
From personal kitchen tests to casual snack-time trials with family and friends, this easy homemade fruit roll-ups recipe has proven itself again and again. Here’s why it stands out:
- Quick & Easy: Ready to eat in about 2 hours, most of which is hands-off drying time. Perfect for busy days when you want wholesome snacks without fuss.
- Simple Ingredients: Uses just a handful of basic, natural items you probably already have — fresh or frozen fruit, a touch of lemon juice, and optional sweeteners if you want.
- Perfect for Kids’ Lunchboxes & Snack Time: They love peeling and rolling their own fruit strips, making it an interactive treat.
- Crowd-Pleaser: I’ve brought these to gatherings, and they disappear fast — even among adults who usually turn their nose up at “kids’ snacks.”
- Unbelievably Delicious: The chewy texture paired with natural fruit sweetness is honestly next-level comforting and satisfying.
This isn’t just another fruit roll-up recipe. I found that blending the fruit thoroughly and drying it at a low temperature keeps the texture soft and pliable — no cracking or overly sticky mess. Plus, the subtle hint of lemon juice brightens the flavor, balancing the sweetness naturally. It’s a snack that feels thoughtful without being complicated — exactly what I needed for those busy afternoons and snack cravings.
What Ingredients You Will Need
This recipe uses simple, wholesome ingredients to deliver bold flavor and satisfying texture without the fuss. Most items are pantry staples or can be swapped easily depending on what you have on hand.
- Fresh or Frozen Fruit (about 4 cups / 600g): Strawberries, mangoes, raspberries, or a blend. I prefer ripe mangoes for a silky texture, but berries give a vibrant color and flavor.
- Lemon Juice (2 tablespoons / 30 ml): Adds brightness and helps preserve the color — fresh-squeezed is best.
- Honey or Maple Syrup (1-2 tablespoons / 15-30 ml) — Optional: Use if your fruit isn’t quite sweet enough. I like to add a touch when using tart berries.
- Vanilla Extract (1 teaspoon / 5 ml) — Optional: Just a hint for extra depth, especially nice with strawberry or mango blends.
For best results, I recommend using ripe, flavorful fruit to keep the natural sweetness front and center. If you’re in a pinch, frozen fruit works well — just thaw and drain excess water before blending. For a gluten-free or vegan option, this recipe is naturally compliant, making it a safe bet for most dietary needs.
Equipment Needed
- Blender or Food Processor: Essential for pureeing the fruit into a smooth, even consistency. I personally use a high-speed blender, but a sturdy food processor works just fine for this recipe.
- Baking Sheet or Dehydrator Tray: A rimmed baking sheet lined with parchment paper is perfect for oven drying. Alternatively, a food dehydrator speeds things up and keeps an even temperature.
- Parchment Paper or Silicone Baking Mat: Prevents sticking and helps peel the fruit leather easily.
- Spatula or Offset Spreader: For evenly spreading the fruit puree across the baking sheet.
- Measuring Cups and Spoons: For precise ingredient amounts.
If you don’t have a dehydrator, no worries! The oven works just as well — just keep an eye on the temperature. Over the years, I’ve tried rolling fruit leather in plastic wrap, but parchment paper is the best for easy peeling and less mess. A silicone mat can be a great investment if you plan to make these often.
Preparation Method
- Prepare the Fruit (10 minutes): Wash and chop fresh fruit into chunks. If using frozen, thaw completely and drain excess water to avoid watery puree.
- Blend the Fruit (5 minutes): Place fruit, lemon juice, and optional honey and vanilla in your blender. Puree until completely smooth. The smoother, the better — no chunks here!
- Preheat and Prepare Baking Sheet (5 minutes): Preheat your oven to 140°F (60°C) or the lowest possible setting. Line your rimmed baking sheet with parchment paper or a silicone mat.
- Spread the Puree (5 minutes): Pour the fruit puree onto the prepared sheet. Use a spatula to spread it evenly, about 1/8-inch (3 mm) thick. Make sure the edges are even to promote uniform drying.
- Dry the Fruit Leather (1.5 to 2 hours): Place the sheet in the oven or dehydrator. Check after 90 minutes; the fruit should be leathery but still pliable, not sticky or wet. Drying times can vary — if the edges start to curl or crisp, it’s ready.
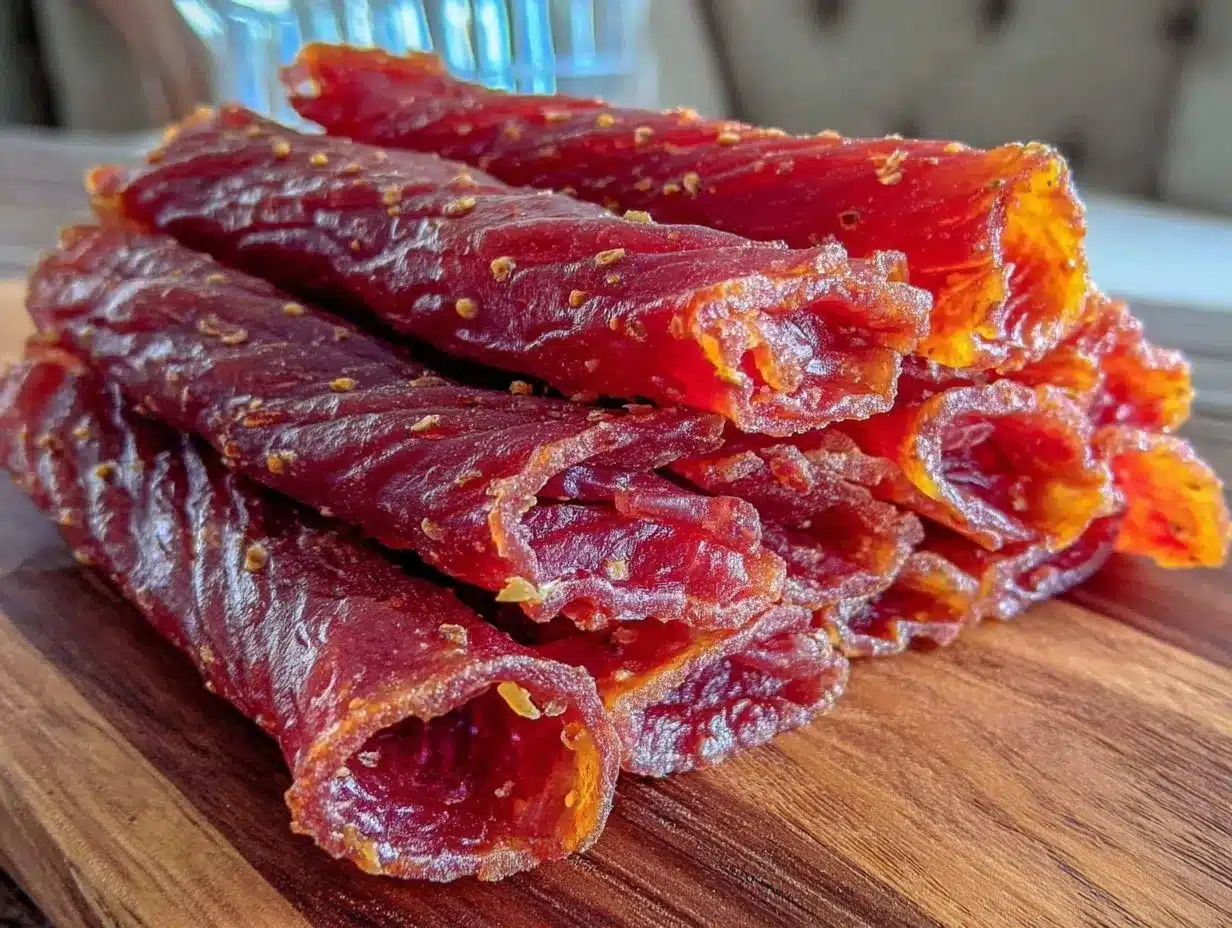
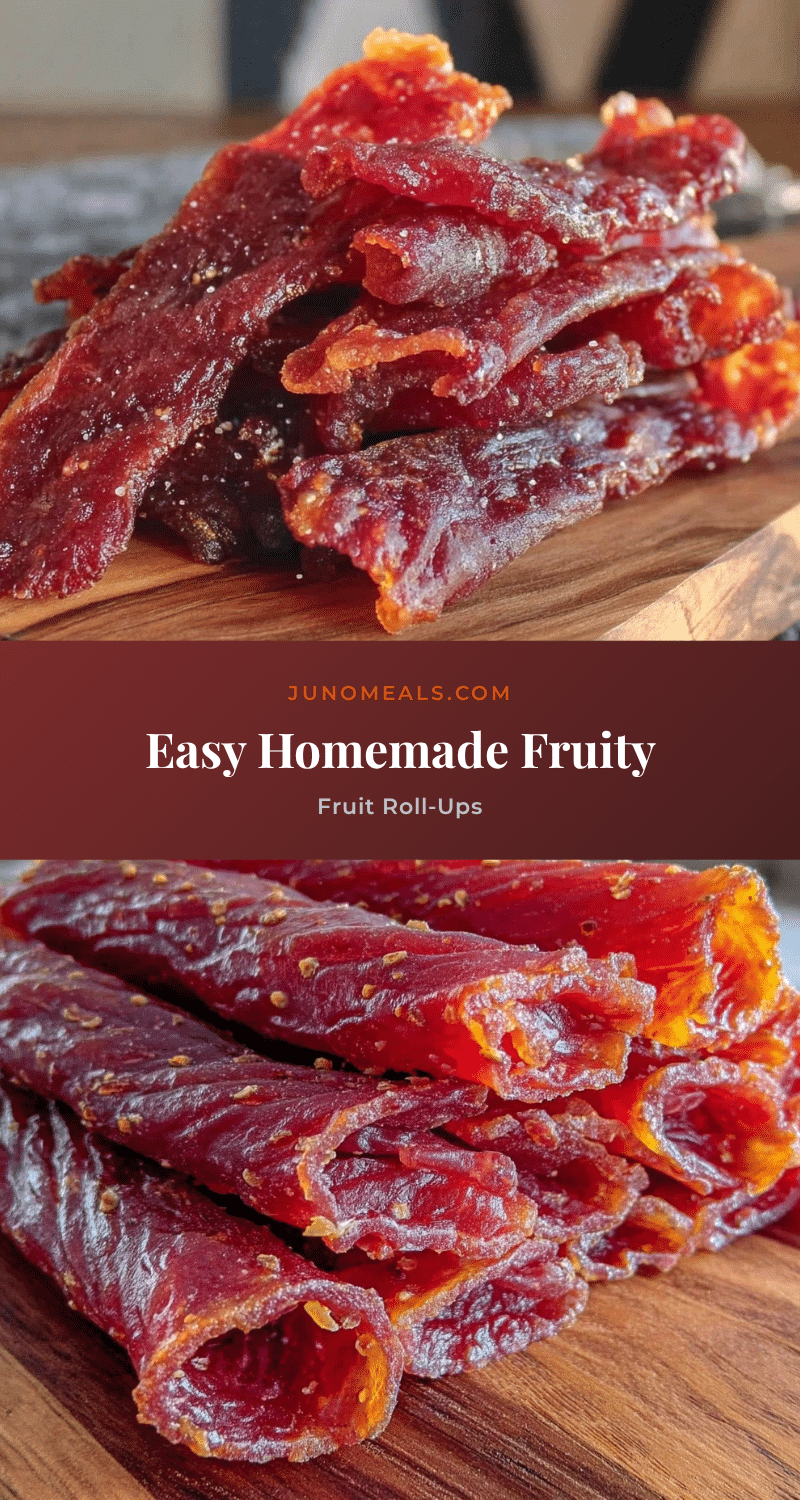
- Cool and Cut (10 minutes): Let the fruit leather cool completely on the baking sheet. Peel off gently and cut into strips using kitchen scissors or a pizza cutter. Roll them up in parchment paper or store flat in an airtight container.
Pro tip: If your fruit puree seems too watery, you might want to cook it gently on the stove for 5-10 minutes before drying to thicken it up. Also, keep an eye on the drying process—oven temperatures vary, and patience pays off for perfect texture.
Cooking Tips & Techniques
Making fruit roll-ups sounds straightforward, but a few tricks make all the difference.
- Choosing the Right Fruit: Some fruits have more water content, which can affect drying time. Mangoes and berries work great, but fruits like watermelon might be too watery without cooking down first.
- Thickness Matters: Spreading the puree too thick means longer drying times and possible uneven texture. Too thin, and you risk brittle, cracking leather. I aim for that perfect 1/8-inch layer.
- Drying Temperature: Keeping the oven low and slow prevents burning and preserves natural flavors. I once set my oven too high and ended up with chewy fruit jerky instead of soft roll-ups!
- Storage Tips: Once cooled and cut, store roll-ups in airtight containers or wrapped tightly in parchment to keep moisture out and prevent sticking.
- Patience is Key: It’s tempting to rush the drying phase, but letting the fruit leather dry fully ensures a texture that’s flexible and not sticky.
From experience, I always recommend testing one strip first before cutting the entire batch. If it tears easily, it needs more drying. If it sticks to the parchment, it’s not quite done. Learning these cues helps you nail the process every time.
Variations & Adaptations
Want to mix it up? Here are a few ways to customize your easy homemade fruit roll-ups:
- Flavor Twists: Add a pinch of cinnamon or ginger for a warming spice note. Or swirl in a little beet juice for a deeper color and subtle earthiness.
- Dietary Tweaks: For a sugar-free version, skip the honey and rely on naturally sweet fruits like ripe mango or banana. For a vegan option, maple syrup works beautifully.
- Seasonal Variations: In summer, use fresh berries and stone fruits for a bright, juicy flavor. In winter, try blending apple and pear with a dash of nutmeg.
- Texture Changes: For a chewier texture, leave the puree a little thicker and dry slightly less. For crunchier roll-ups, spread the puree thinner and dry longer.
- Personal Favorite: I once made a batch with strawberry and a splash of balsamic vinegar — sounds odd, but the tang cut through the sweetness beautifully, and it was gone within a day!
Serving & Storage Suggestions
These fruit roll-ups are best served at room temperature, peeled and rolled up for easy snacking. They pair wonderfully with nut butters or a yogurt dip for a little extra indulgence.
If you’re packing them for lunchboxes or outings, wrapping each strip in parchment paper keeps them from sticking together. Store leftovers in an airtight container at room temperature for up to a week.
For longer storage, you can freeze them flat between sheets of parchment paper for up to 3 months. Thaw at room temperature before unrolling.
Flavors tend to mellow and deepen after a day or two, so if you have the patience, making these a day ahead can reward you with an even tastier treat.
Nutritional Information & Benefits
Each serving of these homemade fruit roll-ups is roughly 70-90 calories, depending on the fruit and sweetener used. They’re naturally gluten-free, low-fat, and packed with vitamins and antioxidants from the fresh fruit.
Lemon juice adds a dose of vitamin C, and using whole fruit means you get fiber benefits too — something store-bought fruit snacks often lack. Skip the added sugars to keep it a wholesome choice.
For those watching carbs, the natural sugars in fruit are balanced by fiber, making this a healthier alternative to candy or processed snacks.
I love how this recipe offers a genuine way to sneak more fruit into the day, especially for picky eaters or anyone craving a little sweet without guilt.
Conclusion
This easy homemade fruit roll-ups recipe is a simple, satisfying way to bring natural sweetness and fun into snack time. It’s adaptable, quick, and free from the usual artificial extras that make store versions less appealing.
Whether you’re packing kids’ lunches, need a quick snack, or just want to treat yourself to something wholesome, these fruit leathers offer a perfect balance of flavor and texture. I keep coming back to this recipe because it’s so versatile and comforting in a low-key way, making it a staple in my kitchen rotation.
If you try it out, I’d love to hear how you customize your fruit rolls or which fruits become your favorites. Happy rolling and snacking!
Frequently Asked Questions
Can I use any fruit for fruit roll-ups?
Most fruits work well, but those with higher water content like watermelon may need to be cooked down first. Berries, mango, apples, and pears are great go-to options.
How do I know when the fruit roll-ups are fully dried?
They should feel leathery and pliable but not sticky or wet. If they tear easily or stick to the parchment, they need more drying time.
Can I store fruit roll-ups in the fridge or freezer?
Yes! Store at room temperature for up to a week or freeze flat between parchment sheets for up to 3 months. Thaw before eating.
Is it necessary to add sweetener like honey or maple syrup?
No, it depends on the natural sweetness of your fruit. If your fruit is tart, a small amount can balance the flavor nicely.
What’s the best way to cut fruit roll-ups?
Use kitchen scissors or a pizza cutter to make clean strips. Cutting while the leather is fully cooled helps prevent sticking and tearing.
For more wholesome snack ideas and recipes, you might enjoy browsing the recipe collection, or for something a little sweeter, the mini lemon blueberry cheesecakes offer a delightful treat that pairs well with fresh fruit rolls.
Pin This Recipe!
Easy Homemade Fruit Roll-Ups

A quick and wholesome snack made from pureed fruit dried into chewy, flavorful fruit leather strips. Perfect for kids’ lunchboxes and a healthy alternative to processed snacks.
- Prep Time: 20 minutes
- Cook Time: 1.5 to 2 hours
- Total Time: 1 hour 50 minutes to 2 hours 20 minutes
- Yield: About 8 servings 1x
- Category: Snack
- Cuisine: American
Ingredients
- 4 cups (600g) fresh or frozen fruit (strawberries, mangoes, raspberries, or a blend)
- 2 tablespoons (30 ml) lemon juice, fresh-squeezed
- 1–2 tablespoons (15–30 ml) honey or maple syrup (optional)
- 1 teaspoon (5 ml) vanilla extract (optional)
Instructions
- Prepare the Fruit (10 minutes): Wash and chop fresh fruit into chunks. If using frozen, thaw completely and drain excess water.
- Blend the Fruit (5 minutes): Place fruit, lemon juice, and optional honey and vanilla in a blender. Puree until completely smooth.
- Preheat and Prepare Baking Sheet (5 minutes): Preheat oven to 140°F (60°C) or lowest setting. Line a rimmed baking sheet with parchment paper or silicone mat.
- Spread the Puree (5 minutes): Pour fruit puree onto the prepared sheet. Spread evenly about 1/8-inch (3 mm) thick with a spatula.
- Dry the Fruit Leather (1.5 to 2 hours): Place sheet in oven or dehydrator. Check after 90 minutes; fruit should be leathery but pliable, not sticky or wet.
- Cool and Cut (10 minutes): Let fruit leather cool completely. Peel off gently and cut into strips with kitchen scissors or pizza cutter. Roll up or store flat in airtight container.
Notes
If fruit puree is too watery, cook gently on stove for 5-10 minutes to thicken before drying. Keep oven temperature low to avoid burning. Test one strip before cutting entire batch to ensure proper dryness. Store roll-ups in airtight containers or wrapped in parchment paper. Freeze flat between parchment sheets for up to 3 months.
Nutrition
- Serving Size: 1 fruit roll-up stri
- Calories: 7090
- Sugar: 14
- Sodium: 2
- Fat: 0.2
- Carbohydrates: 18
- Fiber: 2
- Protein: 0.5
Keywords: fruit roll-ups, homemade fruit leather, healthy snack, kids snack, gluten-free, vegan option, natural fruit snack